Table of Contents
Sync Jupyter Notebooks with the RSpace Python Client
Overview. RSpace Python Client v2.6.2 and above can sync Jupyter Notebooks with RSpace, adding them as attachments to RSpace documents. Use cases. You can use this functionality to: Add your Jupyter…
Overview
RSpace Python Client v2.6.2 and above can sync Jupyter Notebooks with RSpace, adding them as attachments to RSpace documents.
Use cases
You can use this functionality to:
- Add your Jupyter Notebook and data to RSpace documents, which enrich their context and form part of your wider work
- View the Jupyter Notebooks in RSpace through the Jupyter Notebook Viewer
- Keep a backup copy of your Jupyter Notebooks and associated data in RSpace
- Through RSpace, publish your Jupyter Notebooks and their data, making them fully public
- Through RSpace, share your Jupyter Notebooks and their data safely and securely within your organisation - individual colleagues, LabGroups, collaborators, PI or entire organisation.
- Keep a history of executions of your Jupyter Notebook, with a record of the versions of the notebook and associated data
- Through RSpace, restore previous versions of the notebook and data from the history
Functionality
- A new script in the RSpace Python Client,
sync_notebook, writes Jupyter Notebooks to RSpace as attachments and keeps the data in RSpace updated whenever the Jupyter Notebook executes. A history is created of the versions of the Jupyter Notebook and all associated data on each execution of the Notebook. RSpace then allows restoration of previous versions of the Notebook and data, exactly as they were used for each execution run of the Jupyter Notebook. - By default, a new RSpace Document inside the API Docs folder will be created for the Jupyter Notebook; you can instead specify an existing RSpace Document and the field in that document you wish to host the notebook as an attachment.
- The script will attach the Jupyter notebook once, and thereafter will write updates to RSpace only when the Jupyter Notebook's execution count changes.
- You can give the script a list of associated data files and these will also be attached to the RSpace document.
- Associated data will be attached once, and thereafter updates to that data will be written to RSpace if a) The Jupyter Notebook's execution count has changed and b) The
shasumof the associated data file has changed. - A new cell is written to the Jupyter Notebook containing links to all the associated artefacts in RSpace (the document and Gallery files).
- A history of the versions of the notebook and associated data is also written to the new cell; you can see what version of the Jupyter Notebook was run alongside the versions of associated data files.
- RSpace keeps previous versions of files so that it is possible to restore previous versions of the Jupyter Notebook and its associated data.
Supported environments
The code has been tested and verified to work with JupyterLab/Hub and with the Binder environment (eg http://quay.io/jupyter/base-notebook).
Installation
The following video demonstrates the steps to follow on first installation of the sync_notebook script and also demonstrates subsequent use. Note that the sync_notebook script should always be run as the last cell in the notebook. A written description of the steps taken in the video is included below.
- The new
sync_notebookscript needs to be installed in a Python notebook (but it can then be used to sync any type of notebook such as R, Julia, etc) - In a new cell, add
%pip install rspace-client==2.6.2(or whatever the current version of the RSpace Python client is)
%pip uninstall -y rspace-client==2.6.2- Run the cell. You should see messages about how you may need to restart the kernel. Restart the kernel. You wont have to install the client again, all your notebooks in a given JupyterHub/Lab instance now have access.
- In an empty cell add
from rspace_client.notebook_sync import sync_notebook - Run the cell. You should see messages about how you may need to restart the kernel. Restart the kernel. Then run the cell one more time without restarting the kernel afterwards.
sync_notebook script must be saved at least once, before the script will run correctly.- You wont have to do do the import step again in that notebook, but you will need to run the import statement:
from rspace_client.notebook_sync import sync_notebookin every notebook that runs the sync code. - The
sync_notebookscript takes several parameters. Most are optional, the only two which are required are the url of the RSpace instance and an RSpace username for the user who will be sent the Jupyter Notebook as an attachment. - Upon your first run (only) of the
sync_notebookscript for a given RSpace user, you will be prompted to input the RSpace API Token for that RSpace user. The token will be saved and used by all your Jupyter Notebooks, so it need only be entered once. You will need to enter a fresh API Token if you switch to syncing your Jupyter Notebooks to a different RSpace user.
Usage
The next video demonstrates simple usage of the script once first installation is complete:
To run sync_notebook, make a new cell at the bottom of a notebook and copy the following code into it, then execute the cell:
await sync_notebook.sync_notebook_to_rspace(rspace_url="https://researchspace2.eu.ngrok.io/", rspace_username="user1a")
By default, the sync_notebook script will sync the notebook in which it runs. Only two parameters are mandatory when using the script: the RSpace url and an RSpace username. You must have entered an API token for that RSpace user prior to running the script (see above).
On the first run of the script it will always sync the Jupyter Notebook to RSpace as an attachment. On subsequent runs the script will only sync data to RSpace if the execution count of the Jupyter Notebook has changed.
By default, a new RSpace document is created to contain the Jupyter Notebook as an attachment. The RSpace document will be named DocumentFor_<jupyter_notebook_name> and will be located in the API Inbox folder.
Versioning
A new metadata-history cell is written at the end of the Notebook containing links to the RSpace document, the Jupyter notebook in the RSpace Gallery, and any associated data (see below) in the RSpace Gallery. The new cell also contains a 'history'. The history points to the versions of the RSpace document and its attachments. Since this is only updated whenever the Jupyter Notebook execution count changes, we have a record of the version of the notebook and its data for those executions. RSpace can restore those versions if required (see below).
The following shows the default result in RSpace of running sync_notebook in a cell of the Jupyter Notebook called ANY.ipynb:
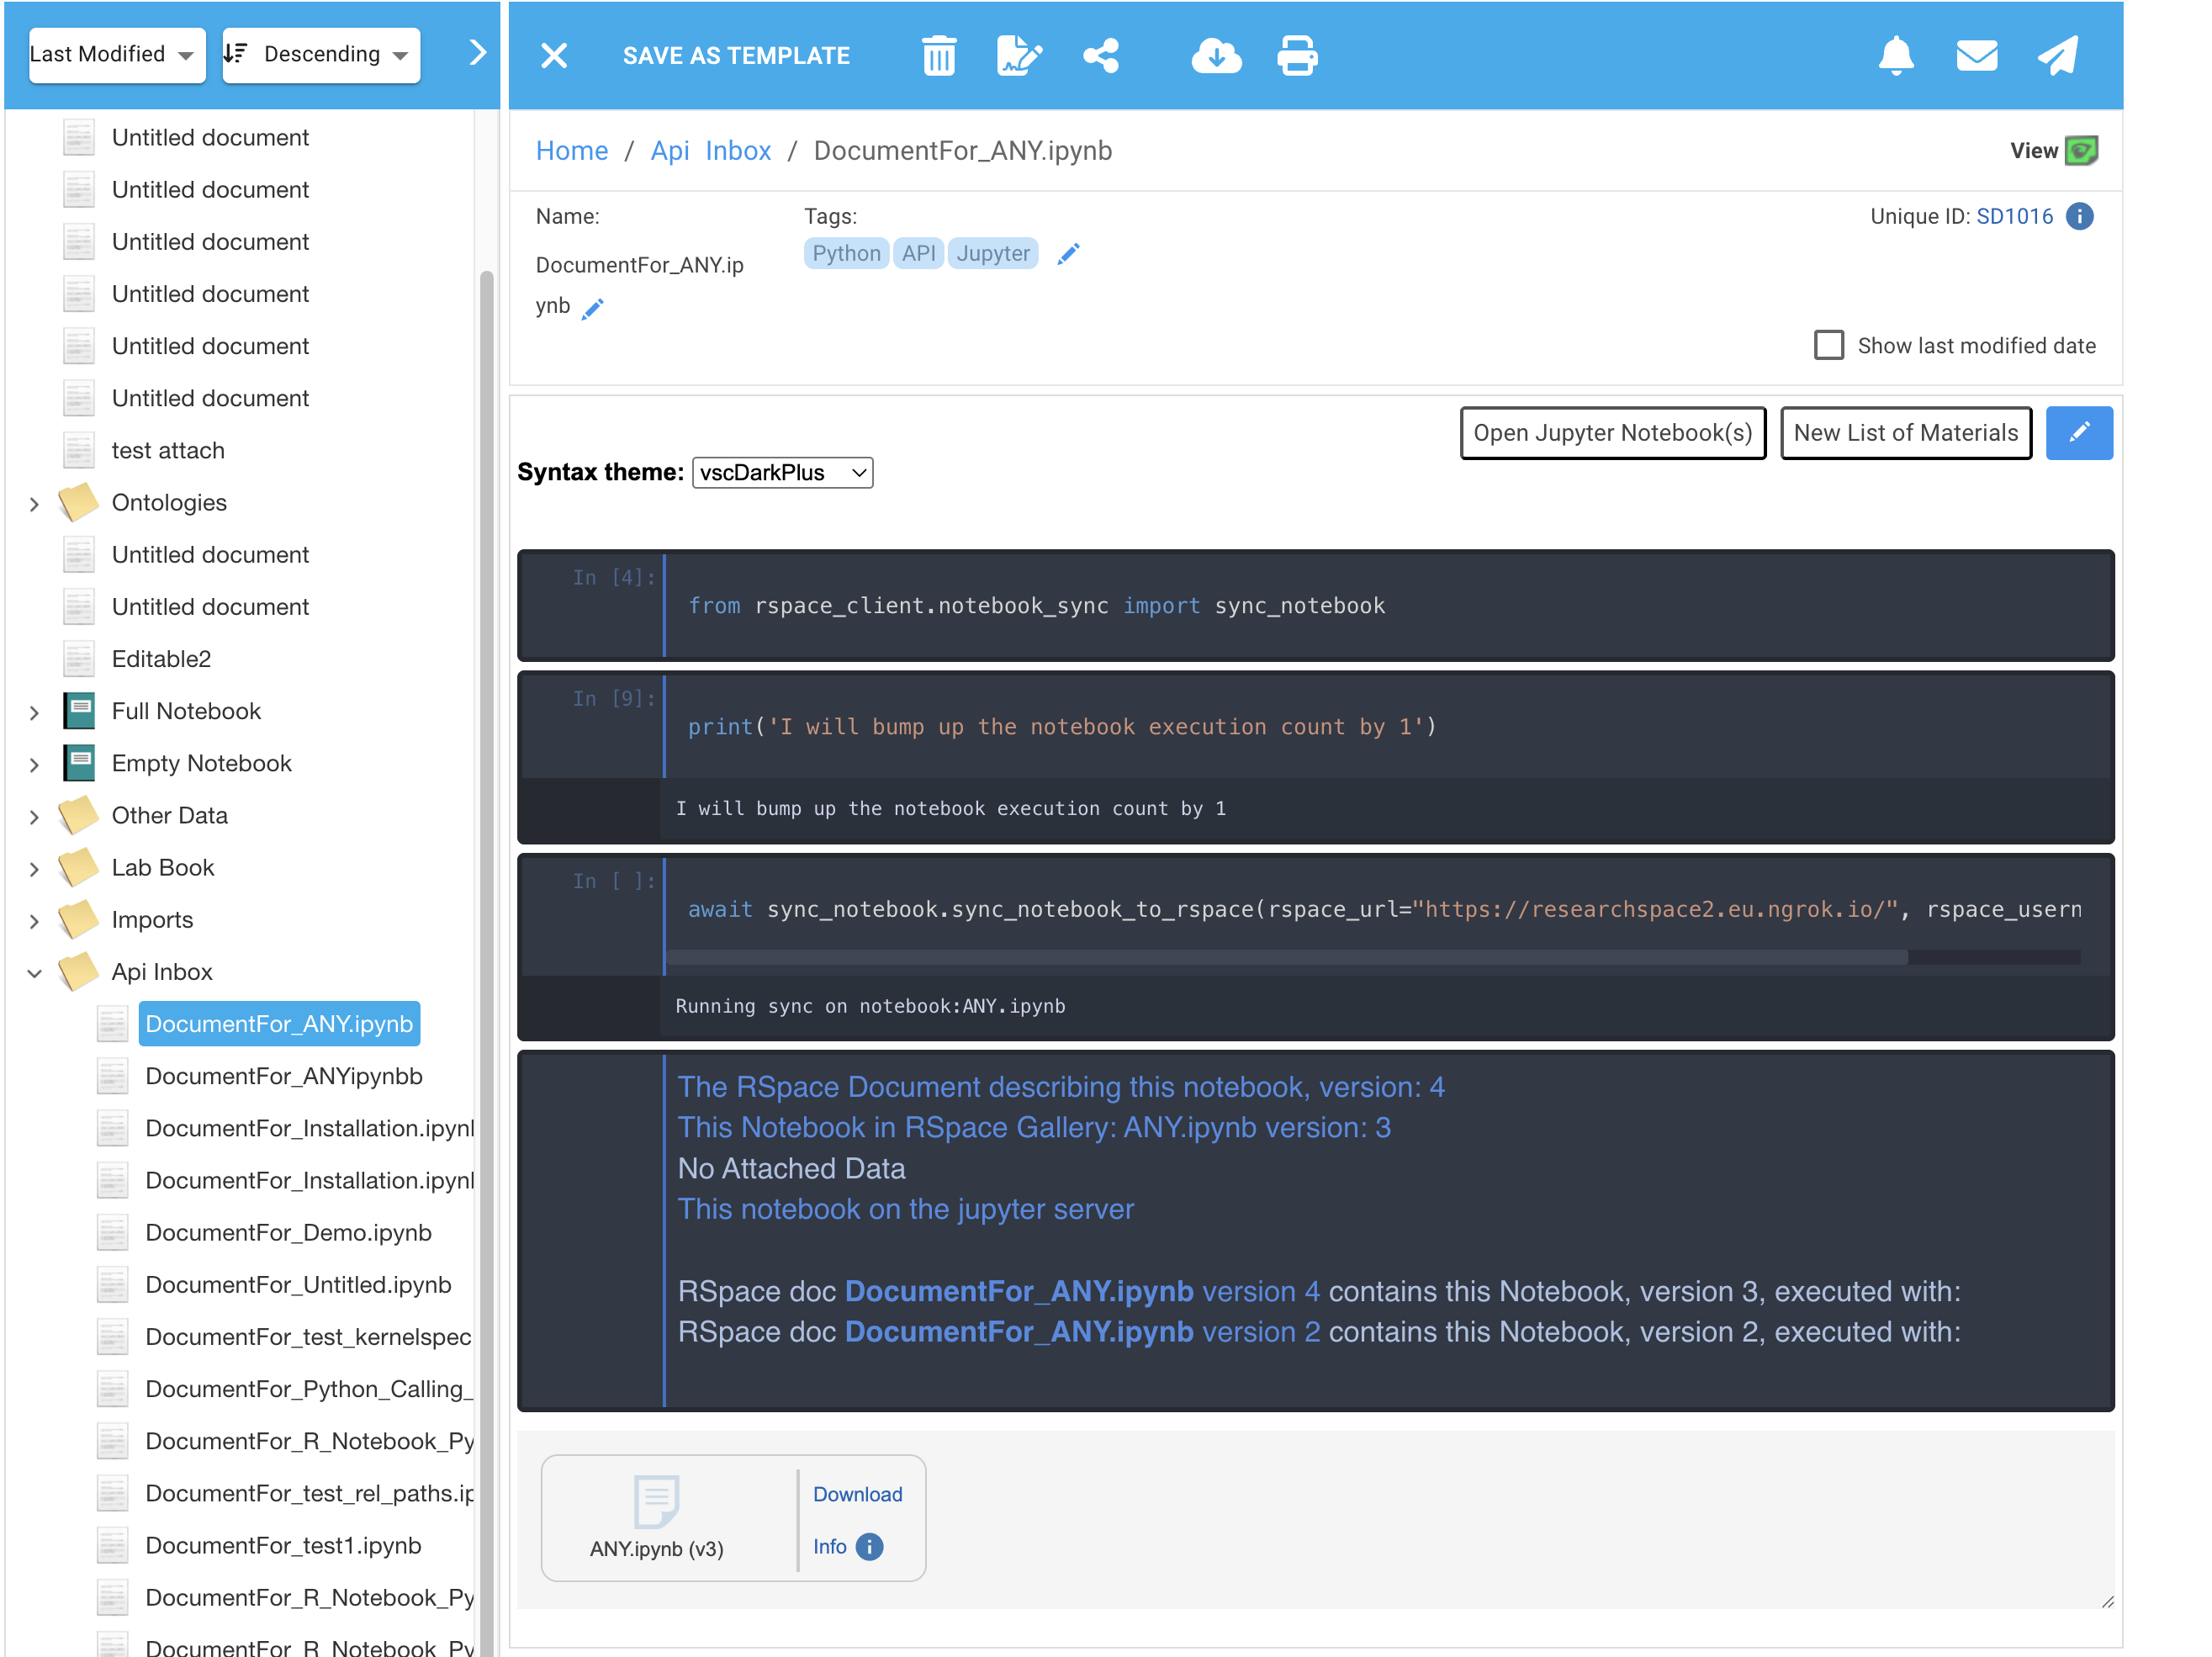
The metadata-history cell in detail:
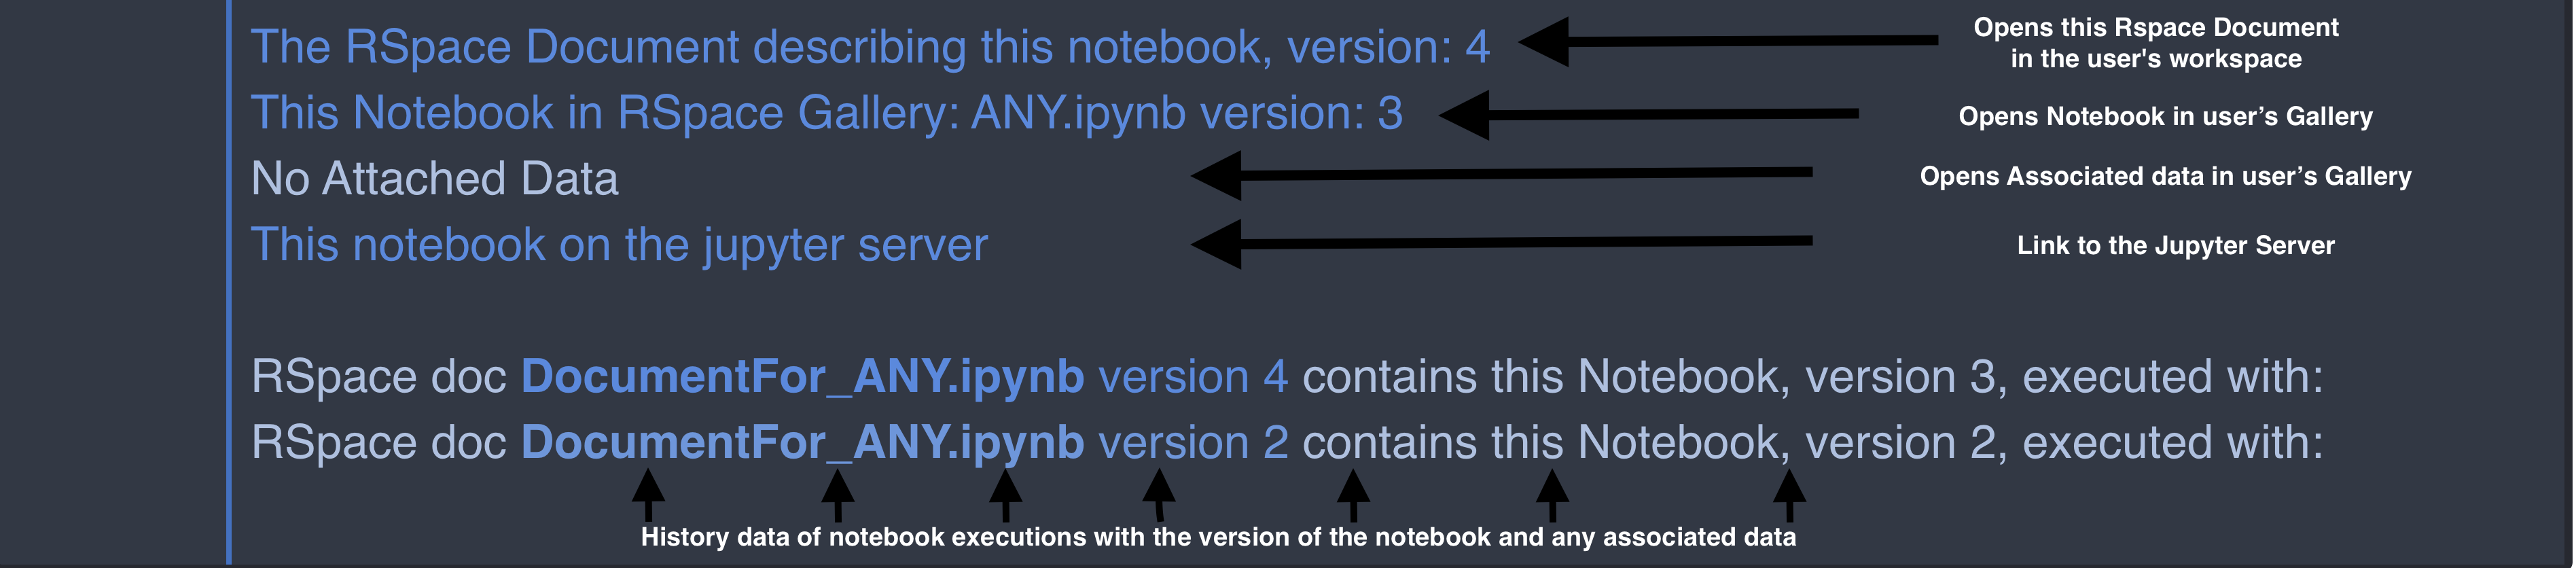
Clicking on a link in the history section will open RSpace at the 'view versions' mode for that document.
Example:
- The current version of the RSpace document in the screenshot above is 4, the Notebook is version 3.
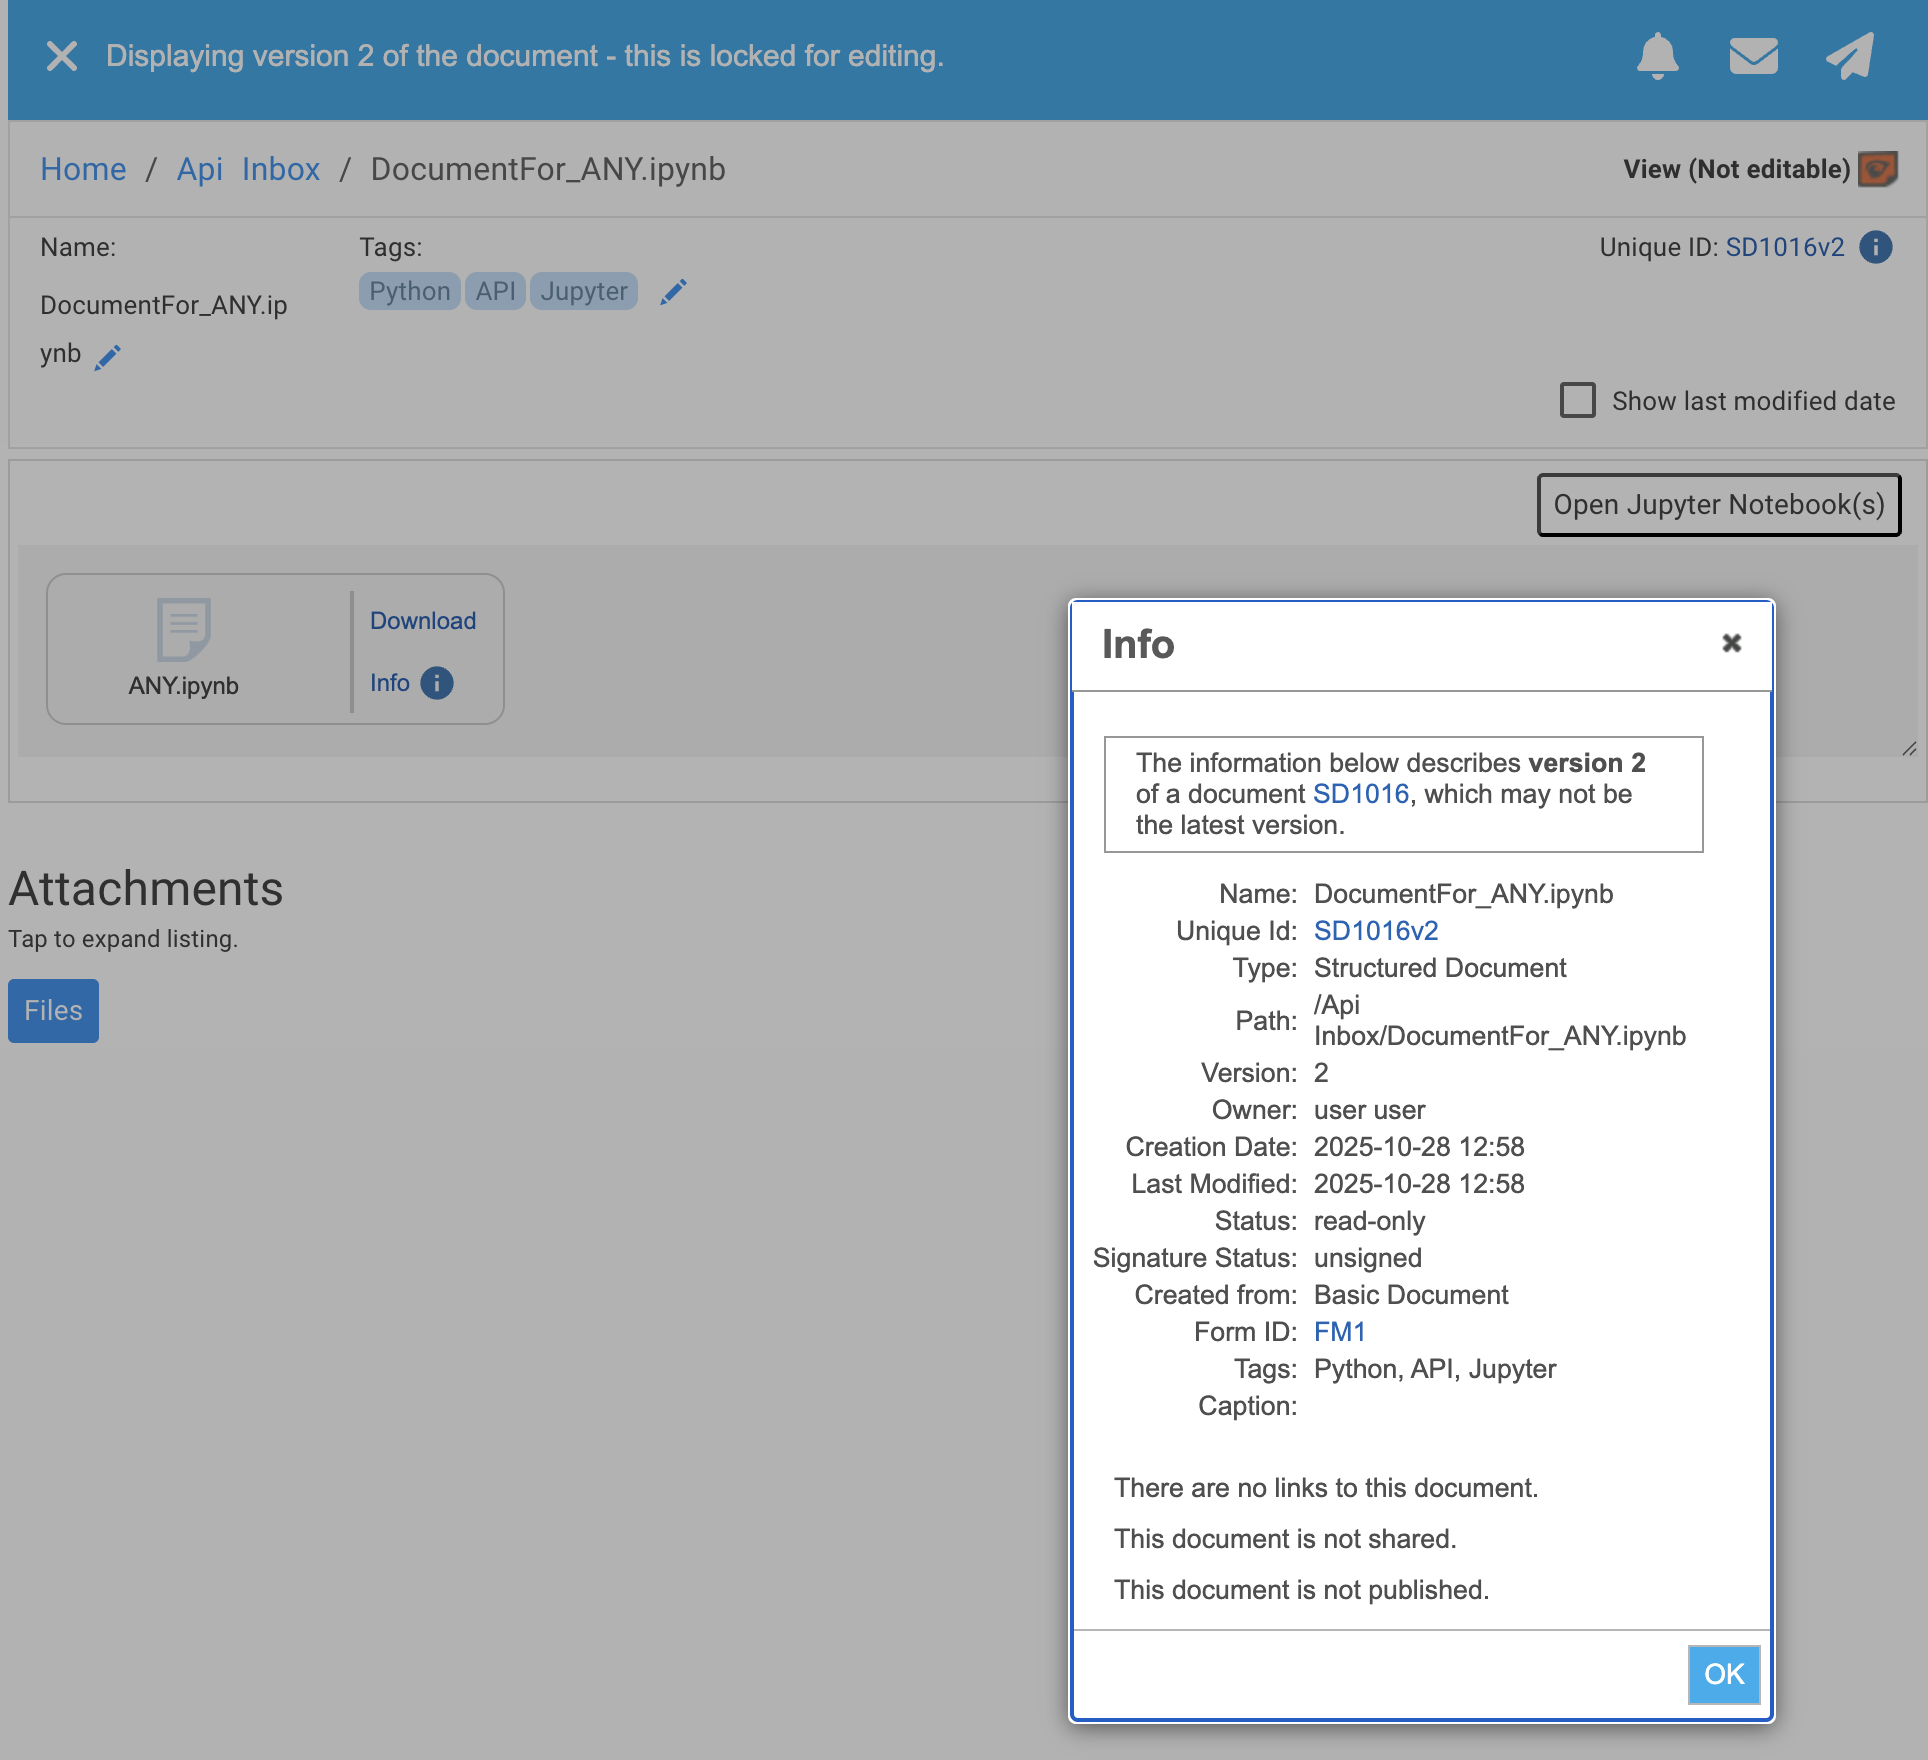
- Clicking on the link in the history for version 2 results in the screenshot below, where we see that the RSpace document is version 2 and the Notebook is version 1.
- If we now want to obtain version one of the Notebook, we can click on the 'download' link for the attachment.
Associating data with the Jupyter Notebook
If there is data you want associated with the notebook, this is added as a new parameter attached_data_files, when calling the script:
await sync_notebook.sync_notebook_to_rspace(rspace_url="https://researchspace2.eu.ngrok.io/", rspace_username="user1a", attached_data_files="spectroscopy_data.csv")
The value for attached_data_files should be obtained by right clicking on the file in Jupyter and choosing 'Copy Path'. Use the exact value pasted, there is no need to modify this as the sync_notebook script will calculate the data's location relative to your Jupyter Notebook.
attached_data_files will now also be synced with RSpace and added as attachments to the RSpace document. The data will be synced once and only subsequently updated if, firstly, the execution count of the Jupyter Notebook changes and secondly, the shasum of the associated data changes (ie - the data has been edited). In the above example spectroscopy_data.csv will be synced once at version 1. It will not be synced again to RSpace and will remain at version 1 unless both the Jupyter Notebook executes a cell and the file spectroscopy_data.csvis edited. If there are multiple files to associate, separate their paths by commas:
attached_data_files="spectroscopy_data.csv,data/spectroscopy_data2.csv,data/spectroscopy_data3.csv"
Syncing an 'external' notebook
By external notebook, we mean a notebook that is different to the notebook running the sync_notebook script.
Setup
The sync_notebook script needs to be run in a Python notebook but you may want to sync an R, Julia or other type of Jupyter Notebook to RSpace. To do this, you need to provide a notebook_name parameter to the script:
notebook_name="R/R_Notebook_Python_callee.ipynb"
The notebook_name value should be obtained by right clicking on the Jupyter Notebook to be synced and choosing 'Copy Path'. Use the exact path as pasted, the sync_notebook script will calculate the position relative to the actual notebook where you are running the script.
notebook_name you must also give a value for server_url: the url for your Jupyter server up to the port number it uses (if there is one).The following shows a Jupyter notebook which will run the sync_notebook script with the target being an R Notebook R_Notebook_Python_callee.ipynb, which will be synced and attached to an RSpace document. The sync will happen once and then not happen again until the execution count of R_Notebook_Python_callee.ipynb changes.
await sync_notebook.sync_notebook_to_rspace(rspace_url="https://researchspace2.eu.ngrok.io/", rspace_username="user1a", attached_data_files="spectroscopy_data.csv", server_url="localhost:10111", notebook_name="R/R_Notebook_Python_callee.ipynb")
Differences when syncing an external notebook
The code behaves differently when the script syncs an 'external' notebook and some manual steps are required.
- In the case where the script syncs its own notebook, it first saves the notebook, writes the contents to RSpace, and then updates the notebook with new data for the
metadata-historycell. Finally, the script reloads the notebook so that the new data is visible in themetadata-historycell. - When the script syncs an 'external' notebook it can neither save nor reload that notebook.
Due to these differences:
- You should save an 'external' notebook before you run the
sync_notebookscript. Otherwise you will write the last saved version of the external notebook to RSpace, which will not be what is currently displayed in the browser if the notebook is in an unsaved state. - Because
sync_notebookcannot reload an 'external' notebook, you will not see updates to themetadata-historycell. To see the updates, you need to first switch to the external notebook and click Save (even if the notebook appears to already be in the saved state). You will be prompted to either Revert or Overwrite. You must choose Revert. Updates to themetadata-historycell will now be visible.
metadata-history cell. If you have made independent changes to the external notebook, you must choose Overwrite or those changes will be lost. The data for the metadata-history cell is not lost even though it won't be displayed, and subsequent runs of the sync_notebook script will update the metadata-history cell correctly with the full history intact.Example external notebook sync
The following video illustrates syncing an 'external' notebook.
- At first, the sync is skipped because the execution count has not changed.
- We then execute a cell in the R Notebook target. That would be enough to cause sync to not skip if the script were syncing its own, Python notebook. However, for an external notebook, sync is still skipped - because we did not save the external notebook.
- After save, the new execution count is detected and running
sync_notebookwrites the data of the R Notebook to RSpace. - When we switch back to the external R Notebook we don't see any update to the
metadata-historycell. However, once we press Save again, we are prompted to either Revert or Overwrite. After choosing Revert, the new contents are displayed in themetadata-historycell.
Syncing data to a specific RSpace document (and/or field)
If you do not wish the data in a Jupyter notebook to be synced to a new document in the API Inbox folder but instead want the data as an attachment in a specific RSpace document that already exists, then you need to supply the RSpace document ID and the position of the field in the document where you want the attachment to be made.
You must give the RSpace document ID in the parameter rspace_prexisting_document_id. The document ID is on top right of the RSpace document; do not include the letters in the ID, just the numeric part.
Notebooks will be attached to the first field in the target document (field 0). If you wish to specify which field the notebook should be attached to, then give a value for the rspace_document_target_field parameter. The values start from 0 therefore in the example below, giving the value 4 for rspace_document_target_field means that the notebook will be attached to the fifth field in the document.
await sync_notebook.sync_notebook_to_rspace(rspace_prexisting_document_id="1032", rspace_document_target_field="4", rspace_username="user1a", attached_data_files="data/spectroscopy_data.csv", rspace_url="https://researchspace2.eu.ngrok.io/")
Setting the RSpace user API Token with set_password
The sync_notebook script has another function called set_password. It takes one parameter, which is the rspace_username whose API Token is being set.
When you first use sync_notebook you are prompted to enter an API Token for the rspace_user. That token is saved and available in all notebooks; you will not be reprompted. However, you will need to set an API Token if you switch to syncing notebooks to a different RSpace user or if the original RSpace user regenerates their API Token.
Enter the following into a cell and run:
sync_notebook.set_password(rspace_username='user2b')
And you will be prompted to enter the API Token:

Links back to the Jupyter Server
As noted above, you may set a value for server_url up to and including any port number the server uses. If you set server_url you must also set the notebook_name (to the value provided by right clicking on the file and choosing 'copy path'). If the default value for links in the metadata-history cell back to the Jupyter server is correct, except for the port number, you can set the server_port parameter.
Providing server_url and notebook_name
await sync_notebook.sync_notebook_to_rspace(rspace_url="https://researchspace2.eu.ngrok.io/", rspace_username="user1a", notebook_name="Installation.ipynb", server_url="http://localhost:10222")
This results in a link to the Jupyter document in the metadata-history cell : "http://localhost:10222/lab/tree/Installation.ipynb"
Providing server_port
await sync_notebook.sync_notebook_to_rspace(rspace_url="https://researchspace2.eu.ngrok.io/", rspace_username="user1a", server_port="10222")
This results in a link to the Jupyter document in the metadata-history cell : "http://localhost:10222/lab/tree/Installation.ipynb"
Providing neither value
await sync_notebook.sync_notebook_to_rspace(rspace_url="https://researchspace2.eu.ngrok.io/", rspace_username="user1a")
This results in a link to the Jupyter document in the metadata-history cell : "http://localhost:8888/lab/tree/Installation.ipynb" because the JupyterHub runs in a Docker container exposing the 8888 internal port under 10222 for externals. This link therefore does not work, although all other parts of notebook syncing work correctly despite that.
Reset 'state' of a Jupyter Notebook
The state of a Jupyter notebook (its execution counts and the data for the metadata-history cell) is stored in a file named after the notebook being synced to RSpace and ending with the extention .pkl. E.g. a notebook called A.ipynb will have its state stored in a file called A_state.pkl.
<notebook_name>_state.pkl file.This file will be located in the directory of the notebook running the sync_notebook script, which might not be the same directory as the notebook being synced to RSpace if syncing of an 'external' notebook is occurring.
Example:
- a notebook called
Python_Calling_R.ipynbis located in the path:code/Python_Calling_R.ipynb - This notebook runs the
sync_notebookscript on an external notebook,R_Notebook_Python_callee.ipynbunder the path:R/R_Notebook_Python_callee.ipynb - The actual code running is:
await sync_notebook.sync_notebook_to_rspace(rspace_url="https://researchspace2.eu.ngrok.io/", rspace_username="user1a", attached_data_files="spectroscopy_data.csv",server_url="localhost:10111", notebook_name="R/R_Notebook_Python_callee.ipynb") - The state of the R Notebook,
R_Notebook_Python_callee.ipynbis stored in a file calledR_Notebook_Python_callee_state.pkl, but that file is not located in the same directory asR/R_Notebook_Python_callee.ipynb. It is instead located in thecode/directory which contains thePython_Calling_R.ipynbnotebook.
How did we do?
Jupyter Notebook Viewer