Create New Users (for System Admins)
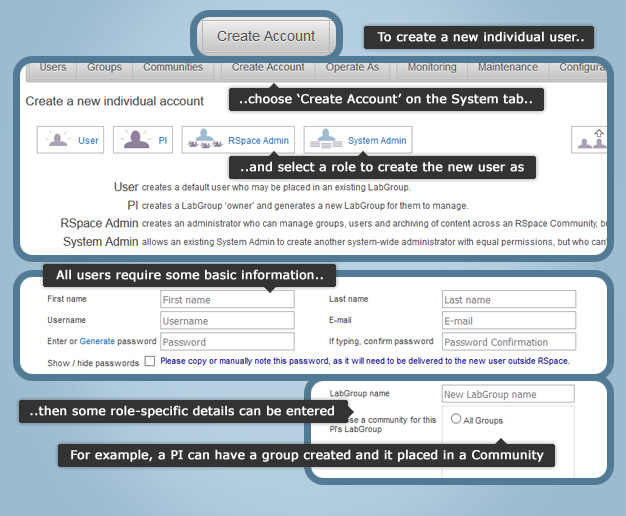
To create an individual new user, log in as a System Admin, access the System tab and select the ‘Create Account’ button in the toolbar.
Options are available across the page-top to create the new user with any of the top-level RSpace roles: a regular user, a PI, an RSpace Admin in charge of managing a Community, or a full RSpace Admin with equal powers to the Admin currently creating the user.

All new users will require entry of identifying details such as names and email address, and a username must be created along with a password – which can be temporarily generated by the system and updated by the user when they log in. Crucially, the password (whether entered or generated) and username must either be known to the prospective user already – for example, if they supplied them – or must be stored outside of RSpace to be communicated to them, as they will need to be able to log in using their credentials.
Once a username has been created, it cannot be changed, so it may be important to think about any special username format conventions your organization wants to use before you begin the process of user creation.
Each new user may require the Sysadmin to perform additional steps, such as creating a LabGroup for a PI, or assigning a standard user to a LabGroup. System Admins can be created with only basic details, as their remit is deployment-wide. System Admins should not be added to LabGroups, should not contribute data, and should not be used as Principal Investigators.
Once the user details have been entered, click ‘Create’ and the user is added to the system. You can go back to the 'Users' area and sort by date created to make sure that you see any new accounts. Users added in error can immediately disabled, or if your server has been configured to allow it, accounts with errors can be deleted.
Note that the system admin can adjust the roles of some users: Standard users can be granted the role of PI, LabAdmin or 'LabAdmin with view-all permission' (also called a senior LabAdmin), or, users with those roles can be converted to a standard user. However none of these user types can be converted to an RSpace System Admin (Sysadmin) or a Community Admin, nor are the Sysadmin or Community Admin roles interchangeable. These administrative accounts must be created specially for named users. If a user is to act as both a contributing scientist AND a Sysadmin or Community admin they will need TWO separate accounts.
Note also that although an email address is required, it can be anything you like and can be edited at any time, since it is not used in the authentication process and is merely used to allow the server to send notifications to users. Every user in the system MUST have a unique email address, i.e., no two user accounts can have the same email address, even if both user accounts are actually used by the same person.
You can only create new users if you have available seat licences. To see how many available seats you have the system admin can look at the top of the System > Users page:
Updating license to reflect a change in user count
If you have recently purchased additional seats for your server but your user page still shows zero available seats, try clicking System > Maintenance > Reload license to force RSpace to contact our online database and update your number of available seats:
Batch User Upload
If you want to create more than a few users, consider using Batch User Registration.
