Table of Contents
- Introduction to Identity in RSpace
- Before starting...
- SAML-based SSO setup
Setting up Single Sign-On Authentication
This article provides detailed documentation on setting up SSO for RSpace. It applies equally to both on-premises and SaaS deployments. RSpace supports two SSO technologies SAML2 LDAP. SAML2 setup. M…
- Introduction to Identity in RSpace
- Before starting...
- SAML-based SSO setup
This article explains how to set up SSO for RSpace using the SAML2 protocol. It applies equally to both on-premises and SaaS deployments.
If you are looking for direct LDAP authentication, please see this article.
If you are trying to set up SSO based on OpenID protocol, check documentation in our github rspace-docker project, or contact RSpace Support.
Introduction to Identity in RSpace
Research data may need to be kept for decades after creation, and it's essential to be able to refer back to the person who created the work, even if that person has changed their name since.
RSpace uses a username to identify users. An RSpace username is immutable and remains eternally unique. This is so that work performed by an individual can be reliably tracked over time, in log files and exports, and is always traceable back to the same individual.
This means that an RSpace username obtained from an IdP (Identity Provider) should not be a changeable value. In many cases, the credentials used to authenticate to an IdP are mutable, so an IdP login username may not make a good RSpace username.
For this reason, we encourage the use of a unique identifer - e.g. the value of the 'eppn' attribute released by the IdP - as the RSpace username.
Before starting...
Setting up SSO can involve several different people at an institution with different roles, e.g. in Identity/Access Management, Data Protection/Privacy, and IdP (Identity Provider) configuration.
In our experience after performing many installations, the process is greatly smoothened if people with these different roles are aware of each other, and have the authorisation to make decisions required to make the system work.
Research Space will appoint one technical contact, and one customer support contact to handle the setup.
SAML-based SSO setup
Once a running RSpace server is available, accessible from the IdP and secured by HTTPS, SSO setup can proceed. There are are four phases:
- Technical setup to connect the Identity Provider with RSpace (the Service Provider).
- Create initial RSpace admin accounts. The usernames created in RSpace MUST exactly the unique IdP ID of the user (usually the SSO username that the user logs in with). There is also an option for "self signup" which automatically generates accounts in RSpace with the correct username when an authenticated user visits the RSpace server for the first time.
- Choose a policy for how users will access RSpace.
- Test and sign-off.
Step 3 can proceed independently of steps 1 and 2.
Each step is explained in more detail below.
1. Technical setup
Research Space will work with customer technical contact to exchange SAML metadata and agree on URLs and SAML attribute names.
The mandatory requirement is that your Identity Provider (IdP) releases one identifying attribute that uniquely and immutably identifies a single user, and you let us know its name and nameFormat. This will become the 'username' in RSpace. Additional, optional attributes are email, first name and last name.
For example if you use Azure, it might release a user-identifying SAML attribute name="http://schemas.xmlsoap.org/ws/2005/05/identity/claims/name" nameFormat="urn:oasis:names:tc:SAML:2.0:attrname-format:unspecified" .
The steps to set this up are as follows:
- We exchange metadata. RSpace needs your IdP-metadata.xml and your IdP need RSpace's service-provider (SP) metadata.xml. You can provide your IdP metadata either as a URL or as a file.
- You tell us the name and format of the attributes your IdP is releasing ( or even better, send us the body of the assertion POST to
https://YOUR_RSPACE_URL/Shibboleth.sso/SAML2/POST) . - We configure Apache Shibboleth on the RSpace server to deal with these attributes and send them to RSpace.
If at all possible, it's very helpful if Research Space staff can troubleshoot independently. For this we either need access to a test/sandbox Idp environment or a guest account on the real IdP. If this can't be accomplished, then we will need the assistance of the customer to help verify the SAML exchange is occurring correctly.
Required SAML attributes
- An attribute containing the user's unique, immutable ID is the only mandatory attribute required.
- For Signup Scenario 1 (self-signup), the initial user experience is enhanced if the
email,first nameandlast namecan also be made available as SAML attributes. A user can edit these values in RSpace if they choose, either at signup time, or later in their profile page.
1a. Logout
When users click to Logout in RSpace, this can either just log them out of RSpace, or log them out of their SSO session. If you want the latter to happen (this is most secure option if using shared computers), then please lst us know a logout URL of your IdP.
2. Creating initial admin accounts
- When RSpace is installed, an internal sysadmin user 'sysadmin1' is automatically created by RSpace. This sysadmin account is not linked to any SSO identity, but is used to 'bootstrap' the system and create an initial set of admin users that are linked to an SSO identity.
- To create a new admin account in RSpace, you need to know the unique user ID, email and name of the person. See Create New Users (for System Admins) for details. Either Research Space staff or customer staff can assume the internal sysadmin role to perform this process.It's essential that the unique id (the user-identifying SAML attribute value that will be provided in a SAML assertion) is used for the RSpace username.
- Running RSpace in Standalone mode, and logged in as sysadmin1 user, create one or more system admin users.
- After restarting RSpace in SSO mode, the newly created sysadmin users can login to RSpace via SSO and have full access to configure RSpace and create more users.
3. User access policy
There are two ways that end-users can start using RSpace.
Signup-scenario 1: Users self-signup
- The first time new users go to RSpace, they will be redirected to the Identity Provider's login page, and will need to authenticate.
- After authentication, users will be redirected to an RSpace signup page, pre-populated with some profile information released from the IdP, and confirming they want an account.
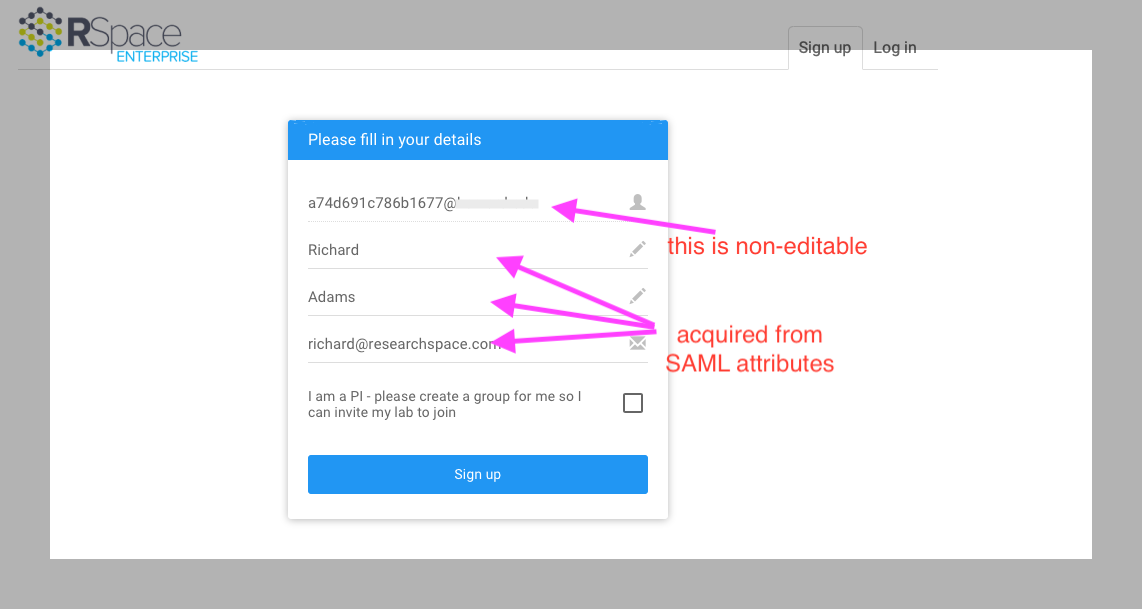 RSpace can be configured to let users self-identify as PIs, in which case a LabGroup will automatically be set up for them. If this option is disabled, people signing up this way will just have regular user accounts, and an administrator can later convert a user account to a PI account.
 - Upon signing up, the new user will go straight through to the RSpace Workspace and they will occupy 1 license seat. They can start using RSpace immediately.
- On subsequent logins, users will go straight to RSpace after authenticating with the IdP.If you are user on an SSO authenticated enterprise server and an account has been created for you, or you have used the signup tab to create your own account, than you SHOULD never again see the RSpace branded login page. If you do see that page, check that you are using the correct server and / or check that you are not using an old bookmark that points at an inappropriate page. If you are having problems logging in, contact ResearchSpace support AND your own LOCAL RSpace admin. Since each university handles SSO authentication differently, ResearchSpace support may not be able to help you with university SSO authentication issues.
Signup-scenario 2: Users are white-listed by an administrator
In this scenario, anybody using RSpace must be 'white-listed' and an account be previously created by an RSpace administrator.
An System Admin can create user accounts of any type: User, PI, Community Admin or System Admin. In this approach, some initial System Admin users can be created by RSpace technical staff, to bootstrap the system. These admins can then create any new user accounts they wish. When a whitelisted user tries to access RSpace, after authentication, they will go straight to the RSpace Workspace, without a sign-up page confirmation.
Which signup scenario to choose?
Scenario 1 (self-signup) is much less admin work. People sign up to RSpace without any admin involvement.
If you are concerned that people will sign up and not use the system, denying other users a license seat, these dormant accounts can later be disabled by a sysadmin, freeing up a license seat.
You can think of this approach as an 'optimistic' approach; that people will largely do the right thing, and mistakes/unintended signups can be rectified later.
Scenario 2 (white-listed signup) is a good solution if you want full control over exactly which individuals can use RSpace. This means manually creating user accounts for every user wishing to use RSpace.
It gives you total control over management of license seats. You must know, or be able to find out, the unique user-identifying SAML2 attribute value for each user in order to set these as usernames for the accounts you create.
It is also possible to create multiple users by batch upload from a CSV file containing user details, or via the RSpace API.
4. Testing and sign-off
Before making RSpace generally available to end-users, the authentication flow should be tested by the customer to ensure that:
- Login and logout work as expected.
- The correct user-access policy is in place.
- At least one admin user has access to RSpace using SSO authentication.
ResearchSpace staff will also confirm that the system is ready for use.
This testing phase will ensure a smooth initial experience for new users, and reduce the risk of authentication-related support requests both to Research Space and the customer.
5. Using the same SSO user to access multiple RSpace accounts
We support this in a limited manner, for example if you setting up an account for someone who is both an adminstrator and end-user of RSpace. Please read:
Using multiple RSpace accounts with the same SSO identity and
Creating a backdoor login account
for details of how to set up these accounts.
6. Allowing specific SSO user to login into account that doesn't match their username
It may be the case that SSO username doesn't match the username of the previously-created RSpace account, and it is not feasible to simply re-create the account with new username. In that case the Sysadmin can set a specific Username Alias that will allow incoming SSO username to be matched with a previously created account.
Please check: Allowing RSpace user to login with specific Username Alias, rather than username.
Glossary and acronyms
eppn
eduPersonPrincipalName: A SAML attribute containing a unique, ideally unchanging username. This may be a staff id or email address but may also be an opaque value. It is essential that this attribute is mapped to the RSpace username.
IdP
Identity Provider: is an application that issues authentication assertions, used in conjunction with a Single Sign On mechanism. The customer's institution may have its own IdP, or use a federated IdP spanning a state or country. Commercial services such as Okta or Microsoft Azure can serve as an IdP.
SAML
Security Assertion Markup Language is an open standard for exchanging authentication and authorization data between parties, in particular, between an identity provider (IdP) and a service provider (SP).
SSO
Single Sign On. Users at an institution can use the same credentials to authenticate to multiple applications.
SP
Service Provider. An application or piece of software that accepts authentication assertions provided by an Identity Provider. Here, RSpace is the Service Provider.
sysadmin
RSpace user with 'System Admin' role who can create and manage user accounts, and configure RSpace global behaviour.
How did we do?
AWS Gateway and linking to AWS S3 files through SMB connector (legacy setup)
Using multiple RSpace accounts with the same SSO identity