You can bulk import your samples, subsamples and containers into Inventory by uploading CSV files. This article explains how to prepare your existing sample/subsample/container data as CSV, and how to perform an import in Inventory.
Importing Instruments and Instrument Templates is not currently supported.
The import process is as follows:
Export your existing data as CSV, and ensure it fits the CSV format requirements
Currently your samples, subsamples and containers need to be listed in separate CSV files but you can define the relationship between items within the imported CSV files and upload up to three CSV files at a time in a single import event to therby import multiple samples (each made up of different subsamples) and with your subsamples placed into specified list containers.
If you import a list of samples using a single CSV and you don't include a subsample CSV, then your imported samples always contain a single subsample by default.
Subsamples can be only imported together with samples, so when preparing a subsamples CSV file also prepare a connected samples CSV file
When importing samples you need to decide which sample template imported samples will be connected to. This could be either a pre-existing sample template, or a new template which is auto-generated during import process. Using a pre-existing template gives more flexibility in deciding the field definitions and default values, but you'll need to ensure that the CSV file matches the template definition exactly. An auto-generated sample template will match the content of a CSV file automatically.
After you've prepared your CSV files, go to Inventory -> Import page. This page has containers/samples/subsample tabs that allow you to import multiple files at once (which is useful if you want to set up a hierarchy of containers and import subsamples into these containers in one operation). Alternatively, you can import samples/containers separately, and connect them later (e.g. by moving imported subsamples into separately imported containers with standard 'move' operation). The only requirement is that subsamples import requires defining samples as a part of the same operation, that's because subsamples can't exist on their own, they need to be tied to samples.
On Inventory -> Import page you should upload CSV files. Samples import page let you decide whether to use an already existing, or auto-generated template for samples, and specify which columns you want to import and what data type each column should have. Containers and subsamples import pages allows you to convert CSV columns into default container or subsample fields.
Here's an overview of importing samples into a new auto-generated template:
1. Export your sample, subsample and container data into CSV files
CSV is a common format for table-type data; any spreadsheet software should be able to export data as CSV.
CSV format requirements
First row has to be a row containing column names. No columns in the header row can be blank
All rows must have the same number of columns
All columns must contain non-blank values
Blank rows are ignored
Blank values are fine
Maximum number of rows is: 500 per containers CSV file, 1000 per samples CSV and 2000 per subsamples CSV
You can check our example files: example_samples.csv and example_containers.csv. Open the files in your spreadsheet software to see how the data looks, as well as try importing it to get a feel for the process. We don't recommend using MS excel for working with these CSV files because excel may automatically force some data to be reformatted, especially dates.
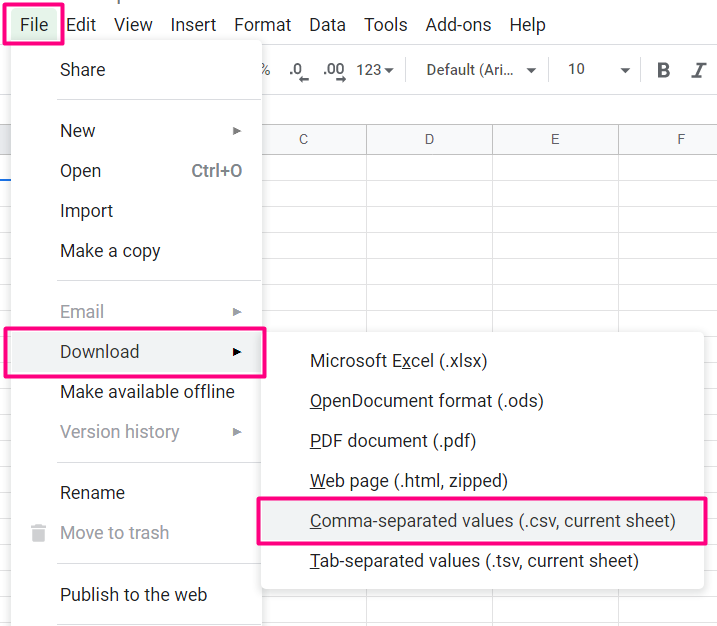
Export as CSV in Google Sheets
In Google Sheets, you can do this by going into File -> Download -> Comma-separated values (.csv)
Export as CSV in Excel
In Excel, you can do this by going into Export -> Change File Type -> CSV (Comma delimited)
You may have a better experience working with .csv data using applications that do not automatically apply formatting (e.g., LibreOffice ). MS Excel is known to automatically introduce a range of formatting changes into .csv files than can negatively affect the RSpace import process.
2. Import your Containers into RSpace Inventory
Note that you can only create LIST containers using this import method. This is because of the difficulty of specifying the exact location of every subsample if you use grid or image containers. If you need to use grid or image containers, consider importing your subsamples to your bench first, then manually moving them to appropriate containers.
We will be using example_containers.csv for this example import. If the file downloads as example_containers.csv.xls, please rename it to example.csv before importing.
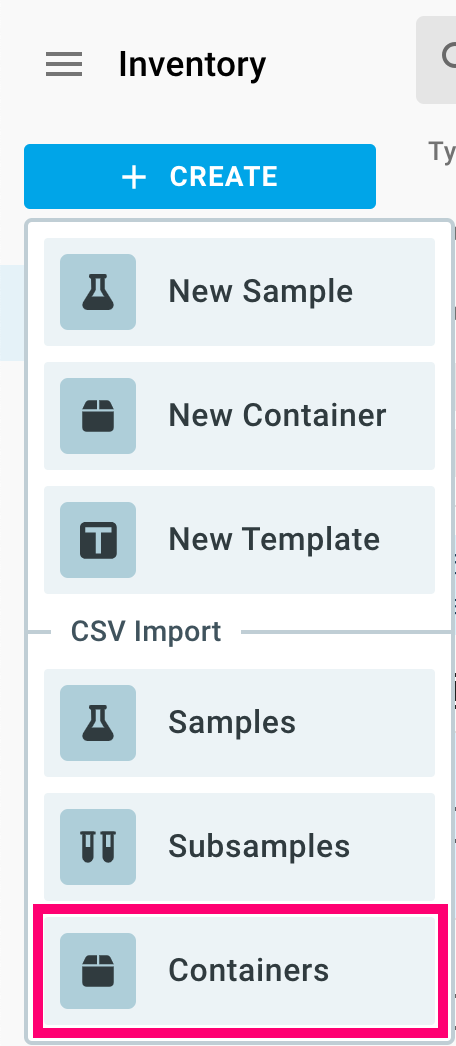
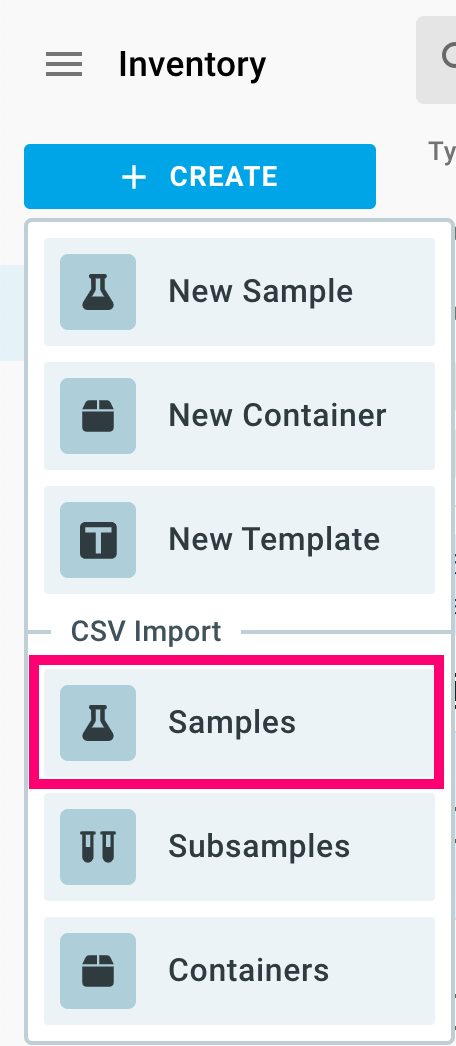
Click on Create -> Containers, under CSV Import in the inventory sidebar (or switch to Containers tab if already on Import page)
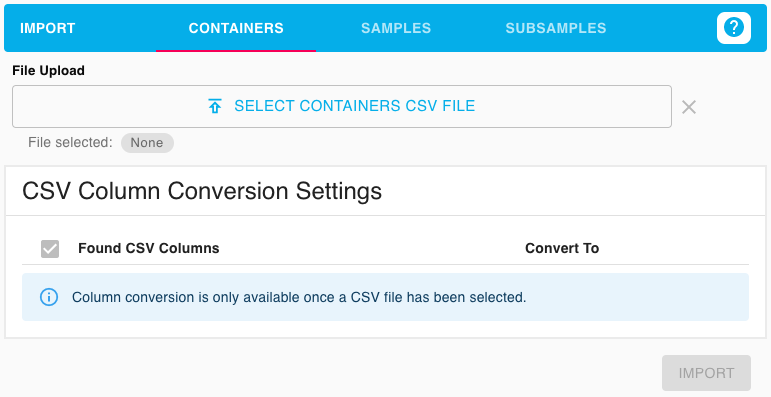
Click on Select Containers CSV File to upload your CSV
The table displays all the columns that were found in your CSV, and enables you to choose which container fields should be populated with data from given column. You can use the checkboxes to select which columns you wish to import.
To perform an import, you must set one column to convert to the Name of the container. The conversion to 'Name' will be automatically selected if there is a CSV column called 'Name', otherwise the dropdown menu let you select the required conversion option.
Inventory suggests different conversions based on the data and names of the columns. The data format rules used for suggestions and available field types for a column are described in the table further down this page.
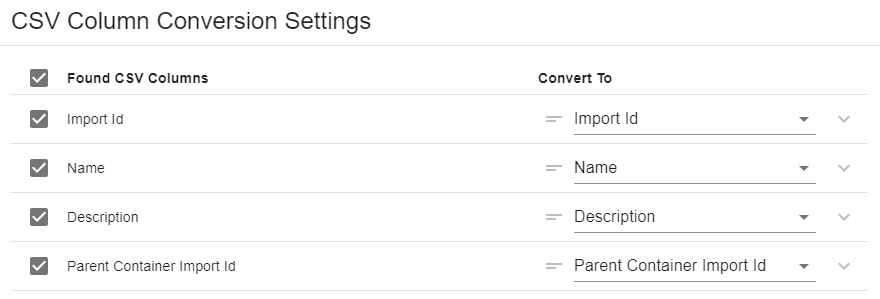
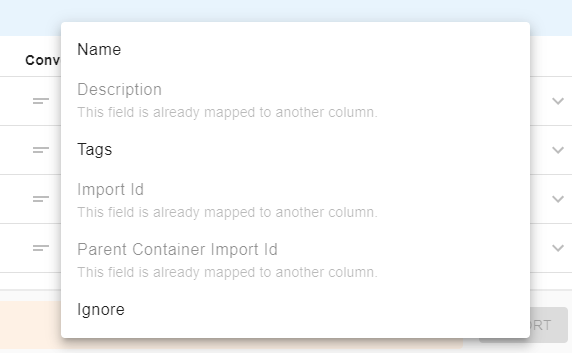
You can define the hierarchy of containers by adding 'Import Id' and 'Parent Container Import Id' columns to the CSV file. To say that "container A" should be created inside "container B" add the unique value (e.g. 'contA') in an 'Import Id' column of the CSV row defining "container A", then reference this value in 'Parent Container Import Id' column of the CSV row defining "container B". Items can also be imported into an existing container. In order to do that, enter a valid container Global Id in a CSV file column, then map it to the 'Parent Container Global Id' field.Please note that you should not map both Parent Container Ids at the same time: an error alert will be displayed in that case.
Once you are done assigning the conversion options, click on the Import button.
You will get a success message if your import has succeeded. Clicking on the dropdown arrow will show you the list of uploaded containers, with clickable global IDs. The imported items are placed in a "virtual" container on your Bench. If your import is unsuccessful, the error message will explain the problem. In such case you may want to check the troubleshooting guide below.
3. Import your Samples into RSpace Inventory
(optional) Prepare a Sample Template to be used for imported samples
This step is optional, you can skip it and import samples into auto-generated template instead.
Auto-generated template is a quick way to get your samples into the Inventory, but creating a custom template upfront gives you some benefits:
full control on field types, default values, and possible options on radio/choice fields
way to define some additional properties on template level, e.g. Quantity Unit
way to import from multiple CSV files and still have samples that all link to a single sample template. If you have multiple CSV files, and keep using an auto-generated template for each file, the samples imported from different files will have no connection to each other.
The downside is that you must ensure that the pre-made template you select must precisely match the data fields of the samples you are trying to import from CSV file. If you use an auto-generated sample template, it should match the content of your CSV file automatically.
See our documentation on how to Create and Use Sample Templates 🧪. The sample template used for import must follow a few rules so the incoming CSV file is considered valid:
the number of template fields must be the same as the number of columns in CSV file (not counting the CSV columns that will be put into core sample fields, e.g. name, expiry date, etc.).
the template fields must be named and ordered the same as columns in CSV file
the template fields must have types and definitions matching incoming CSV lines
We will be using example-sample.csv for this example import. If the example file downloads as example-samples.csv.xls, please rename it to example_samples.csv before importing.
(optional) Prepare subsamples CSV with details of subsamples that should be created for imported samples
You can import a single samples CSV on its own, in that case each imported sample will have a single default subsample. But if you want to specify more details of subsamples (e.g. Quantity) that should be created for each imported sample you can do that too, by uploading a subsamples CSV that references the samples defined in samples CSV. Check the section on subsample import below.
(optional) Automatically Link Pre-Registered IGSN IDs
You can link pre-registered IGSN IDs to imported samples during the import process. To do this, add a column to your samples CSV file containing the pre-registered IGSN IDs and map it to the 'Identifier' field during import. Ensure the IDs are pre-registered in the IGSN IDs section of Inventory before importing. This feature eliminates the need for manual linking after import and ensures samples are immediately associated with persistent identifiers.
Import the Samples CSV
Click on Create -> Samples, under CSV Import in the inventory sidebar (or switch to Samples tab if already on Import page)
Click on Select Samples CSV File to upload your CSV
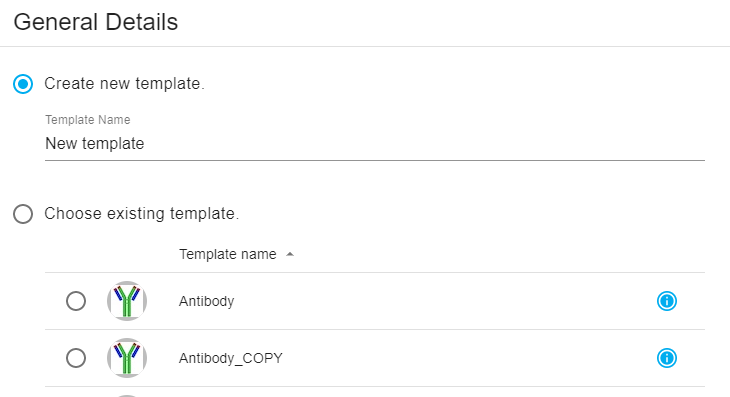
If you want to use auto-generated template, keep Create new template option selected, and set the template name for the new template. If you want to import samples using pre-existing template, select it on Choose existing template listing.
All the samples imported in the same CSV will share a sample template; if you wish to assign different templates to some samples, you will have to create separate CSVs for each sample type and import them separately.
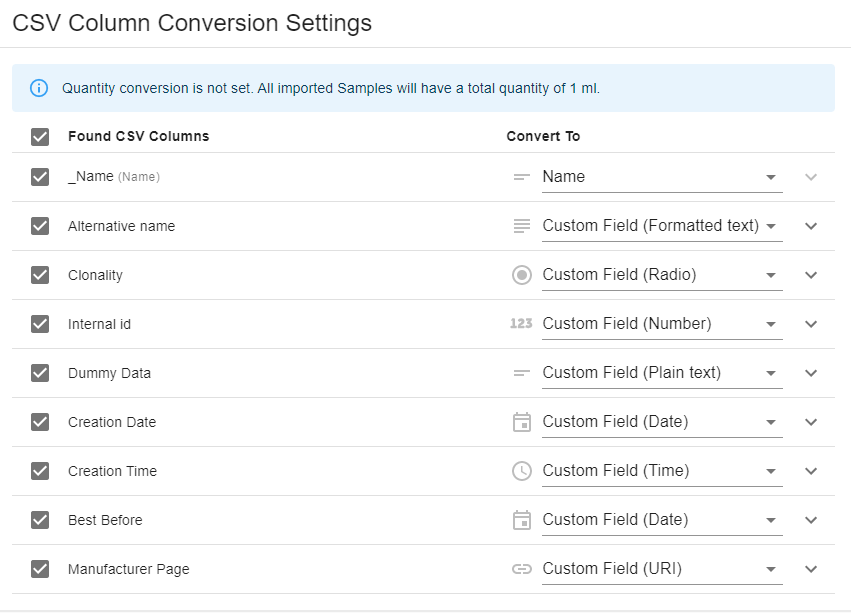
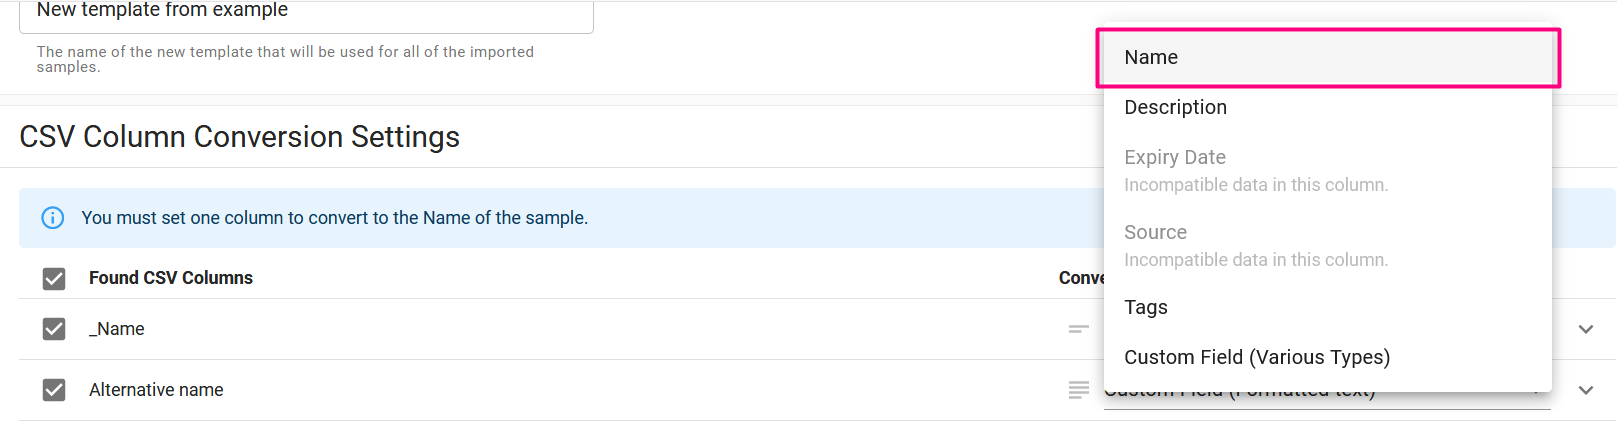
The table displays all the columns that were found in your CSV, and enables you to choose what Inventory field type each will be converted to during import. You can use the checkboxes to select which columns you wish to import.
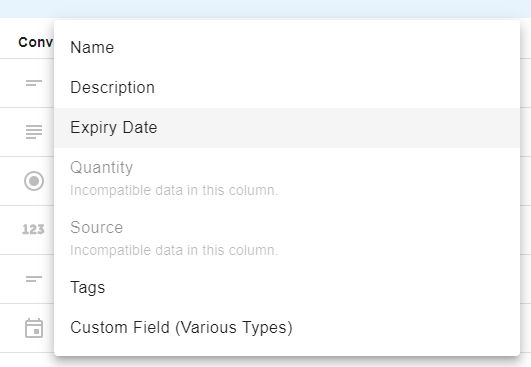
To perform an import, you must set one column to convert to the Name of the sample. To change the field type of a column, click on the dropdown and select a type:
Inventory suggests different field types based on the data in the columns, which you can change. The data format rules used for suggestions and available field types for a column are described in the table further down this page.
If you select Custom field, the view will expand so you can rename the column, and select from the field types available.
Clicking on the custom field type will give you a dropdown of field types that are available for that column. See the table further down this article for information on the rules used to determine which field types are available for a column.
You can use the arrow on the right to expand or close the custom field options view.
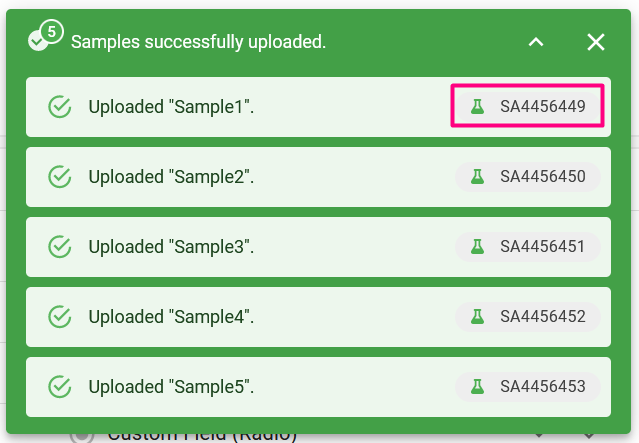
Once you are done assigning field types, click on the Import button.
You will get a success message if your import has succeeded. Clicking on the dropdown arrow will show you the list of uploaded samples, with clickable global IDs. The imported items are placed in a container on your Bench. If your import is unsuccessful, the error message will explain the problem. In such case you may want to check the troubleshooting guide below.
4. Import your Subsamples into RSpace Inventory
We will be using example-subsamples.csv for this example import. If the file downloads as example-subsamples.csv.xls, please rename it to example.csv before importing.
Subsamples can be imported by themselves and associated with an existing Sample OR if you are importing entirely new Samples AND Subsamples, then Subsample import can be executed together with Samples import in a single import event using 2 CSV files. We will use example-sample.csv for samples import part. Each subsample needs to reference a sample from samples CSV that is a part of the same import.
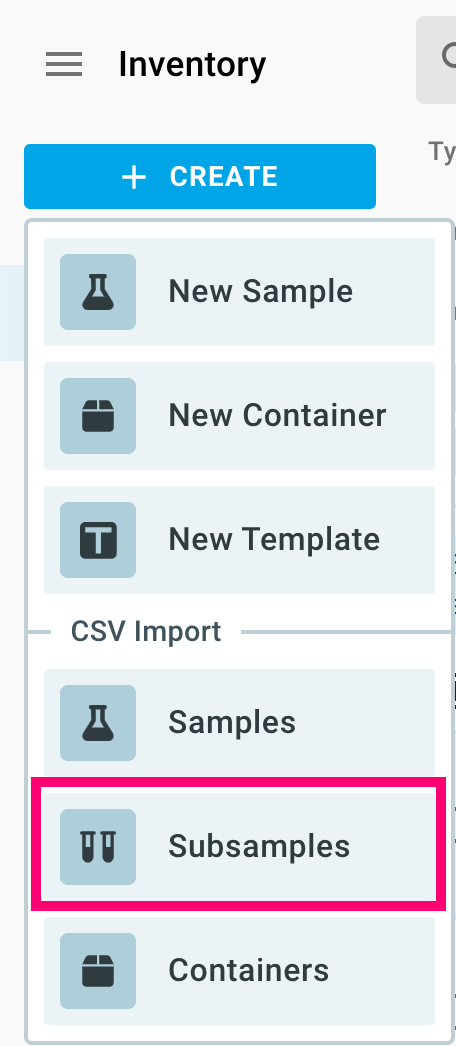
Click on Create -> Subsamples, under CSV Import in the Inventory sidebar (or switch to Subsamples tab if already on Import page)
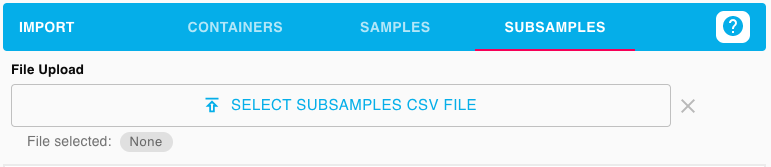
Click on Select Subsamples CSV File to upload your CSV
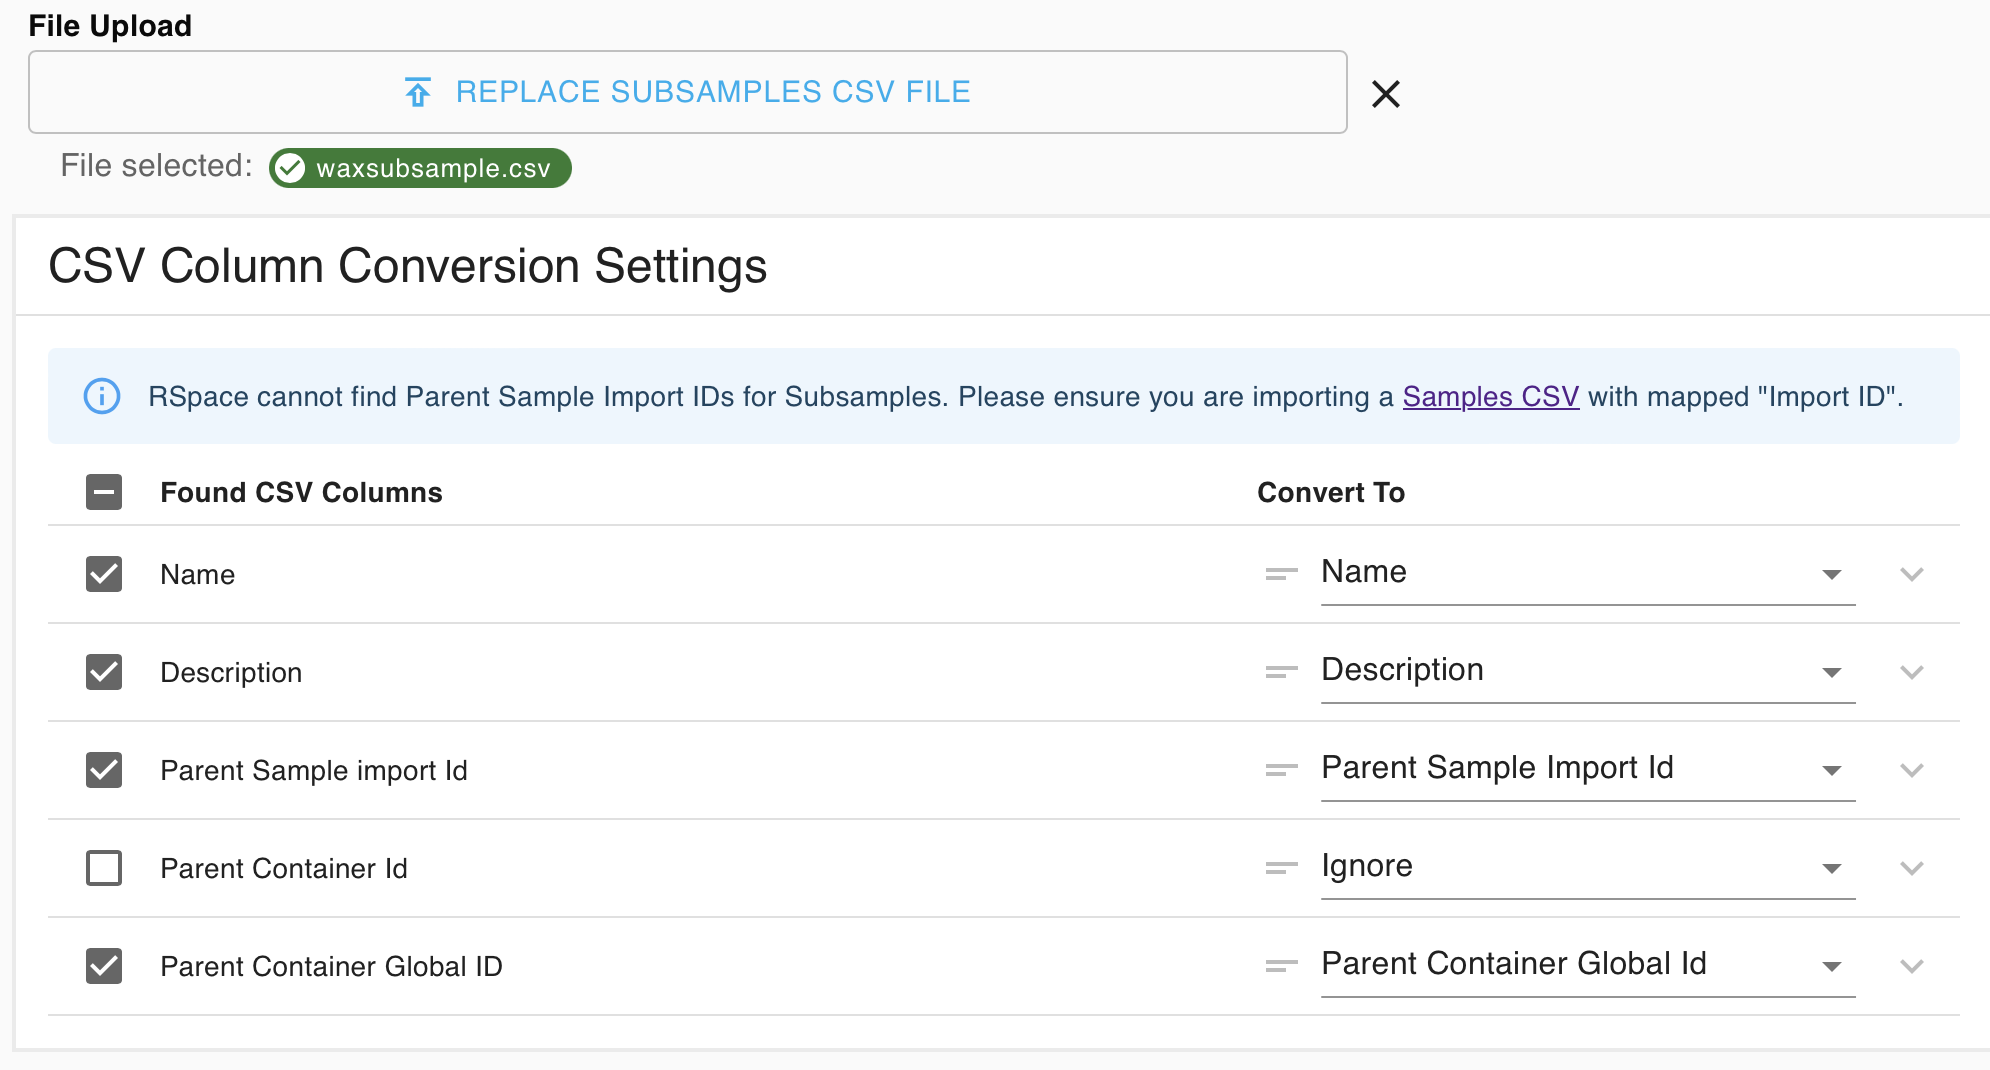
The table displays all the columns that were found in your CSV, and enables you to choose which container fields should be populated with data from given column. You can use the checkboxes to select which columns you wish to import.
To perform an import, you must set one column to convert to the Name of the subsample. The conversion to 'Name' will be automatically selected if there is a CSV column called 'Name', otherwise the dropdown menu let you select the required conversion option.
Inventory suggests different conversions based on the data and names of the columns. The data format rules used for suggestions and available field types for a column are described in the table further down this page.
To perform an import of subsamples, you must set one column to convert to the Parent Sample Import Id (or, alternatively, an existing Parent Sample Global Id - see below), and also import a corresponding samples CSV file that converts one of the columns to 'Import Id'. This way subsamples can be tied to the correct samples. To say that "SubSampleA" should be associated with parent sample "SampleAB" add the unique value (e.g. 'sAB' in an 'Import Id' column of the sample CSV row defining "sample AB", then reference this 'sAB' value in 'Parent Sample Import Id' column of the subsample CSV row defining "subsample A.01".
Subsamples can be imported into an existing sample. In order to do that, enter a valid sample Global Id in the Subsamples CSV file column, then map it to the "Parent Sample Global Id" field. Please note that you should not map both Parent Sample Ids at the same time.
Samples and / or subsamples can also be imported already enclosed in a new container by using a separate CSV file and a Parent Container Id, or they can be added to existing containers already in RSpace. To do that, enter a valid container Global Id in the Parent Container Global ID CSV file column, then map it to the "Parent Container Global Id" field. Note that currently only simple LIST containers are supported by the import mechanism.
In the example below, subsamples are being associated with samples in a separate sample CSV file using a Parent sample import Id but are being placed into a specific existing container based on the container's RSpace global ID, which was included in the "Parent Container Global Id" column of the subsample CSV.
If you have mapped the 'Parent Sample Import Id', then switch to the Samples tab, and import a samples CSV file that defines the samples referenced by imported subsamples. Note: if you have mapped the 'Parent Sample Global Id', there is no need to do that. The subsamples can be imported on their own, provided the referenced 'Parent Sample Global Id's are all valid Ids of existing samples.
Quantity information for each imported subsample can also be provided, by adding it to a CSV column that will be mapped to the Quantity field (just like for samples).
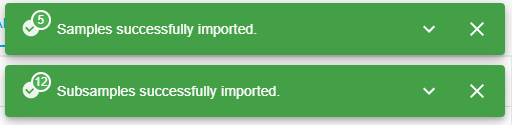
Once you have uploaded and assigned conversion options for both Samples and Subsamples CSV, click on the Import Samples + Subsamples button.
You will get success messages if your import has succeeded. Clicking on the dropdown arrow will show you the list of uploaded samples and subsamples, with clickable global IDs. The imported items are placed in a container on your Bench. If your import is unsuccessful, the error message will explain the problem. In such case you may want to check the troubleshooting guide below.
Troubleshooting Guide
While we have tested import extensively, it is a new feature and thus might contain some bugs. If you're having issues, please email us with your CSV file and we will investigate!
Dates MUST be in the ISO format yyyy-mm-dd. If you use MS Excel to edit your CSV file, excel may automatically force reformat of certain values, especially dates and times. If you experience this, consider using a different editor app that does not automatically reformat your CSV files.
Expand the warning message for details on why the import failed:
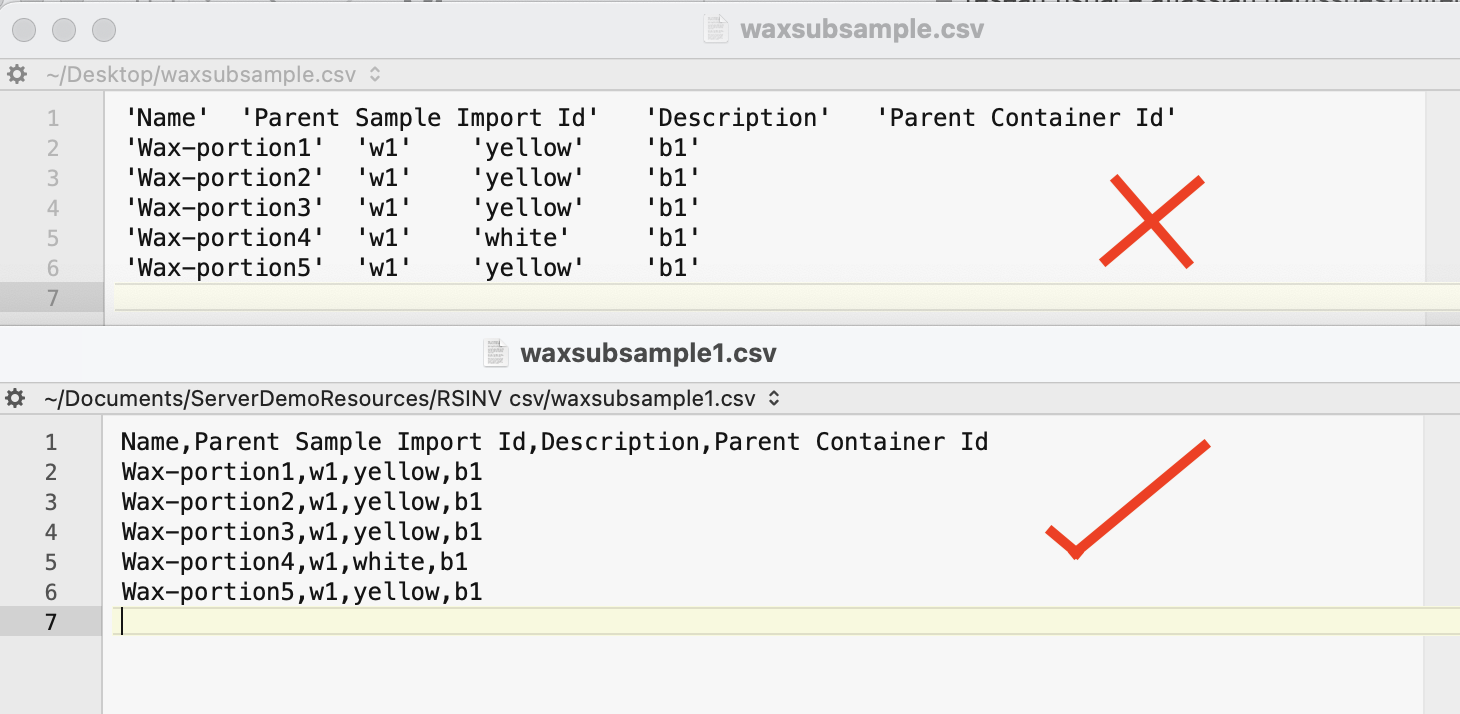
Check if any of the fields in your .csv contain commas (eg. 1, 3); these should be enclosed in quotes (eg. "1, 3") to be treated as a single value. This is due to CSVs using commas to separate columns, and the presence of commas in fields causing a conflict.
Different applications open, process and save .csv files differently. It's really easy to acquire a .csv file that is in the wrong format. Even if the file LOOKS like a "comma-separated value" file when viewed with a specialized spreadsheet program, the values may in reality be separated by tabs or the values may be delimited in some way that RSpace does not recognize. Even opening and resaving a .csv file that USED to work with RSpace can sometimes cause it to be converted into a format that is incompatible depending on the characteristics of the application you opened it with last. If in doubt, try examining your .csv file not with a spreadsheet application, but with a simple text editor instead. Files you want to import to RSpace should separate values ONLY with commas. In the example below the top file will not import properly to RSpace, the bottom file will.
Rules for field type suggestions
Inventory suggests different field types for CSV columns based on predefined rules. The first matching rule is used as a field suggestion. You can always change the field type of the CSV columns during import.
Column properties
Suggested field type
Types you can change the field into
All values are empty or whitespace
Plain text
Radio (if < 20 distinct values), Formatted text
Any value is longer than 100 characters
Formatted text
None
All values in a column are dates that are in ISO-8601 format (i.e. 2021-01-29)
Date
Radio (if < 20 distinct values), Plain text (if < 100 characters), Formatted text
All values in a column are integers or real numbers
Number
Radio (if < 20 distinct values), Plain text (if < 100 characters), Formatted text
All values in a column are in the HH:mm time format (i.e. 13:42)
There are no more than 20 distinct values in the column, and there are repeated values
Radio
Choice, Plain text (if < 100 characters), Formatted text
Is not suggested, but can be switched to from a Radio field
Choice
Radio, Plain text (if < 100 characters), Formatted text
Default
Plain text
Radio (if < 20 distinct values), Formatted text
Rules for mapping into core sample/subsample/container fields
You can map CSV file columns into some of core sample fields: Name (required), Description, Expiry Date, Quantity,Source or Tags. Below are the rules for deciding if column can be used for a given core sample field mappings.
Core property
Required format
Name
plain text, non-empty value in every row, length limit of 255 characters
Description
plain text, length limit of 250 characters
Expiry Date (only for samples)
ISO date format, e.g. '2030-12-22'
Quantity (only for samples and subsamples)
numeric value followed by the unit type, e.g. '200 mg';
Supported unit types are: mass (kg/g/mg/μg/ng/pg), volume (l/ml/μl/nl/pl or ㎥/dm³/cm³/mm³) or dimensionless (no unit). Units used for samples in a single CSV file must all belong to the same category, but may differ between rows (e.g. '5 g' in one row, '20 mg' in another).
Source (only for samples)
one of 3 options: LAB_CREATED, VENDOR_SUPPLIED, or OTHER
Tags
plain text, length limit of 8000 characters (including commas)
For CSV columns matching the format the mapping options will be enabled in Convert To dropdown. This dropdown can allow users to "bend" the default logic used to import data from CSV columns, allowing you to choose which columns should be map to which fields in RSpace.
The import feature can be extremely powerful and save users and organizations large amounts of time and effort when working with large numbers of samples.
Tutorial with downloadable examples
You can find a series of additional videos on our YouTube channel that will demonstrate simple and more advanced import workflows. The videos make use of the bundle of additional example CSV files that you can download below. Feel free to use these to practice or experiment with teh various differnet types of import on your own server. Note that in some case you will need to edit things like RSpace Global IDs that appear in these CSV files to get them to correspond to IDs that exist on your own RSpace server: