Table of Contents
Scan, Use and Print Barcodes in Inventory 🧪
Scanning, formats, and browsers. You can read barcodes in RSpace, either generated by RSpace itself, or created by other systems. The formats you can scan will depend on the browser and OS you are us…
Scanning, formats, and browsers
You can read barcodes in RSpace, either generated by RSpace itself, or created by other systems.
The formats you can scan will depend on the browser and OS you are using. Results will also be affected by camera capabilities, barcode size, and light conditions.
The largest range of formats can be scanned using an Android device with camera, or the Chrome browser on a Mac computer with a webcam. These will be able to read 1D barcodes, QR codes, Matrix codes and many more. If you are using a different device/browser combination (e.g Safari on an iPhone), you will still be able to scan QR codes, but not other formats.
Barcodes and Items
Each Inventory item can be associated with one or more barcodes, and a barcode can be associated with one or more items (a "many to many" relationship).
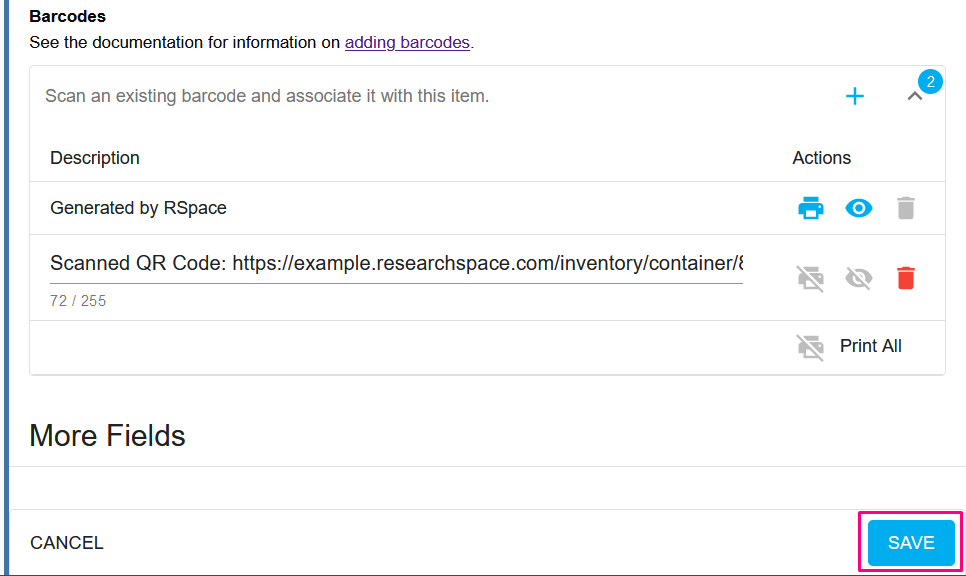
If you are editing an existing item, you can save a barcode (generated anywhere) and associate it with the item in the Barcodes section.
Once a barcode has been scanned, you can use the value encoded in it to search items in RSpace (1-click "scan and search").
Scan an existing barcode
To scan an existing barcode:
- First click Edit at the top of the details panel of the item
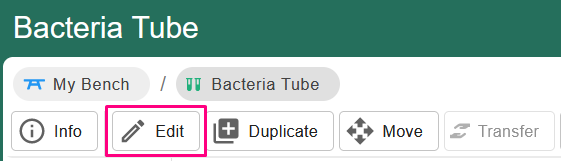
- Scroll down to the Barcodes field, and click the "plus" icon to activate your device camera
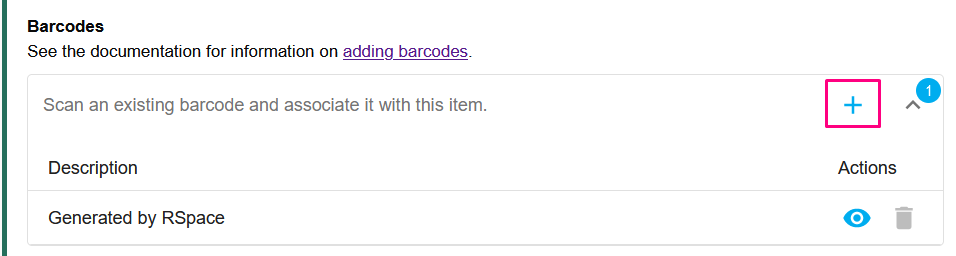
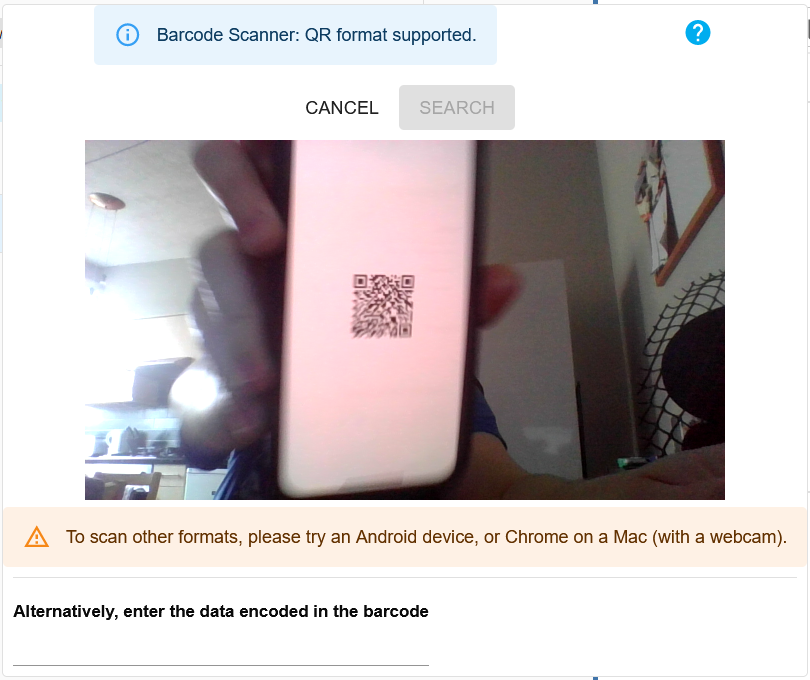
- Position the item so that the camera can read the barcode. Alternatively, if the camera is struggling to detect the barcode or you've got a barcode scanner, you can enter the data encoded in the barcode manually.
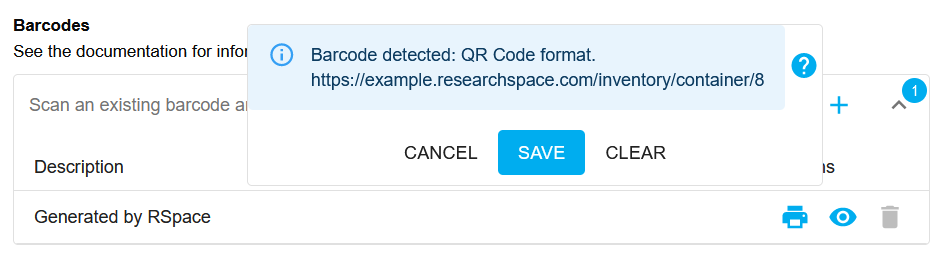
- When the camera successfully reads the barcode, the content and format of the barcode will be displayed. Click Save to save that barcode. Note that you can associate more than one barcode with an item.
- You can edit the label for the newly scanned barcode. Click Save at the bottom of the details panel to save all changes and end the editing session.
Search items by barcode ("scan and search")
- Click on Barcode in the search filters:

- Your browser might ask for permission to use your camera, which you'll need to allow.
- Position the item so that the camera can read the barcode.
- The system will indicate when a barcode was successfully read. Click on Search to display all Inventory results that match your barcode.
- Even if you don't have permission to fully access the searched item, you will still be able to see its name and owner. You will then be able to contact the owner to gain full access in case you need it.
Barcode Features
QR codes generated by RSpace encode a direct link to an item, eg. https://university.researchspace.com/inventory/subsample/1310785. Both the generated QR code or any type of barcode that you have associated with an item can be read by another RSpace user in order to access those items via "scan and search".
Note that you can use this approach to:
- read barcodes created by any type of barcode printer that you use in your lab (either currently or in the past) and associate those codes with RSpace items
- read and associate existing barcodes printed on the item by the manufacturer
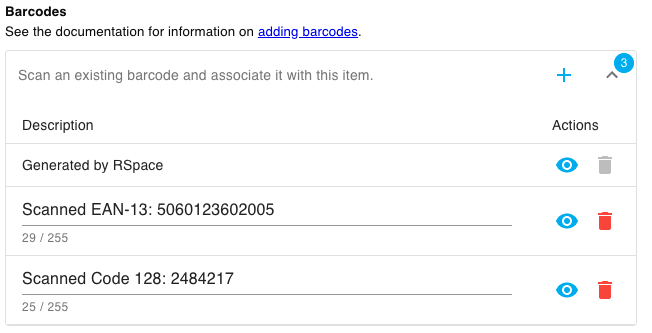
In the example below, three barcodes are associated with an item, the first is a QR code generated by RSpace (which cannot be deleted) and two additional barcodes that were read directly from the item (which can be deleted if necessary). The two extra barcodes were originally 1D linear barcodes but RSpace converts and displays previews of those as QR codes which can then be printed. Currently RSpace cannot display or print 1D "traditional" barcodes that have been associated with an item.
Barcode Printing
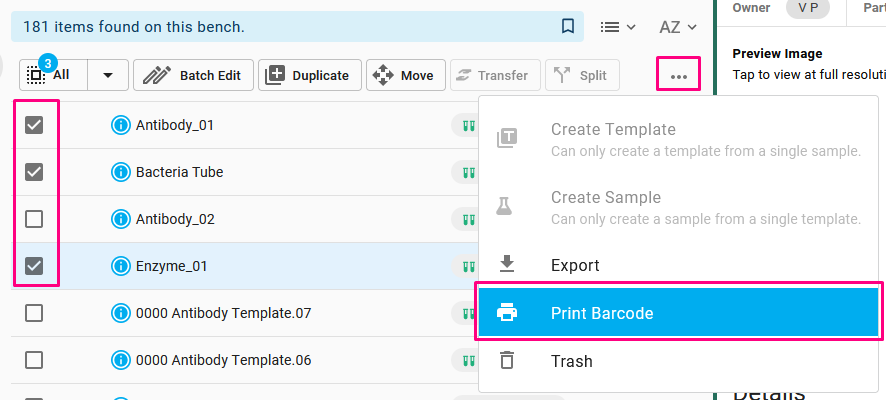
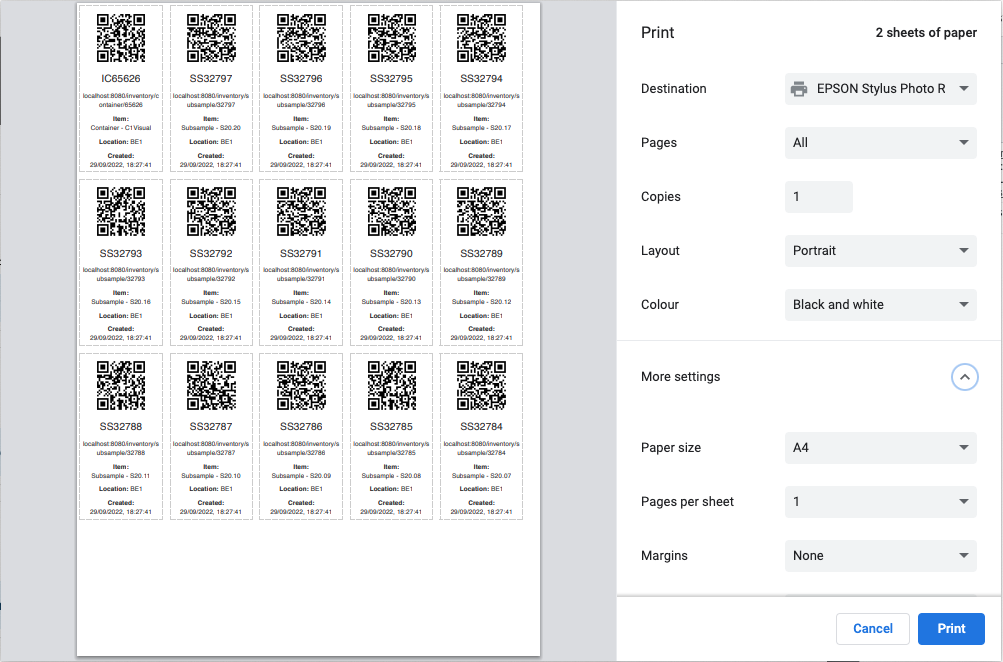
- Select one or several items using the checkboxes. Then, click on the three dots menu to expand your actions, and select Print Barcode. Note that this will print out the QR codes generated by RSpace for each item, plus some other details.
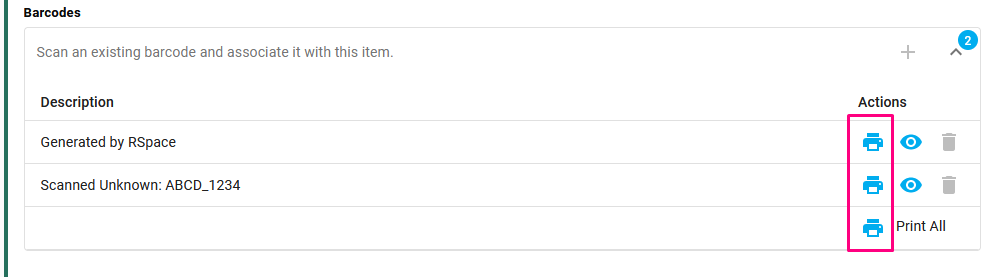
- You can also scroll down to the Barcodes section of an item, and use the print icon to print one or all barcodes associated with an item. Note that all barcodes will be converted to QR codes for printing, even barcodes of a different format that were associated with the item.
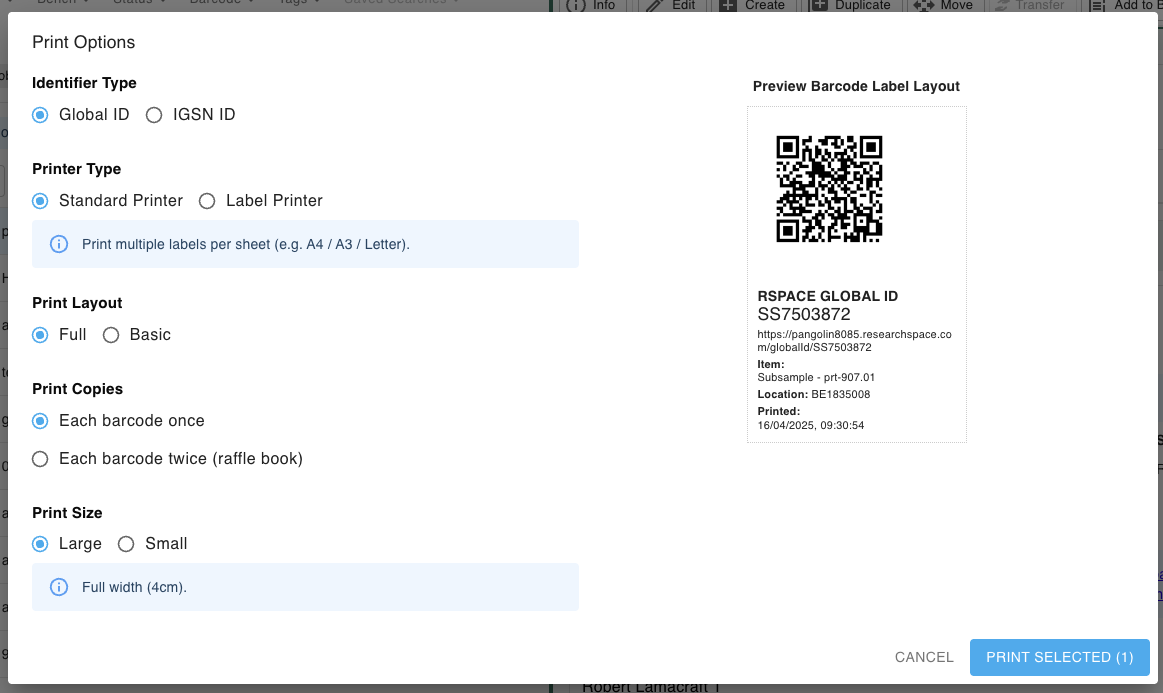
- A print options panel will open, where you can customise the size and information on your label. A preview of what an individual label will look like is displayed on the right.
- Identifier Type determines the data that will be encoded in the QR code. All Inventory items have a Global ID and thus a QR code that encodes a link to the item using its Global ID, but these QR codes will only be scannable by someone with an RSpace account. On the other hand, Inventory records can also be assigned an IGSN ID, which when encoded in the QR code and the IGSN published, allows anyone to scan the barcode to find out more information about the physical sample.
- Printer Type toggles the layout of the print-out, either for generic printers or for Zebra label printers.
- Print Layout has two options: Basic prints the QR code and the record's Global ID, and Full prints QR code, Global ID, description, type and name of the item, item location, and label creation time. If you have selected a Label Printer, then you will have to make sure the sticker labels used by your printer match the layout you select. Full will require a rectangular label, Basic will work on both square and rectangular ones.
- Print Copies determines how many of each label to print. There are two options: either one copy of each label for regular label printing, or two copies in a layout similar to a raffle-ticket book. This second option supports a workflow where one label can be attached to the physical sample and second stored elsewhere as a record of which samples have been used; particularly useful in scenarios where an Internet connection is not reliable.
- Print Size: small (2cm wide) and large (4cm wide) options are available only if you select Standard Printer. If you select Label Printer, the size will be automatically adapted to the sticker size, so you cannot choose between small and large in this case.
- After you click on Print Selected, your browser's print dialog will open and display all the barcodes that will be printed. If you selected the Standard Printer option, several labels can be printed on one page. If you selected the Label Printer option, then each label will be printed on a different page, in order to have one label per sticker. You can make any final adjustments, such as margins and scaling, before clicking on Print.
Using a Zebra printer
The Print Options panel lets you prepare Inventory item barcode data for a Label Printer, and we support Zebra printer models in particular.
When you select the Label Printer option in the Print Options dialog, each label will be placed on a different page, which is ideal for printing with a device like Zebra. If you want to print pre-cut labels for 20 containers or 100 subsamples, you can easily achieve this.
Some Zebra printers ship with a default pack of labels, but usually support several label sizes (check Zebra website for details on your printer).
Matching a Layout with a physical label
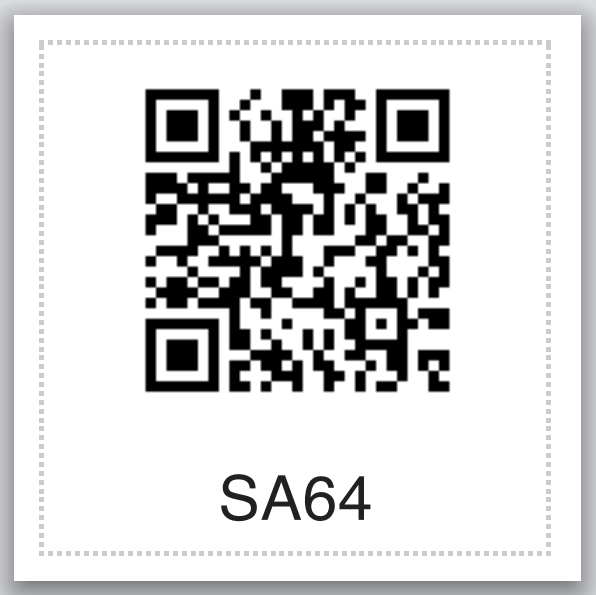
You should make sure you are using the right label for the layout you want to print. Zebra labels can be either square or rectangular. The Full layout option should be printed on a rectangular label (e.g. 1.25" x 3.5") in "Portrait" mode, while the Basic layout is ideal for square labels, as shown below.
Other combinations may work: the Basic layout can be printed on a rectangular label (leaving some white space), but we don't recommend printing the Full layout on square labels (unless you rescale accordingly in the printer options).
Troubleshooting: label sizes shown in print dialog are not correct
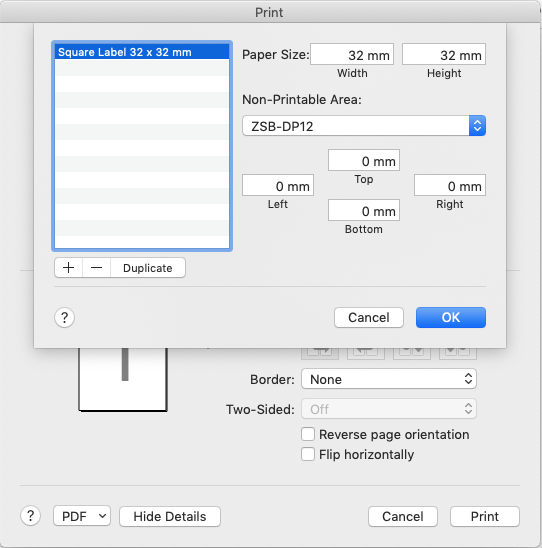
In some cases, after replacing the original printer labels with different sized labels, the browser window may still display the old paper size. This is caused by the printer drivers, and not by RSpace Inventory.
In the case shown below, we have loaded a cartridge with square labels (1.25" x 1.25") in a ZSB series printer, but the labels are not detected correctly by the browser (on a macOS device), and the previous label size is shown as the only option.

If that happens you can access the OS print dialog (there should be a link in the browser print window) and select the desired label size, or add a custom system setting for your new label, which will then be available to all applications on your device.
How did we do?
Toggle Inventory and Container Views 🧪
Add a File Attachment to an Inventory Item 🧪