Table of Contents
Add PIDINST IDs to your Inventory Items 🧪
Introduction. PIDINST IDs. PIDINST IDs are persistent, globally resolvable, and unique identifiers (PIDs) for instruments. By associating a PIDINST ID with an instrument, you enable transparency and…
Table of Contents
Introduction
PIDINST IDs
PIDINST IDs are persistent, globally resolvable, and unique identifiers (PIDs) for instruments. By associating a PIDINST ID with an instrument, you enable transparency and traceability between research objects. This is achieved by providing a publicly accessible web page (called a landing page) that contains the instrument metadata, serving as a unique "source of truth" when referencing the instrument in research outputs.
The PIDINST ID metadata can also describe relationships between the resource and other related materials, such as projects, institutions, people, and research outputs; it can also be used to identify an individual instrument, a group of instruments, or a feature-of-interest (e.g. a collection site for instruments).
Create a PIDINST ID
There are two ways to give an Instrument a PIDINST ID in RSpace:
- Register a new PIDINST ID for an Instrument you already have in Inventory. RSpace creates the identifier at your institution's registry and manages it for you. See the Register a PIDINST ID section below.
- Import an Instrument from a published PIDINST. If the instrument already has a published PIDINST at the registry your RSpace uses, you can search for it and create an Instrument from it, with the PID linked. In the sidebar, click Create and choose From PIDINST registry. See Search and Import PIDINST Instruments into your Inventory 🧪 for details.
Each Instrument can hold only one PIDINST ID, however it was obtained.
Register a PIDINST ID
This approach begins with an existing Instrument in RSpace Inventory and creates a PIDINST ID directly from the item's Identifiers section. When you create a PIDINST ID this way, the metadata for the identifier is automatically populated with information from your Instrument in RSpace, streamlining the setup process.
RSpace reserves a PIDINST ID in Draft state and associates it with the RSpace Instrument. PIDINST ID metadata will be available to fill out in RSpace, but the metadata and identifier are not made public at this stage.
The Draft PIDINST ID can be deleted, or published to explicitly make the metadata publicly accessible.
To create an automatically linked PIDINST ID:
- Open the Identifiers section on the Instrument:
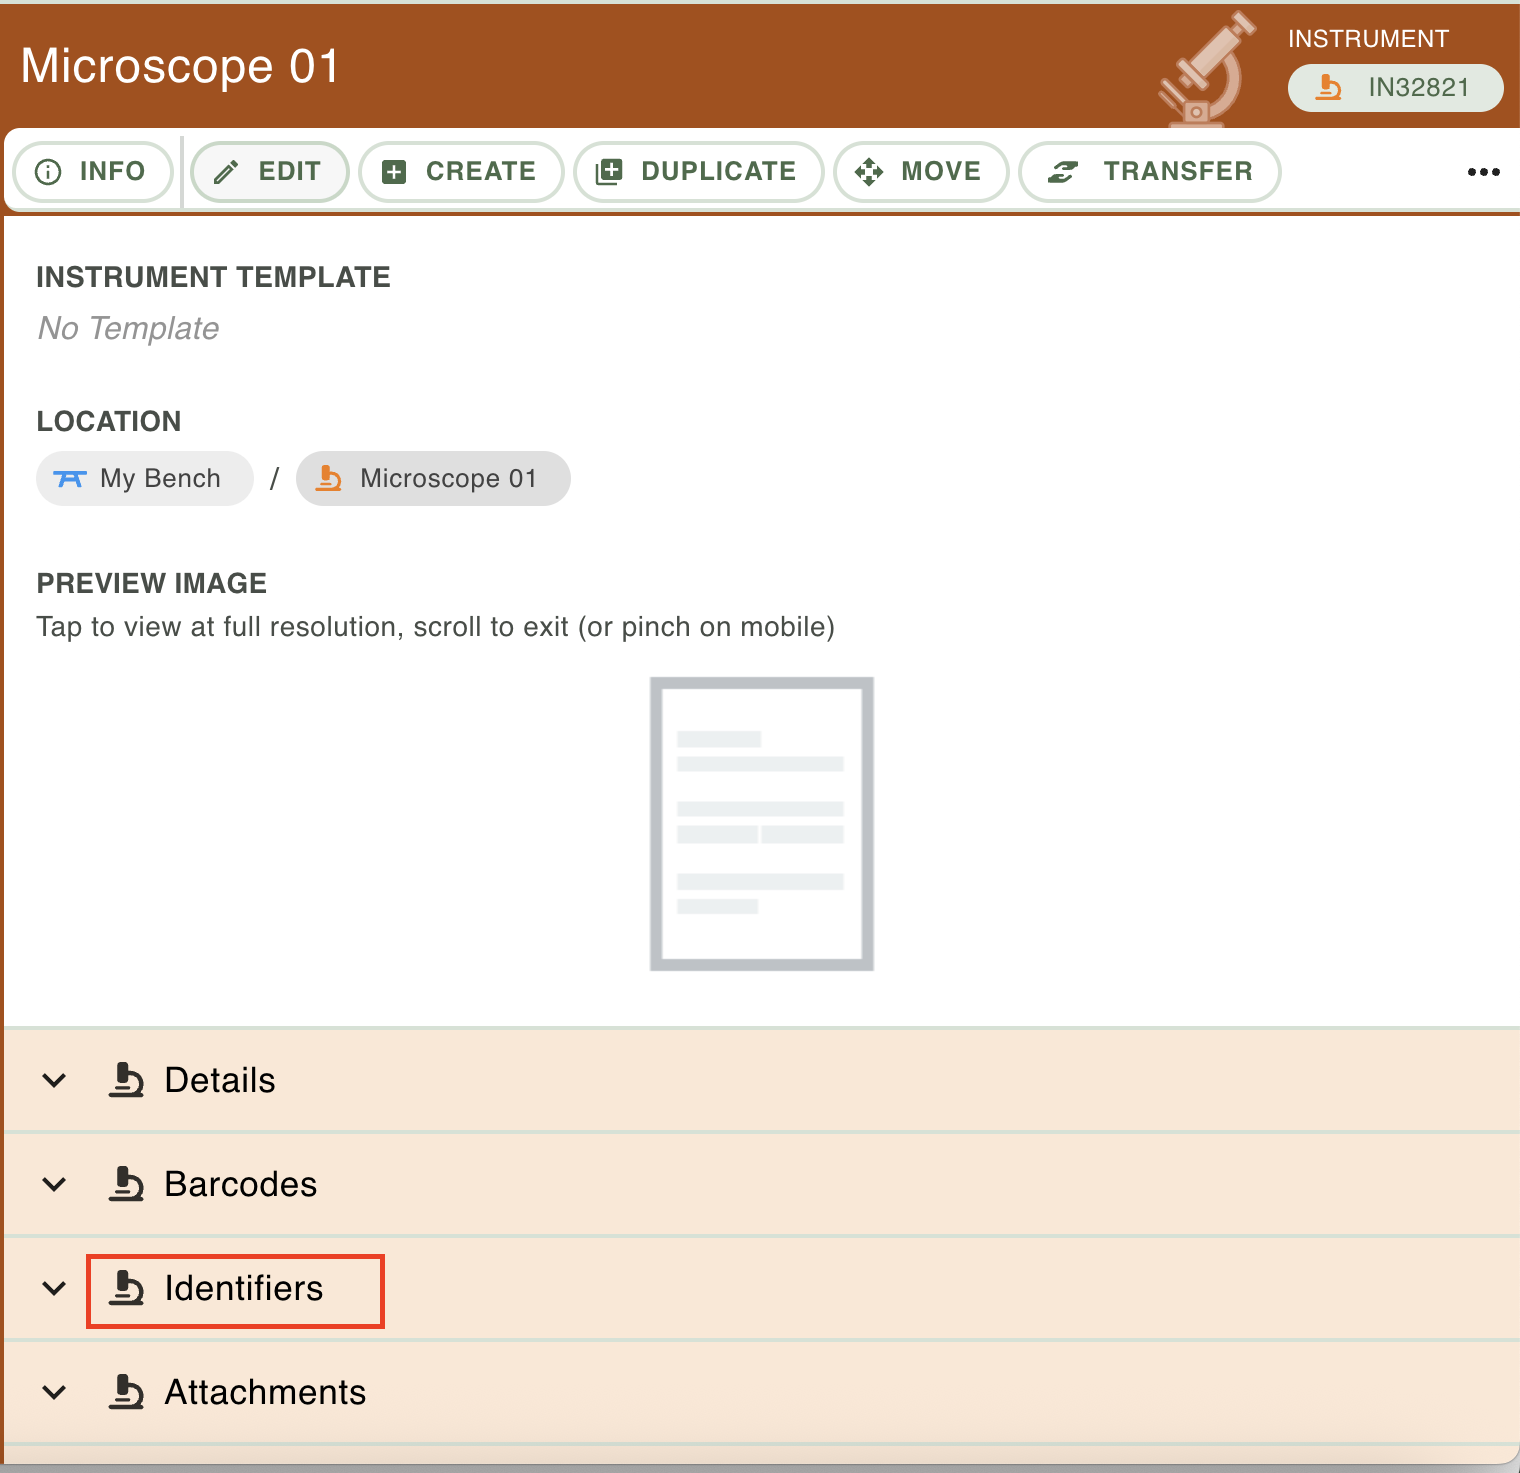
- Press the "Create new PIDINST ID" button to create a PIDINST ID. Each Instrument can only be assigned 1 PIDINST ID. If an Instrument imported from a PIDINST registry already holds its linked PID, then no new PIDINST ID can be registered for it. Note that if you are in the process of creating a new item, you will need to save the item first before being able to create a PIDINST ID for it.
 If the button is disabled, or you get a "The Identifier could not be created. PIDINST integration is not enabled on this RSpace instance." error after pressing the button, please contact your System Administrator.
 - The identifier section now shows the Draft PIDINST ID and its metadata fields. Required fields have been pre-populated with default values.Nothing is made public while the PIDINST ID is a Draft. RSpace does keep the registry's draft copy current: each time you save the Instrument, its metadata is sent to the draft record at DataCite or B2INST. See the Keep the registry record up to date section below.
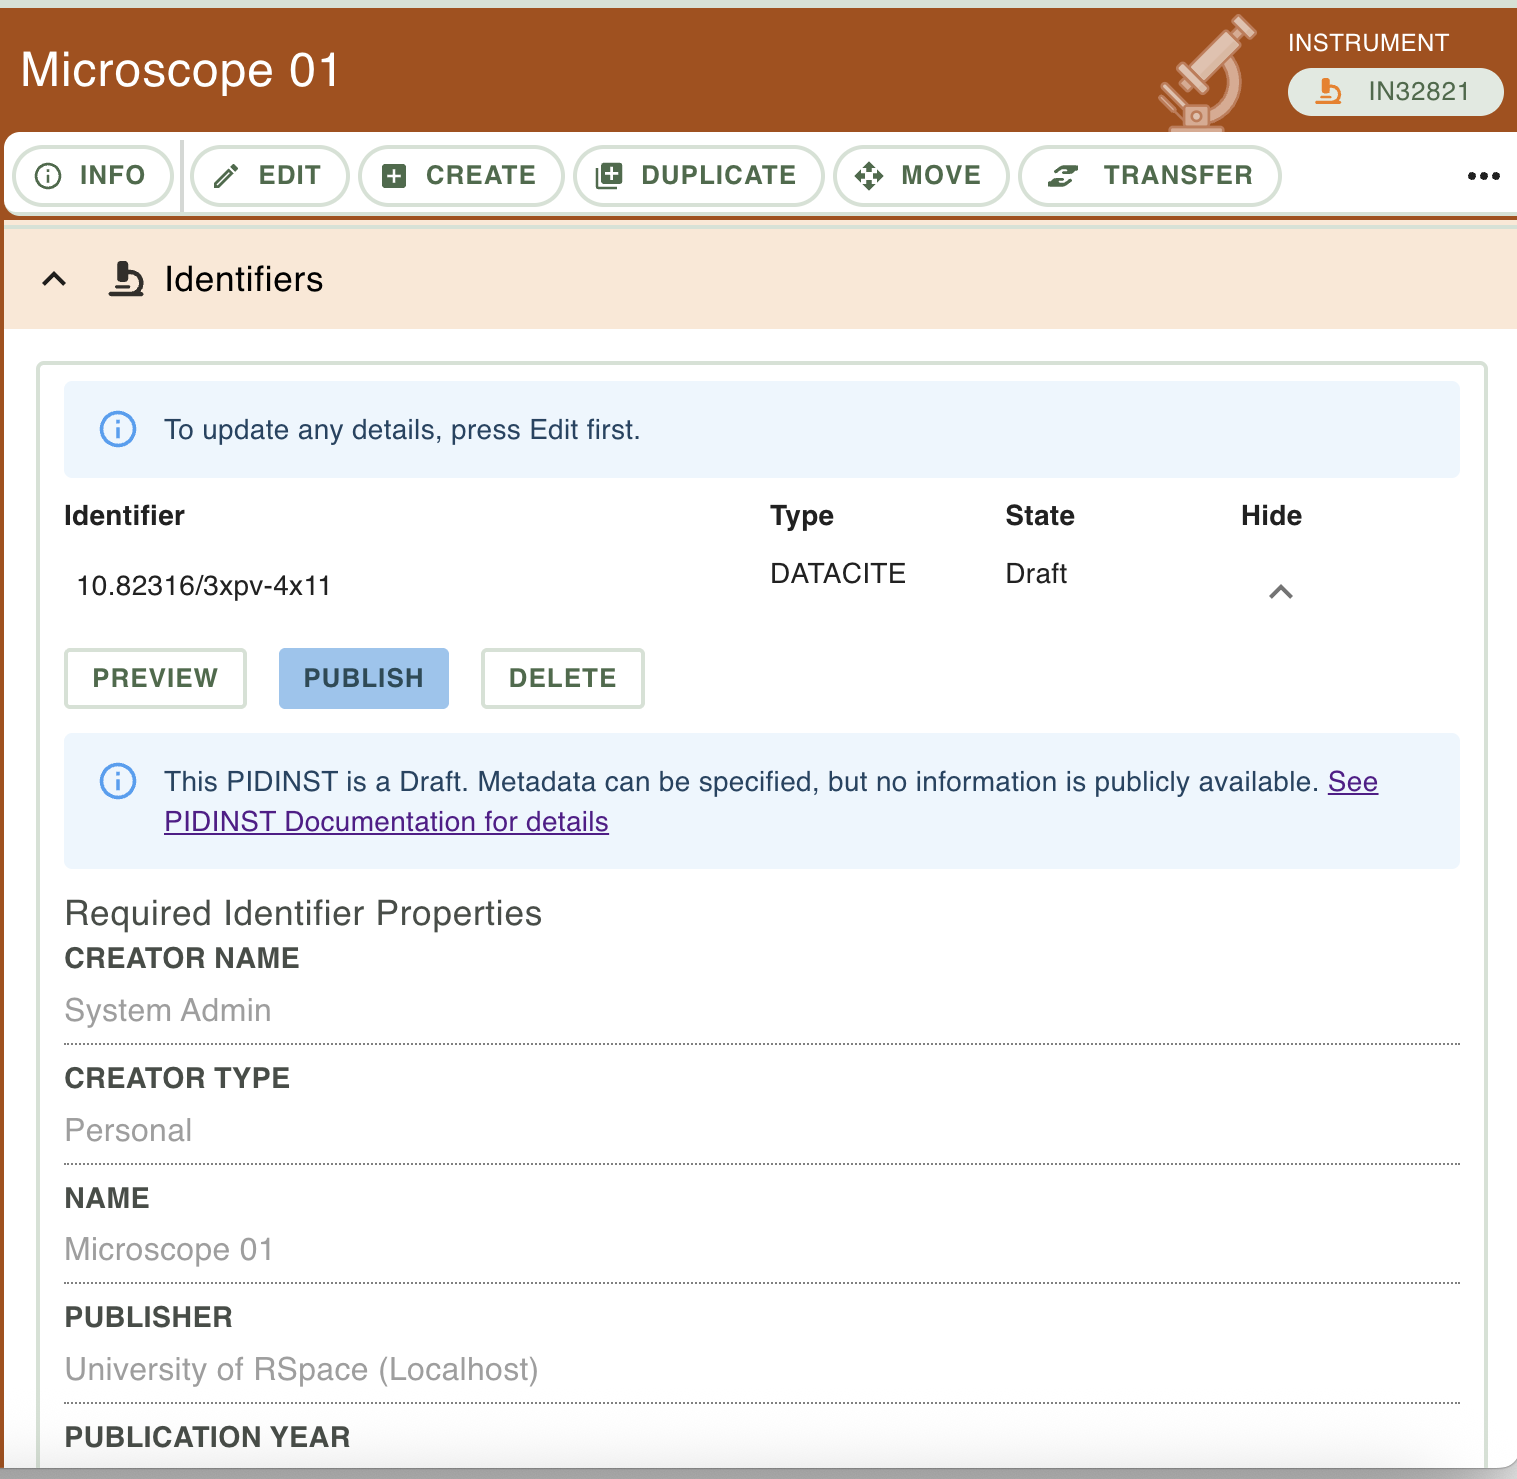 If your RSpace uses B2INST, the Identifiers section does not show the DataCite-style required and recommended metadata (such as Publisher and Publication Year). B2INST takes its metadata from the Instrument's template fields instead; see the B2INST workflow overview section below.
The Landing page field
When you register a PIDINST ID, RSpace writes the address of the identifier's public landing page into the Instrument's Landing page field, unless the field already holds an address you typed yourself. With B2INST, this field is registered as the record's landing page: an address you typed is used if it is a complete http or https address, otherwise the RSpace public landing page is used. Once a B2INST record has been accepted, its landing page can no longer be changed. With DataCite, the field is not sent to the registry, and the PIDINST ID always resolves to the RSpace public landing page. When you duplicate an Instrument, or create one from a template, the Landing page field starts empty.
Add geolocation information (ONLY DataCite)
For DataCite you can associate various geolocation data with each PIDINST ID, e.g. to describe the location of the instrument, or the reach of its sensors. The specification for how this data is captured is quite complex, so here's an overview.
Format options
First, each geolocation can be described using one or more methods: as a point, a description, a box, and/or a polygon.
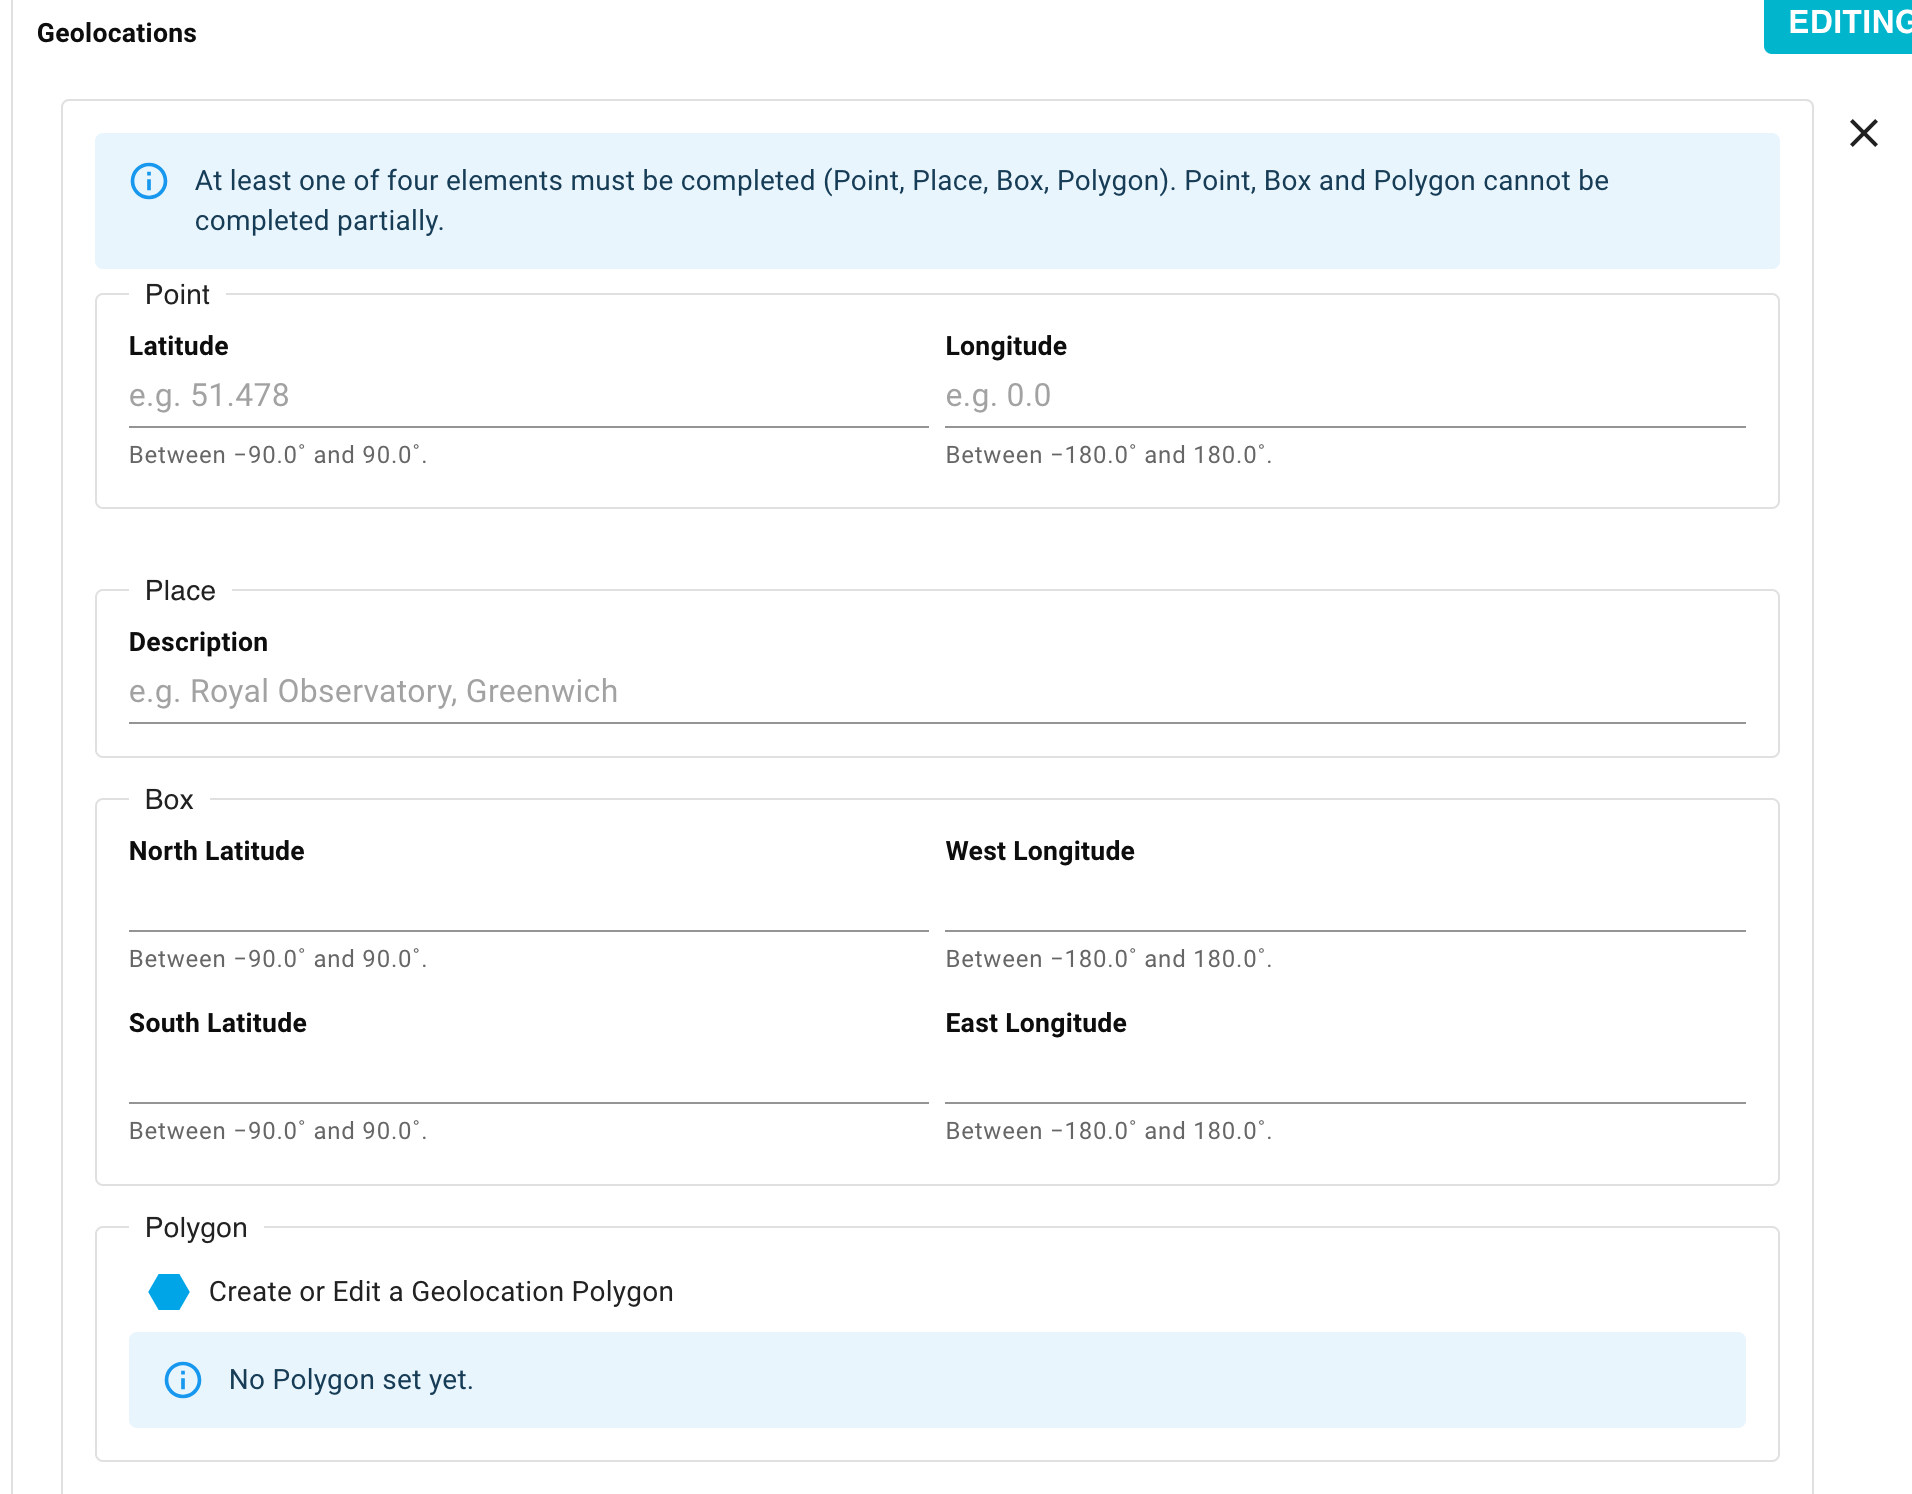
All longitudes and latitudes use decimal degrees rather than minutes and seconds, so any decimal value between -90.0 and 90.0 inclusively for latitudes, and -180.0 and 180.0 inclusively for longitudes, is valid.
- The point is a single longitude and latitude pair. Both values need to be set to define a point.
- The description is a textual description of the place. An instrument may be located at a particular site, with the site's location described by the other geolocation properties, while the address is included here.
- The box is a region defined by four bounds, in each of the cardinal directions. This is useful for describing approximate regions, again, using decimal degrees.
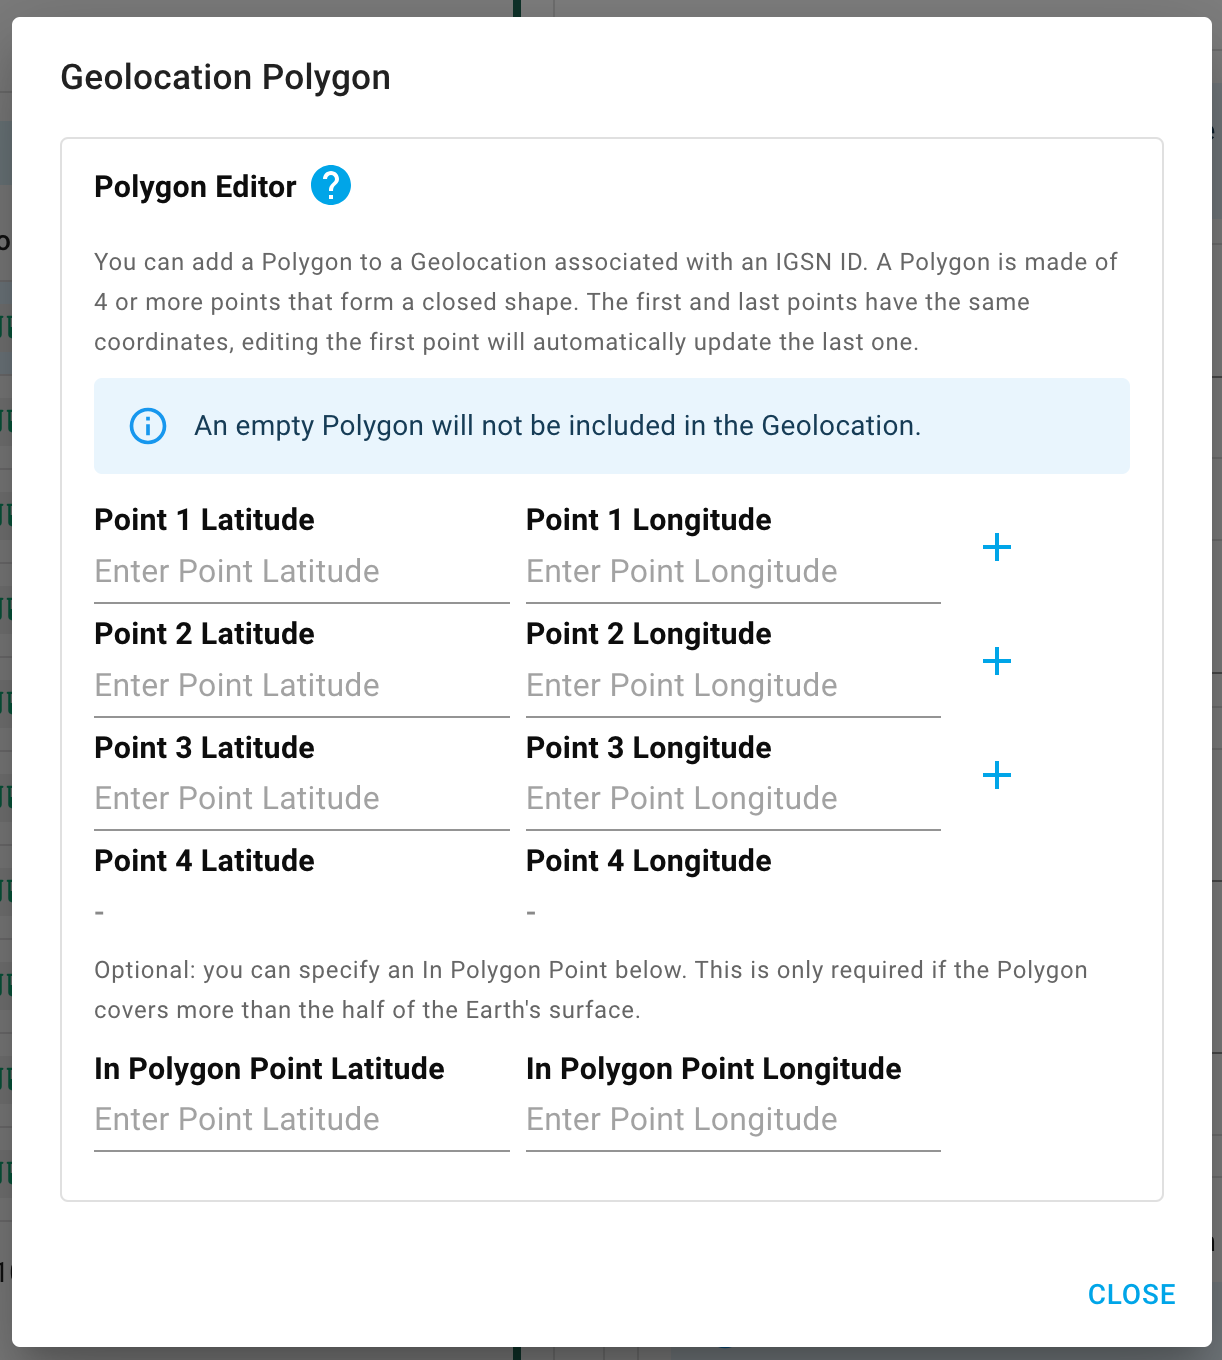
- The polygon method provides a mechanism for accurately describing a region based on a series of vertices. The first and last points are always the same, enclosing an area. For the avoidance of any ambiguity, an additional point within the enclosed region can also be specified, but this is only really necessary when it may not be obvious whether the region is the area inside the points, or the rest of the Earth.
Preview map
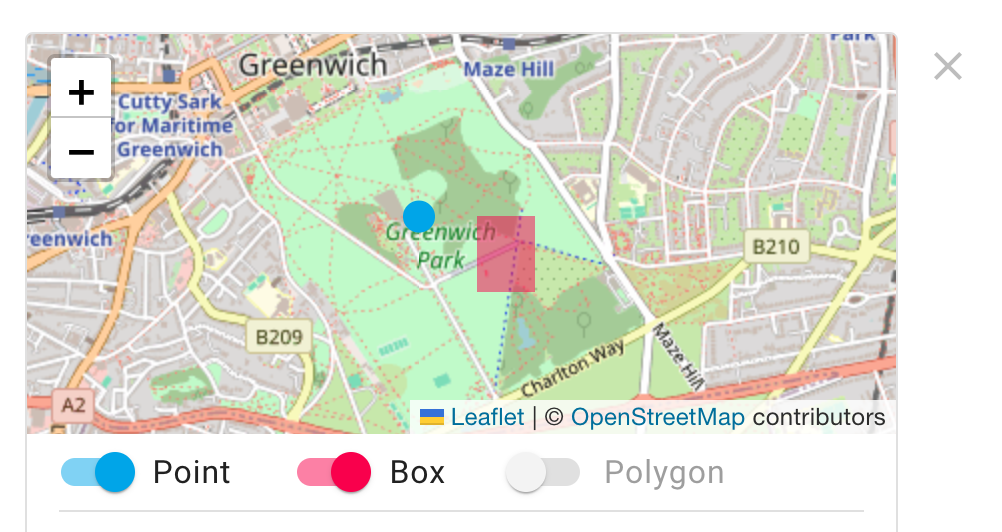
The point, box, and polygon are shown on a map both in Inventory and on the public page, alongside the numerical coordinates, to make it easier to visualise the location being described. Points are shown as a blue circle, with the precise point being at the circle's center. Boxes are shown as red rectangles, and the polygons are shown in orange.
The partial screenshot below shows a point at the Royal Observatory and a region of Greenwich park by means of a bounding box.
Note that you can pan the map by clicking and dragging, and use the plus and minus icons to zoom in/out. You can also temporarily toggle the visibility of various data on the map, by using the toggles below it (the selection resets once you refresh a page).
Publish geolocations
Each geolocation entry needs to be defined by at least one of these methods, but can also be described by all four. Multiple geolocation entries can be added to the same PIDINST, and the methods they use to describe a location can be different.
Whilst the Inventory item with the PIDINST can be saved at any time, if the geolocation data is invalid, e.g. a coordinate is missing or outside of the valid range, then the PIDINST cannot be published.
Include Instrument metadata
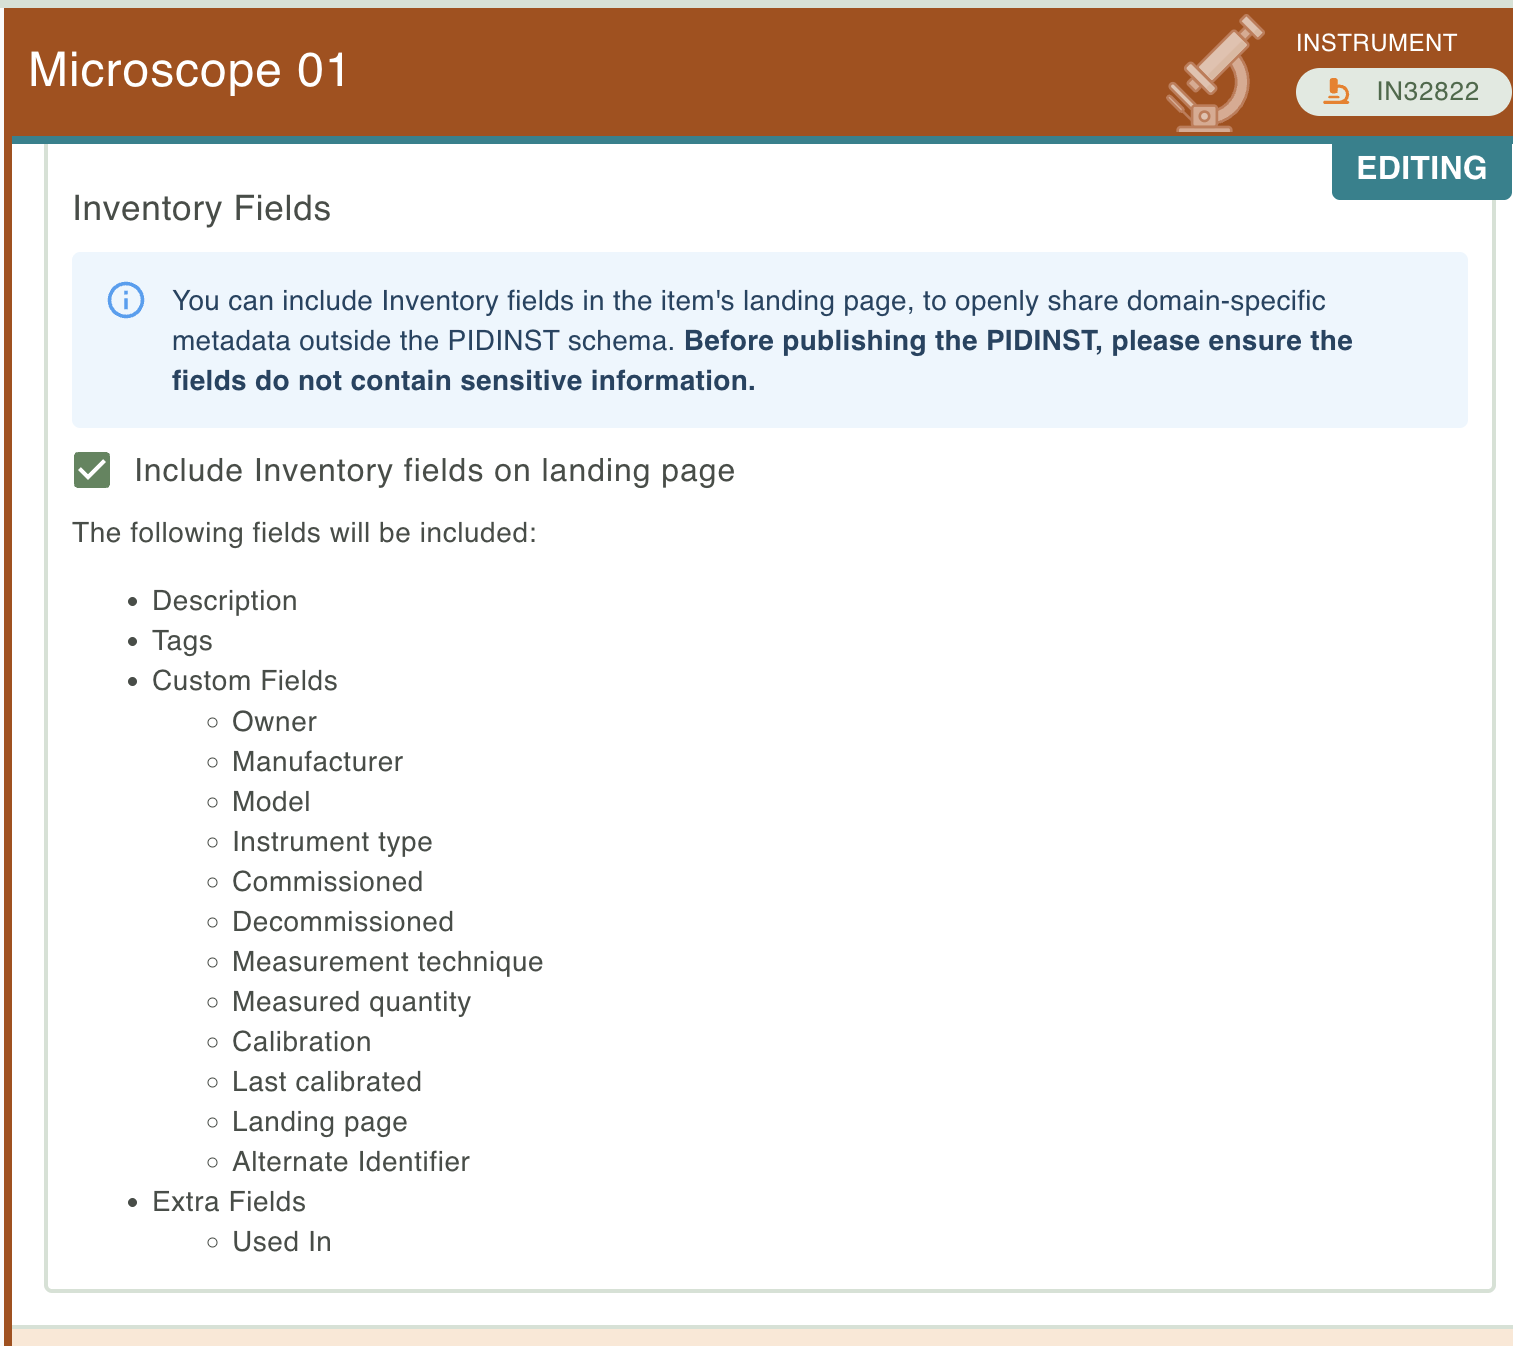
Various metadata associated with the Instrument, but not part of the PIDINST schema, can be included on the PIDINST landing page to provide a comprehensive, domain-specific record of the item. This includes description, tags, the custom fields as populated from the template, and any extra fields that have been added to the item.
- To include these fields on the public page, simply check the box labelled "Include Inventory fields on landing page".
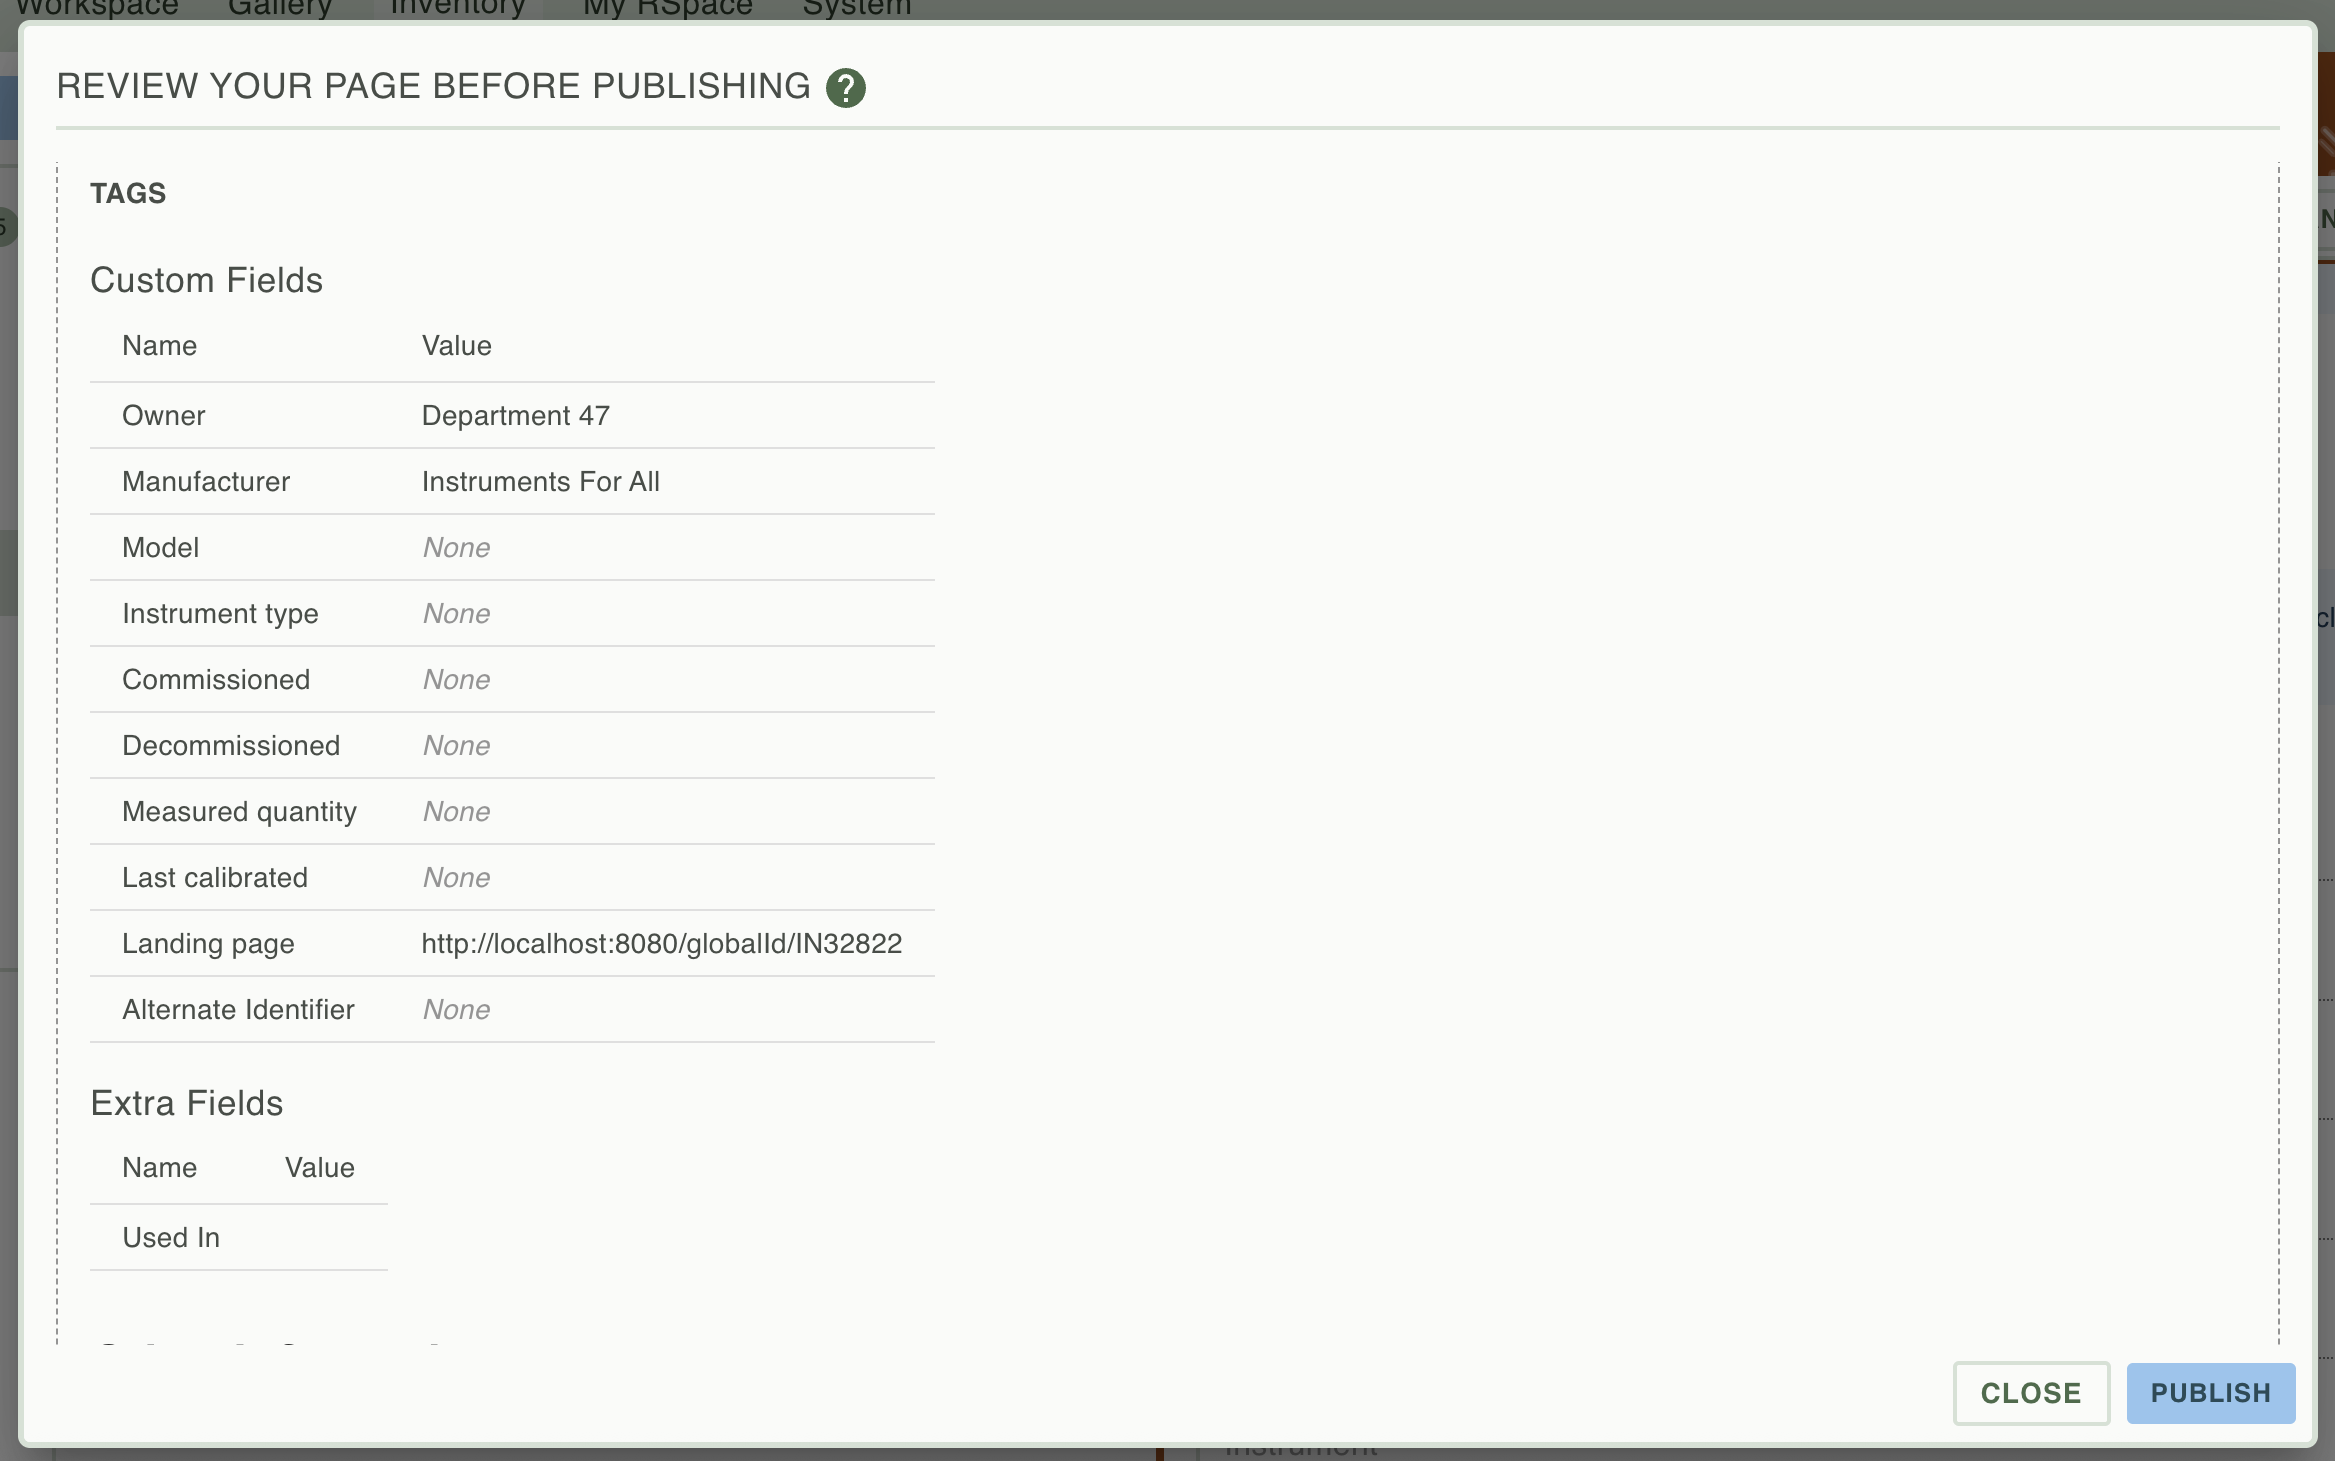
- Preview the updated landing page to make sure you are happy with the fields that will be made public, then save the Instrument. If the PIDINST ID is already published, the fields appear on the public landing page as soon as you save. Otherwise, they appear when the landing page goes live: with DataCite when you publish the PIDINST ID, and with B2INST when a curator has accepted it and you have pressed Refresh.
- Later changes to these fields do not appear on the public landing page straight away. With DataCite, republish the PIDINST ID to update the page. A B2INST PIDINST ID cannot be republished once it is Accepted, so to update its page, untick "Include Inventory fields on landing page" and save, then tick it again and save.
Publish a PIDINST ID
The publishing process for a PIDINST ID depends on whether your RSpace instance uses DataCite or B2INST as a registry.
See DataCite DOI States or the B2INST documentation for more information.
DataCite workflow overview
Publishing sets the PIDINST ID state to Findable on DataCite. The PIDINST ID and its metadata, alongside a landing page generated by RSpace, will be made publicly accessible through DataCite websites and their respective APIs. A persistent, citable PIDINST ID URL will be created, pointing to the landing page.
After publishing, the PIDINST ID cannot be returned to a Draft state. Changing the state to Registered (retracting the record) still keeps the metadata visible via the DataCite Member API.
B2INST workflow overview
The publishing process depends on the B2INST community your RSpace instance is publishing to. The community setup determines whether further curation steps are involved to publish your Instruments. Please contact your administrator for further details on the process used at your institution.
For rspace-community B2INST community, a newly created PIDINST ID will be in a Draft state.
Field values from the default instrument template are mapped to specific B2INST fields. Until the PIDINST ID is Accepted, saving the Instrument sends the latest template field values to B2INST. You can duplicate the template to add additional metadata about the instrument, but for the mapping to work, the fields from the default template must be present.
The Measurement technique and Calibration links are sent to the registry as the address of the linked item's page in RSpace, which only signed-in users who can see that item can open. If a link is pinned to a version, that version is sent. A link is left out if its item has been deleted, or if the Instrument's owner cannot see it.
If you publish a PIDINST ID, it will change to a Submitted state; the PIDINST ID needs to be reviewed and accepted on the B2INST portal by a community curator.
RSpace does not check for the curator's decision automatically: press Refresh in the Identifiers section to fetch the latest status of the identifier from B2INST. Once the status is Accepted, the identifier is published and the landing page is available.
Once the PIDINST ID is Accepted, it cannot be amended anymore from RSpace. Metadata changes made on RSpace's side cannot be sent to update the B2INST entry anymore.
These are the states a B2INST PIDINST ID can show in RSpace, and what you can do in each:
- Draft: registered at B2INST but not yet sent for review; nothing is public. You can edit and save the Instrument (the metadata is sent to B2INST), Publish, Delete or Refresh.
- Created: a review request exists but has not been submitted to the community yet. Press Publish to submit it.
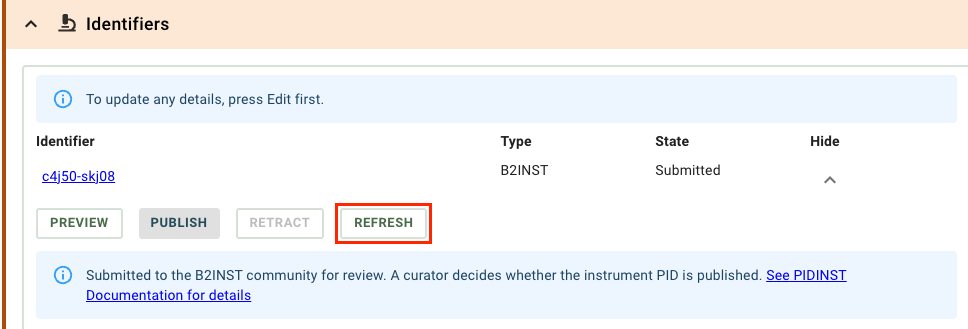
- Submitted: awaiting a curator's decision; there is nothing for you to do yet. Publish is disabled; press Refresh to check the outcome. Saving the Instrument still updates the B2INST draft.
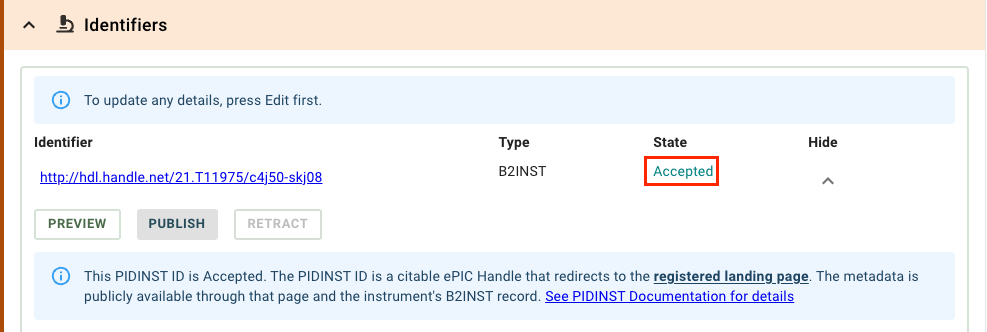
- Accepted: published. The PIDINST ID is a citable ePIC Handle that redirects to the registered landing page. Metadata changes can no longer be sent from RSpace, and the PIDINST ID cannot be retracted or deleted.
- Declined: the community declined the submission. Delete the identifier and register a new one.
- Cancelled: the submission was cancelled before review. Delete the identifier and register a new one.
- Expired: the submission expired before it was reviewed. Delete the identifier and register a new one.
Publish a PIDINST ID in DataCite
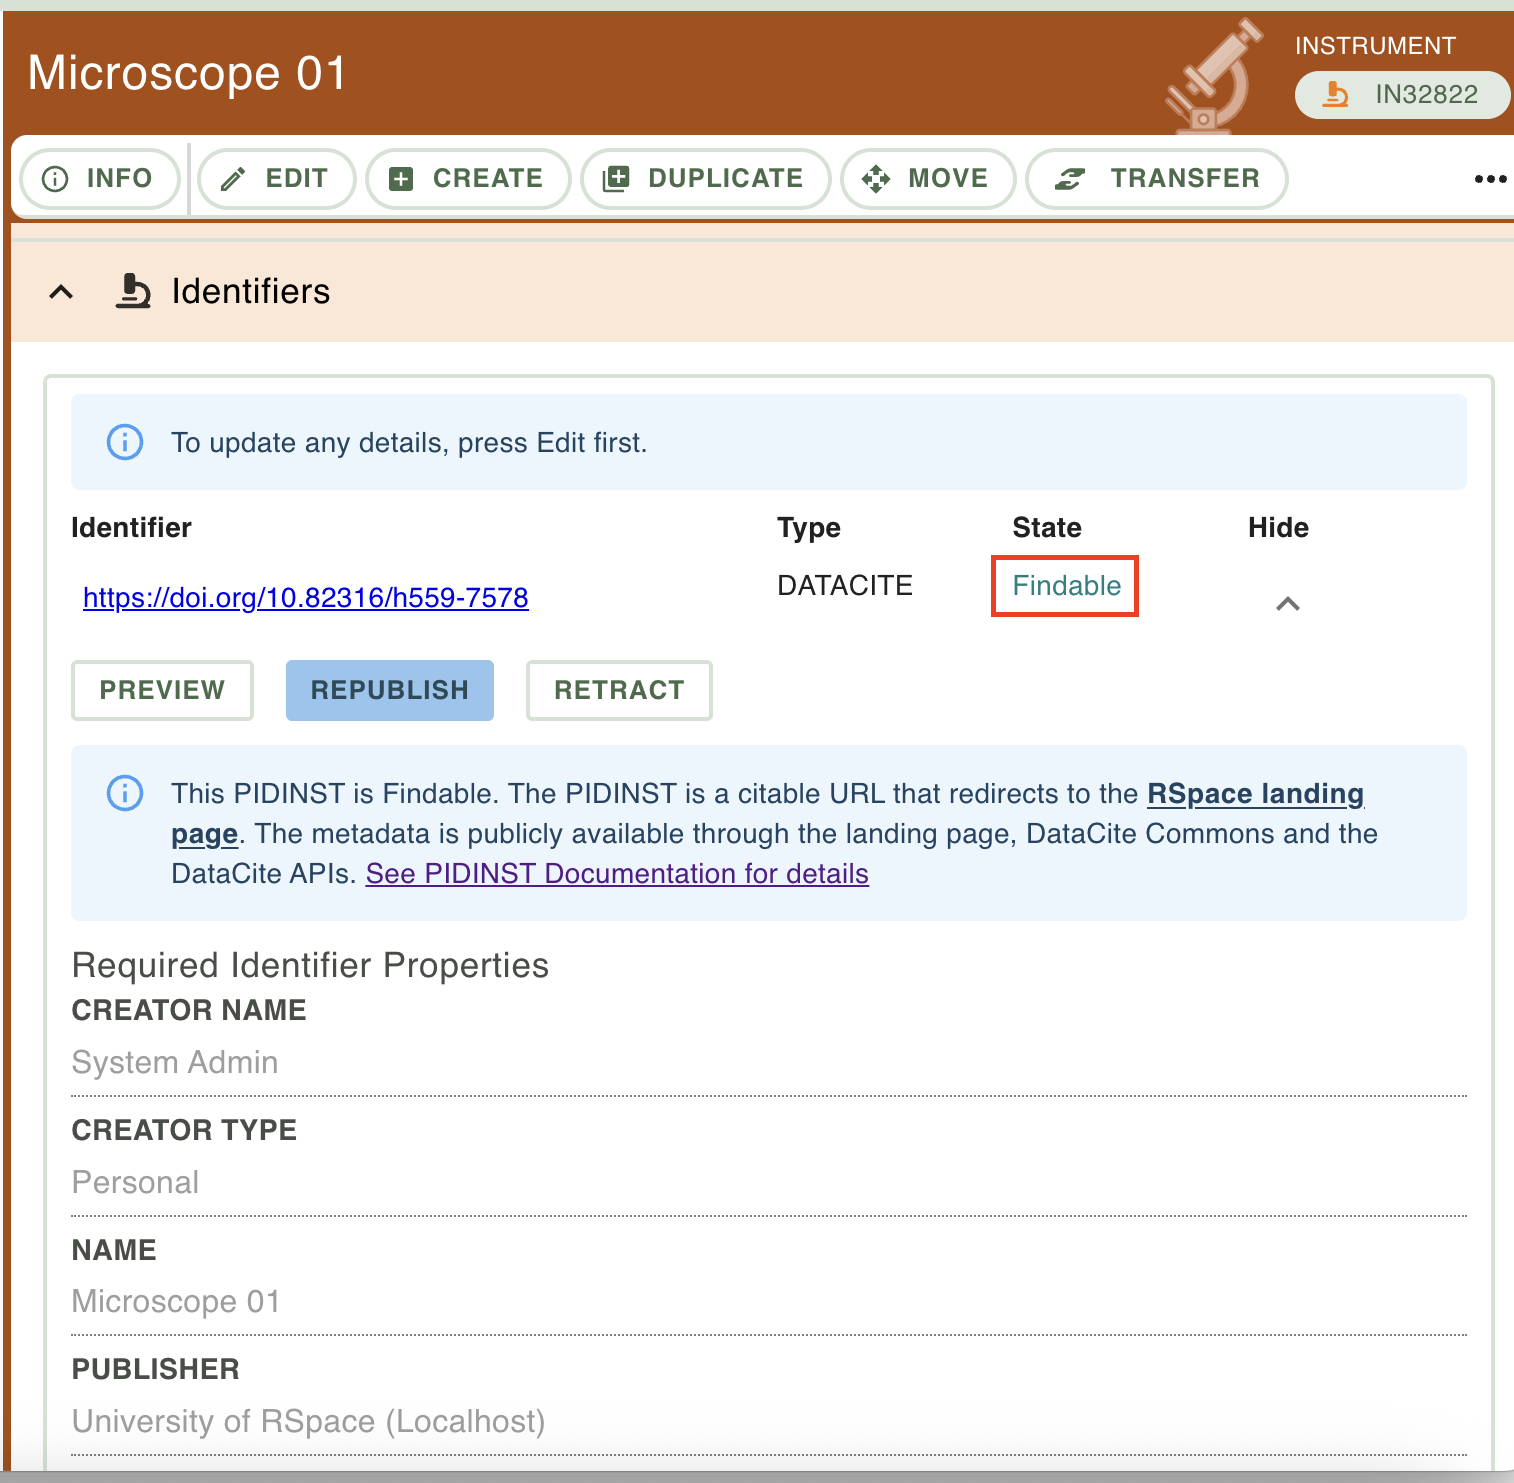
- Click on Publish in the Identifiers section. The button is only enabled if all required fields are filled in.
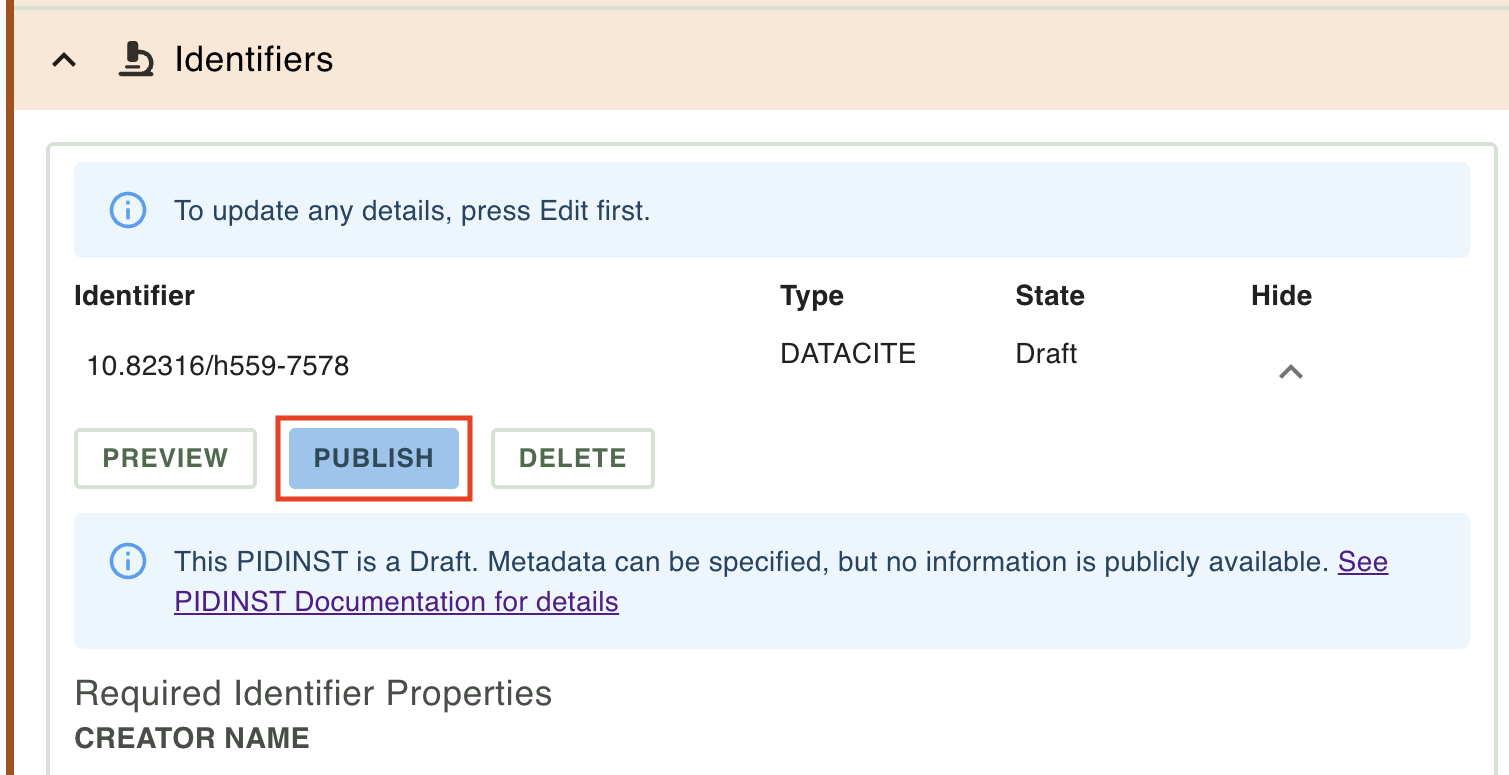
- The state of the PIDINST ID changes to Findable. A persistent and public landing page is generated and hosted by RSpace. The PIDINST ID redirects to this landing page, providing a stable URL that can be used to share and reference this item.
Publish a PIDINST ID in B2INST
- Click on Publish in the Identifiers section
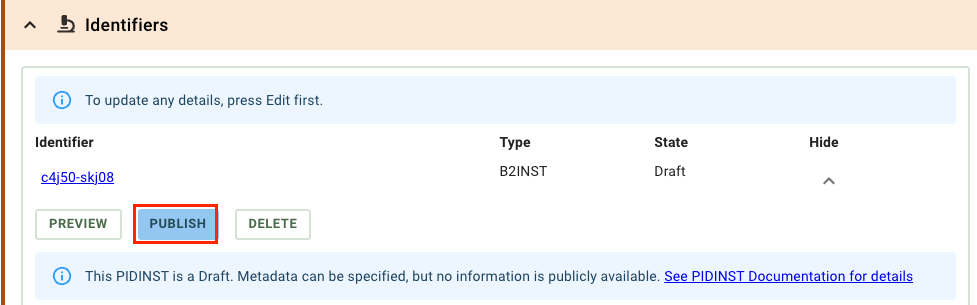
- The state of the PIDINST ID changes to Submitted, and Publish is disabled while the community reviews the record. Press Refresh to check the outcome.
- Once a B2INST community curator accepts the submission and you press Refresh, the state of the PIDINST ID changes to Accepted. A persistent and public landing page is generated and hosted by RSpace. The PIDINST ID redirects to this landing page, providing a stable URL that can be used to share and reference this item.
- If the curator declines the submission, Refresh shows Declined with an explanation. Delete the identifier to register a new one.
Add PIDINST IDs to Dataverse export metadata
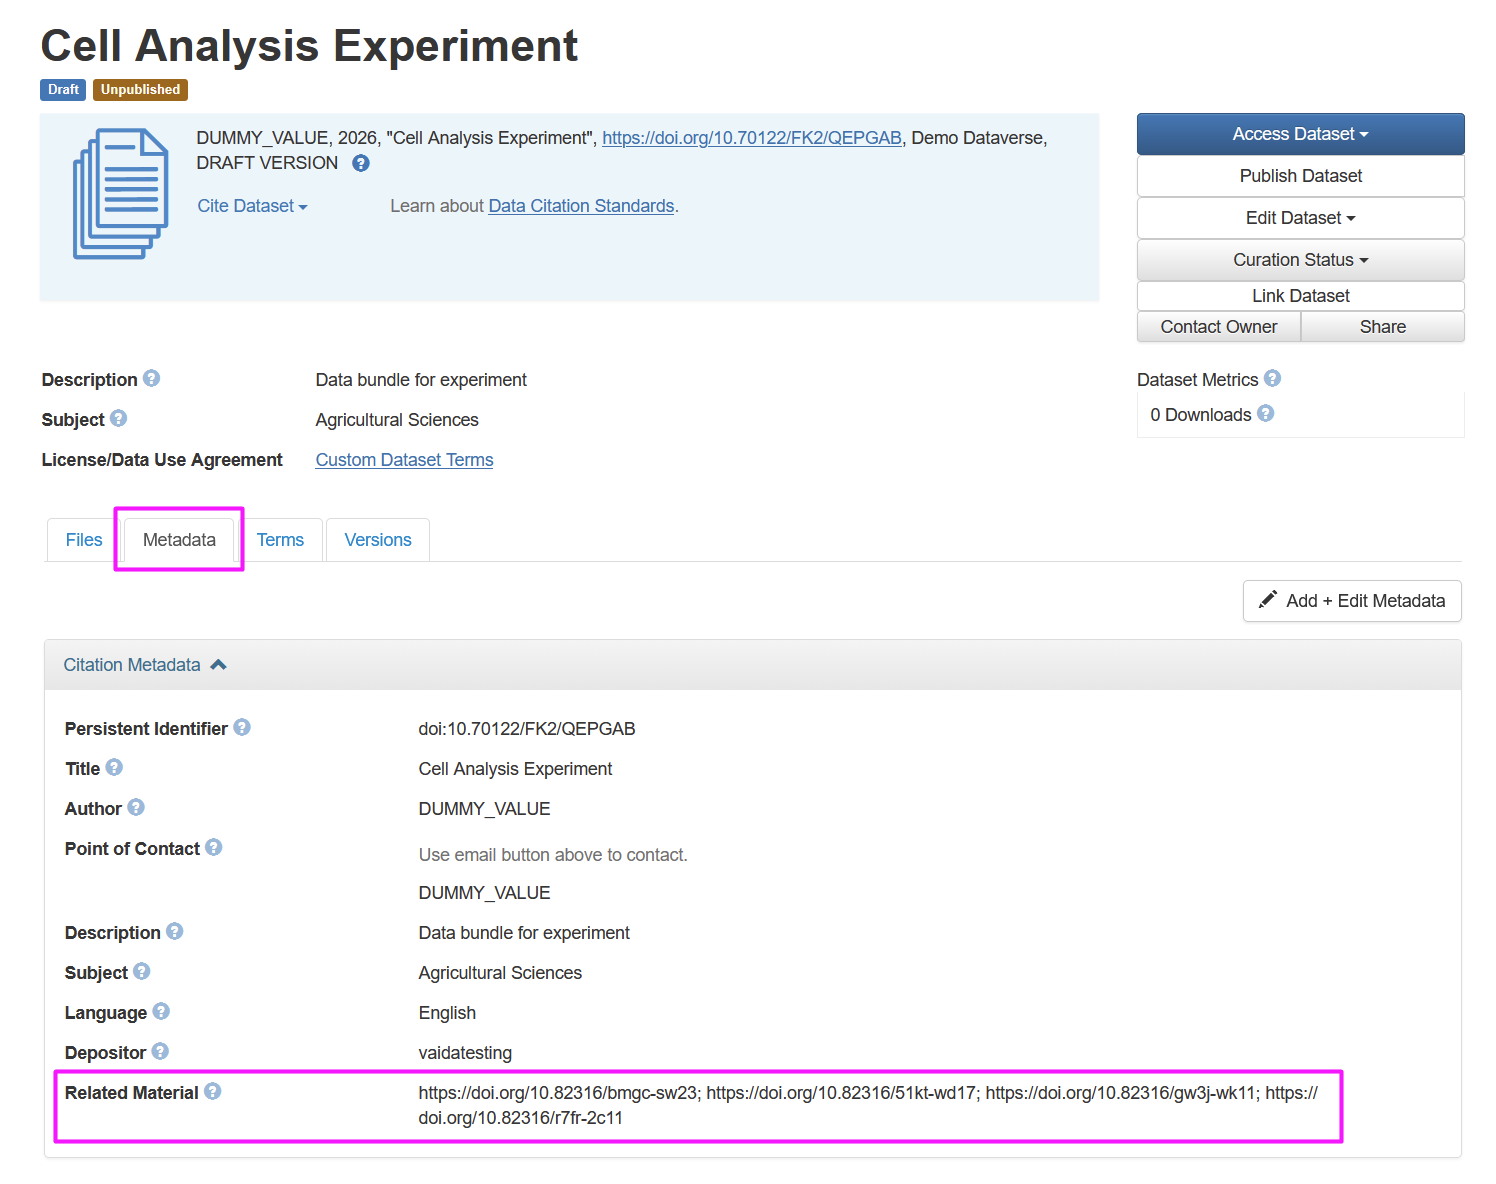
When you export your research data from RSpace to Dataverse, the PIDINST IDs of associated instruments will be automatically included in the Dataverse dataset metadata as Related Materials. This enables reviewers, collaborators, and future researchers to easily access the authoritative instrument information from the Dataverse dataset page. PIDINST IDs linked to an Instrument by importing it from a PIDINST registry are included too.
The following process ensures PIDINST IDs are added to the Dataverse export metadata:
- Ensure you've got a Dataverse Integration set up.
- Add PIDINST IDs to relevant Instruments.
- Attach those Instruments to documents using a List of Materials, which is used to keep track of Inventory items used during experiments.
- When you are ready to export your research, select those documents and export them to Dataverse in a format of your choice.During the export setup, you can increase the depth of linked documents that get included in the export. Any PIDINST IDs in the Lists of Materials of those linked documents will be included in the export metadata as well.
- The Dataverse export's metadata panel will display a full list of PIDINST IDs associated with the export. This list includes all Instruments with PIDINST IDs that were present in Lists of Materials of the exported documents.
Update a PIDINST ID
PIDINST ID metadata changes you make in RSpace are not made public until you publish or republish. Saving the Instrument still updates the registry's non-public draft copy; see the Keep the registry record up to date section below. We recommend only updating a PIDINST ID to provide additional metadata, or to correct any errors.
If the item has been modified significantly enough to exhibit different properties, you need to decide whether it is important for you that a PIDINST ID always points to a specific version of the item, e.g. if the PIDINST ID is going to be referenced in a paper. If so, we recommend creating a separate item in RSpace, assigning it a new PIDINST ID, and clearly indicating the link between the historical and new item in their metadata. Duplicating an Instrument does not copy its PIDINST ID: the copy starts without one, and its Landing page field is empty.
To update a Findable DataCite PIDINST ID:
- Make required changes to the PIDINST ID metadata fields
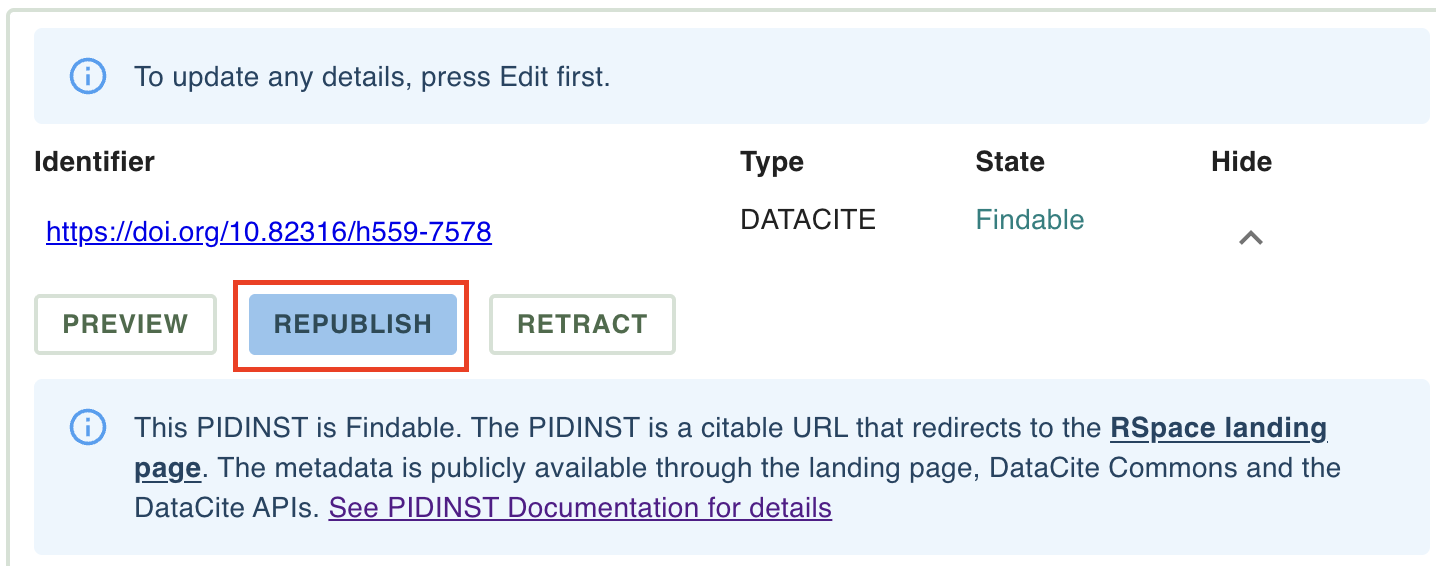
- Click on Republish
- The landing page will now reflect the latest version of the metadata
An Accepted B2INST PIDINST ID cannot be republished from RSpace.
Keep the registry record up to date
When you save an Instrument that has a PIDINST ID, RSpace sends the Instrument's current metadata to the registry, as long as the registry record can still be changed:
- DataCite: only while the PIDINST ID is a Draft. For a Findable PIDINST ID, use Republish.
- B2INST: in every state except Accepted.
Nothing is sent for a PIDINST ID that was imported from a registry and linked to the Instrument. Your Instrument is always saved, whatever the registry answers, and each attempt is recorded in the audit trail.
After saving, RSpace tells you if the registry record was not updated:
- No extra message: the registry record was updated. Nothing to do.
- Error: "Instrument PID not updated": the registry could not be reached, or rejected the update. The Instrument itself was saved, so saving it again later will try the update once more. If it keeps failing, contact your System Administrator.
- Information: "Instrument PID left unchanged": this is expected when the registry record is closed to changes, that is an Accepted B2INST record or a DataCite PIDINST ID that is no longer a Draft. For DataCite, use Republish to send the current metadata. An Accepted B2INST record cannot be changed from RSpace.
Transferring an Instrument to a new owner also updates the registry record, because the owner is part of the PIDINST metadata. The new owner sees the outcome; the previous owner does not, as they no longer see the identifier.
Delete a PIDINST ID
Deleting removes the PIDINST ID and its association with this item.
You can delete a PIDINST ID that is:
- a Draft, at either registry, or
- a B2INST PIDINST ID whose review ended without publication: Declined, Cancelled or Expired. Deleting it is how you clear a failed submission so you can register a new one.
To delete a PIDINST ID:
- Click on Delete in the Identifiers section.
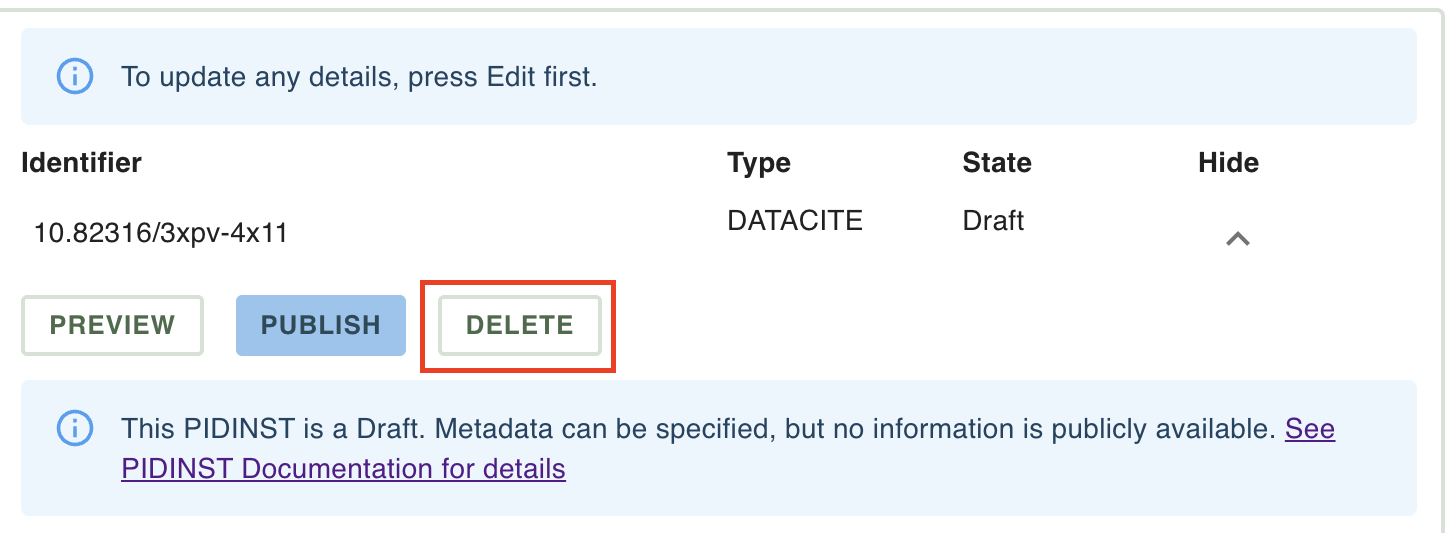
- The PIDINST ID is deleted and removed from the section.
A new Draft PIDINST ID can be created and associated with the item in the future, whether the item had a Draft PIDINST ID previously or not. However, only one PIDINST ID can be associated with an item at any one time.Deleting a PIDINST ID also removes all metadata you might have filled in, therefore we recommend only deleting a PIDINST ID if you are confident this item will not require one for the time being.
Retract a PIDINST ID
Retract is available for DataCite PIDINST IDs only. Click on Retract to change a Findable PIDINST ID into a Registered PIDINST ID. This removes the PIDINST ID from DataCite Commons and the public DataCite API, and the landing page no longer displays any metadata. Keep in mind that DataCite members can still access historical metadata about the item through the Member API.
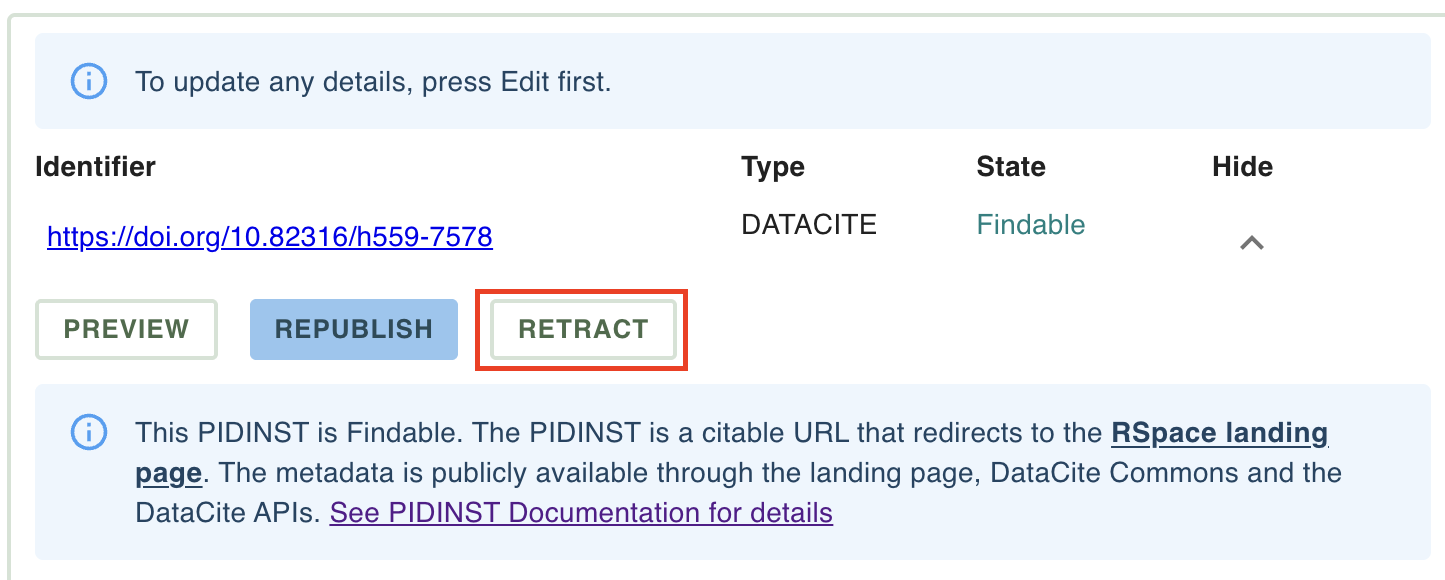
If you wish to have the instrument be public again, you can Republish it to turn it back to Findable.
Delete an Instrument that has a PIDINST ID
Moving an Instrument to the trash also removes its PIDINST ID from it, so the PID is free to be registered or imported again, for this Instrument or another one. Trashing several Instruments at once works the same way.
- Nothing changes at the registry. A published DOI or Handle keeps resolving.
- For a PIDINST ID that RSpace registered and published, the RSpace landing page stops being available as soon as the Instrument is trashed, so the DOI will point at a page that no longer answers. If you want a DataCite PIDINST ID to stop being discoverable, Retract it before trashing the Instrument.
- Restoring the Instrument from the trash does not bring its PIDINST ID back. Register or import one again if you need it.
How did we do?
Samples vs Subsamples 🧪
Examining the history of any Inventory item using the ELN audit trail 🧪