Table of Contents
- Basic individual organization in an individual's own workspace
- Locating the shared folder for a LabGroup
- Examples of sharing scenarios and project organization
- 1. Using sub-folders or shared notebooks within the main LabGroup sharing folder to define a project
- 2. Using a separate LabGroup to define a project
- If a PI needs tighter control of access, especially when their lab includes guests, rotation students or researchers who belong to more than one LabGroup
- 3. Using a Collaboration Group to define a project
- 4. Using a Project Group to define a project
Examples of Sharing Scenarios and Project Organization
Here are some examples of how individuals and groups can organize their data, both within their Workspace and within the Shared folder.
- Basic individual organization in an individual's own workspace
- Locating the shared folder for a LabGroup
- Examples of sharing scenarios and project organization
- 1. Using sub-folders or shared notebooks within the main LabGroup sharing folder to define a project
- 2. Using a separate LabGroup to define a project
- If a PI needs tighter control of access, especially when their lab includes guests, rotation students or researchers who belong to more than one LabGroup
- 3. Using a Collaboration Group to define a project
- 4. Using a Project Group to define a project
Here are some examples of how individuals and groups can organise their data. You can read more about how to share at Sharing Content.
Basic individual organization in an individual's own workspace
Individual RSpace documents are arranged in each user’s own Workspace and can be manually organised by that user into folders and/or Notebooks. Project separation and organizational structure here is defined by the folder and notebook hierarchy and enforced entirely by the owner. A typical strategy is for top-level folders to represent projects, and within that folder, a user might place one or more notebooks, plus other sub-folders or RSpace documents as needed. If a user moves to a new lab, or exports all their data in XML format, then imports it to a new RSpace server, the individual user's organizational structure of work in their own Workspace is unaffected.
The example below shows a user who has two main project folders they created in their Workspace shown in "List View". The folder "robert41 PHD work" contains three Notebooks and an RSpace document.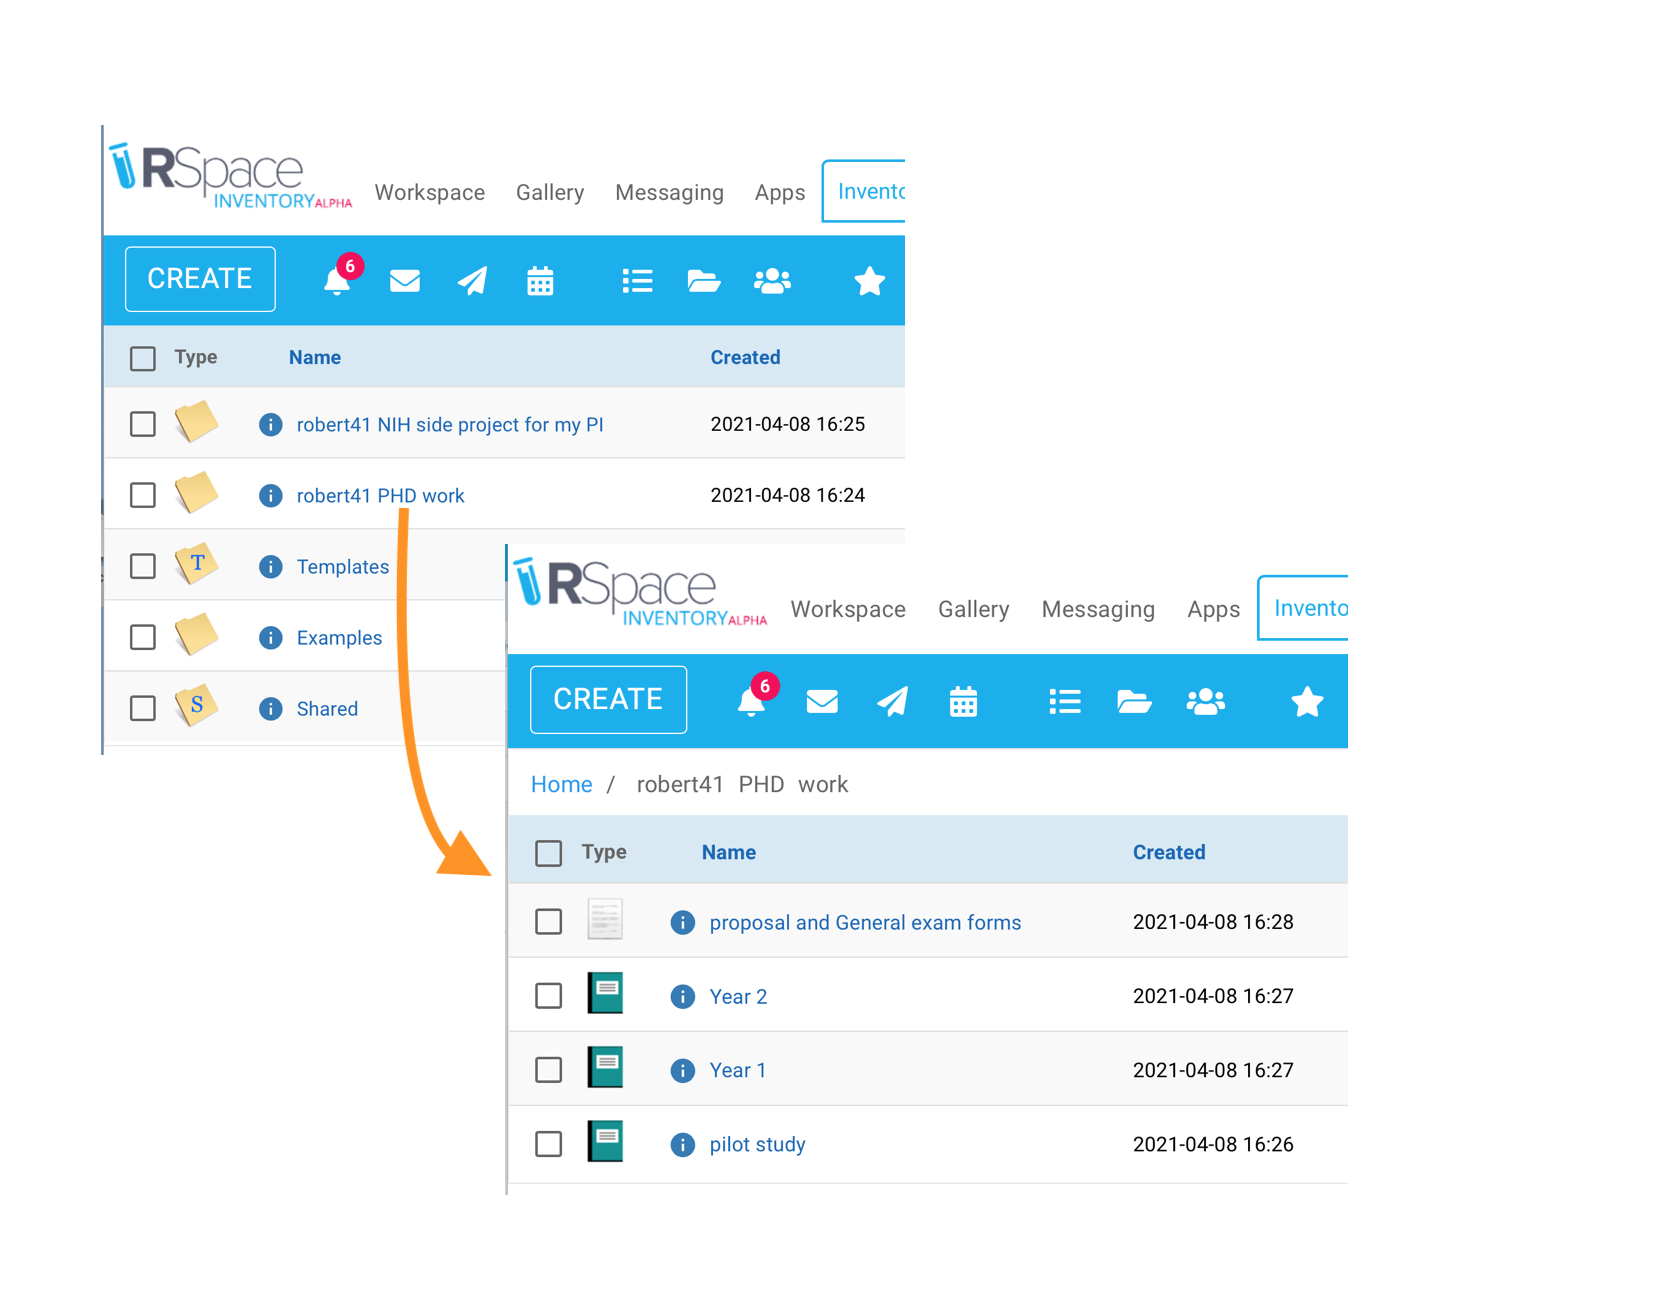
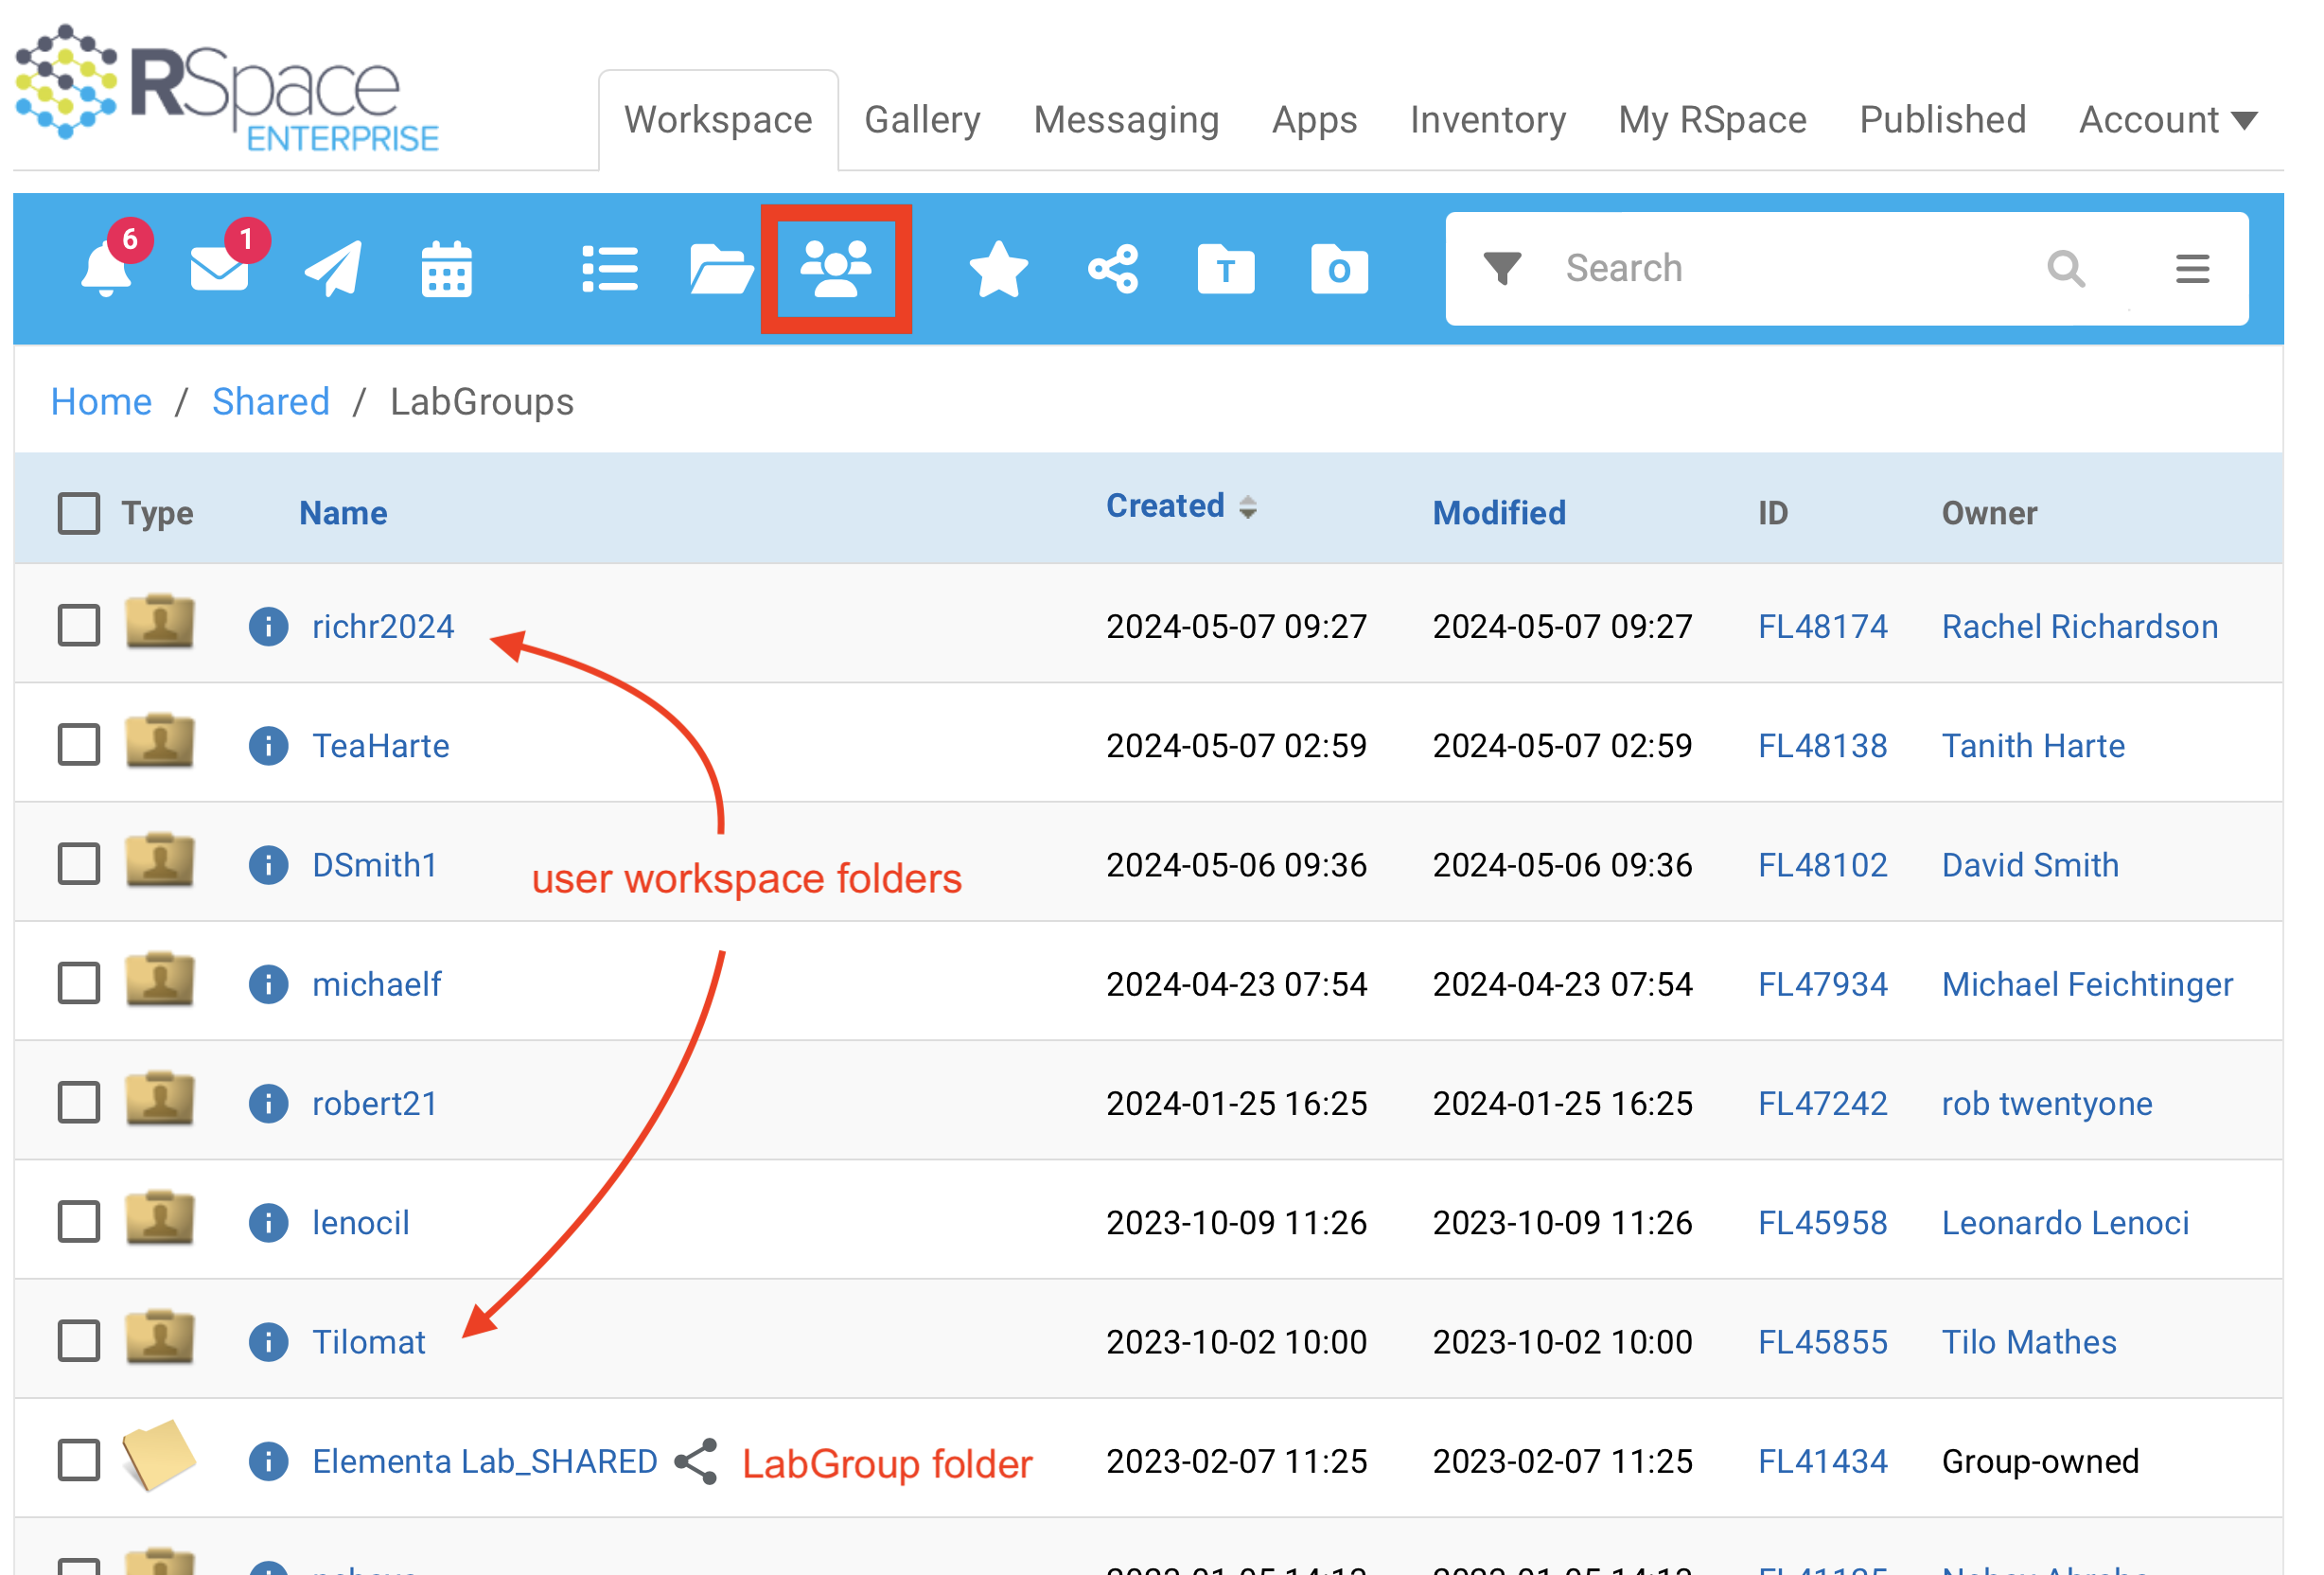
Only the owner, the owner's PI, a properly authorized LabAdmin with view permission (assigned by the PI) and the system admin(s) can directly view a user's Workspace by default. PIs and LabAdmins can view the user's Workspace by going into Labgroup records, which contains the Workspace folders of each LabGroup member, plus the main sharing folder for each LabGroup. Standard users see ONLY the shared LabGroup folders on this page.
Locating the shared folder for a LabGroup
The main LabGroup Sharing folders contain:
- Work shared manually from each user in the group, or
- All work, automatically shared using the autoshare feature
In the main LabGroup sharing folder, documents can be created or shared into new or existing folders by any user in the LabGroup, with the owner’s choice of either “read” or “edit” access, but documents can be only moved between folders or deleted by the PI or designated LabAdmins. This feature is designed to make sure that PIs have ultimate control of the organization of data that may span their entire career even as different students or technicians come and go from the lab over time. Note that the PI can designate as many LabAdmins as they like.
Users can also choose to share entire Notebooks into shared folders, and other users can then contribute to those Notebooks by either: 1) Creating new documents in their own workspace and sharing into the target Notebook or 2) Creating new shared documents directly within a shared location is also now possible. This will automatically generate a second link to that item in the owner's Workspace. ALL shared items exist as two or more links. One in the shared location, one in the owner's Workspace. 3) Editing existing documents in the target Notebook or folder if the user has edit permission. There are however some restrictions on whether or not documents in Notebooks can later be moved. Generally only a user who is both the owner of the owner of the Notebook and the owner of the target doccument can move items out of a notebook. All other documents will have to be unshared by the owner, and then reshared to the new location.
Project separation and organization in the main LabGroup_SHARED folder is enforced mainly by the folder/Notebook structure defined and enforced by the PI or by designated LabAdmins. All users who are members of the main LabGroup can access all folders and Notebooks in the main shared folder. For a lab with an open culture, the PI might choose to turn on autosharing for all members, so that all work performed in the lab is automatically added to the shared folder, specifically into a named top-level subfolder for each user in the group, with all work accessible to all lab members. If you or your lab uses Autosharing it is important to be certain of the name of primary, top level folder that your work is sent to by default. If your PI generated the name of that folder, you may need to check with them to be sure you can locate it. You won't be able to easily find your autoshared work unless you know what folder it has been autoshared to.
In the example below we see how the user "robert41" can access the main sharing folder for the LabGroup they belong to called "Pione", shown in "List View".
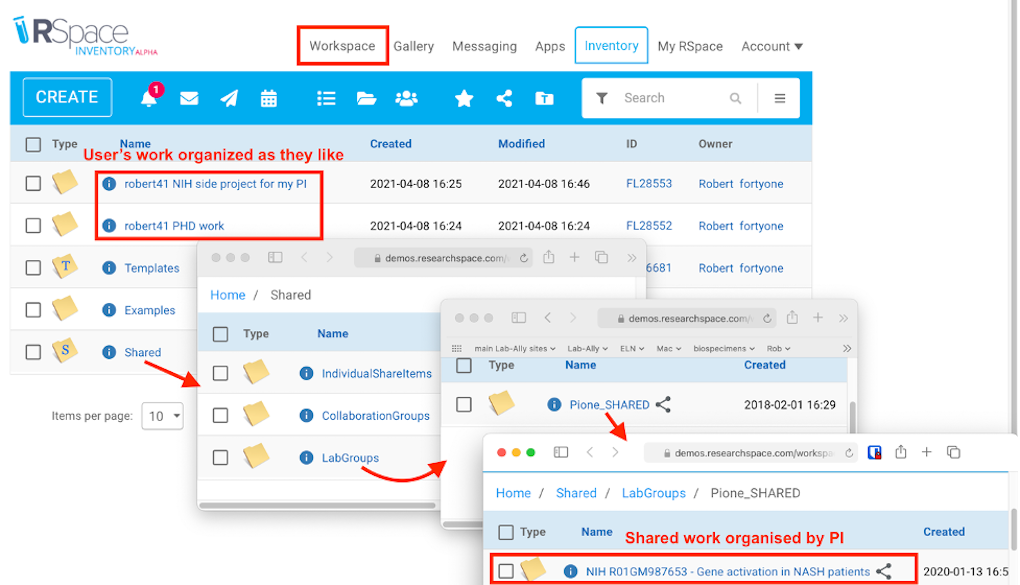
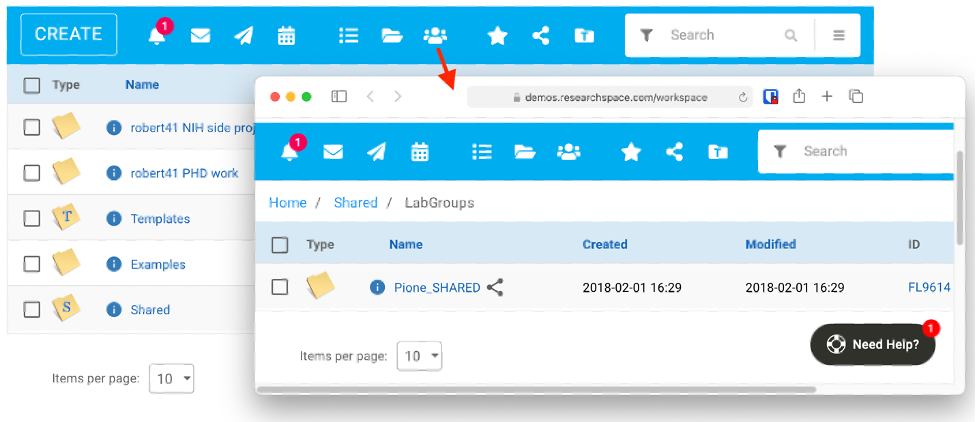
LabGroup members can also access the same shared folder from the "LabGroup Records" shortcut as seen in "List View":
In RSpace version 1.90 or higher you can also reach the main shared folder for each group by clicking the shared folder link on the Group Details page (image below).
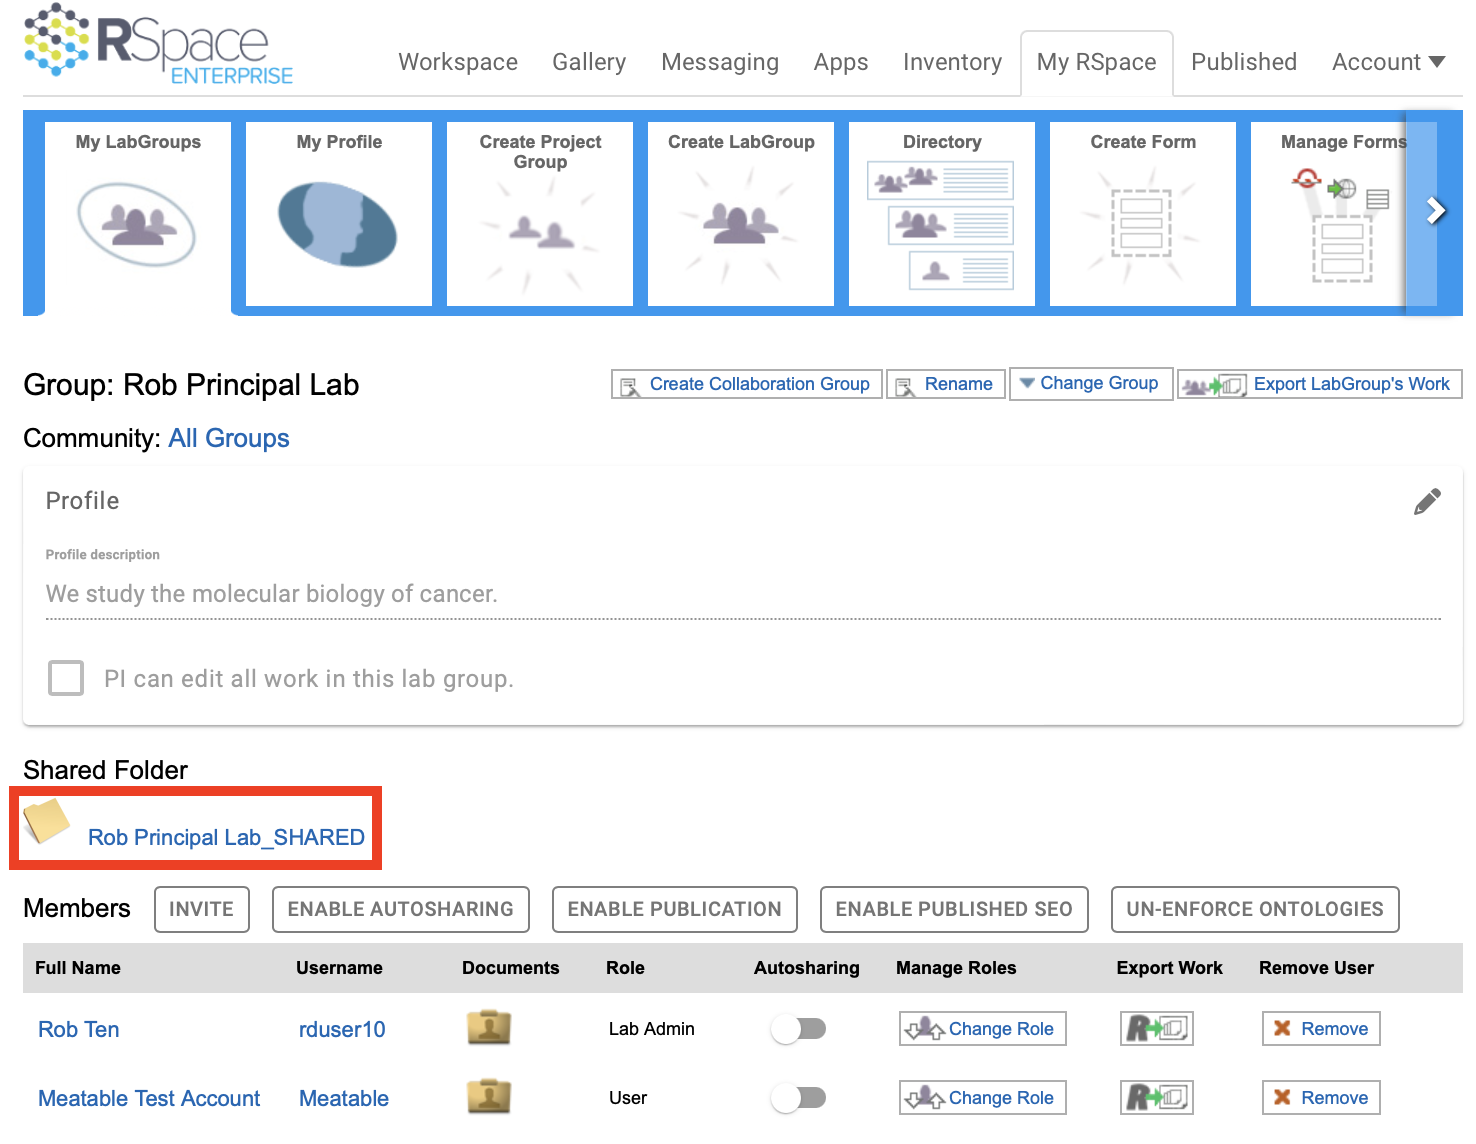
• Users and PIs who are not members of the LabGroup called "Pione" cannot access this shared folder or its content.
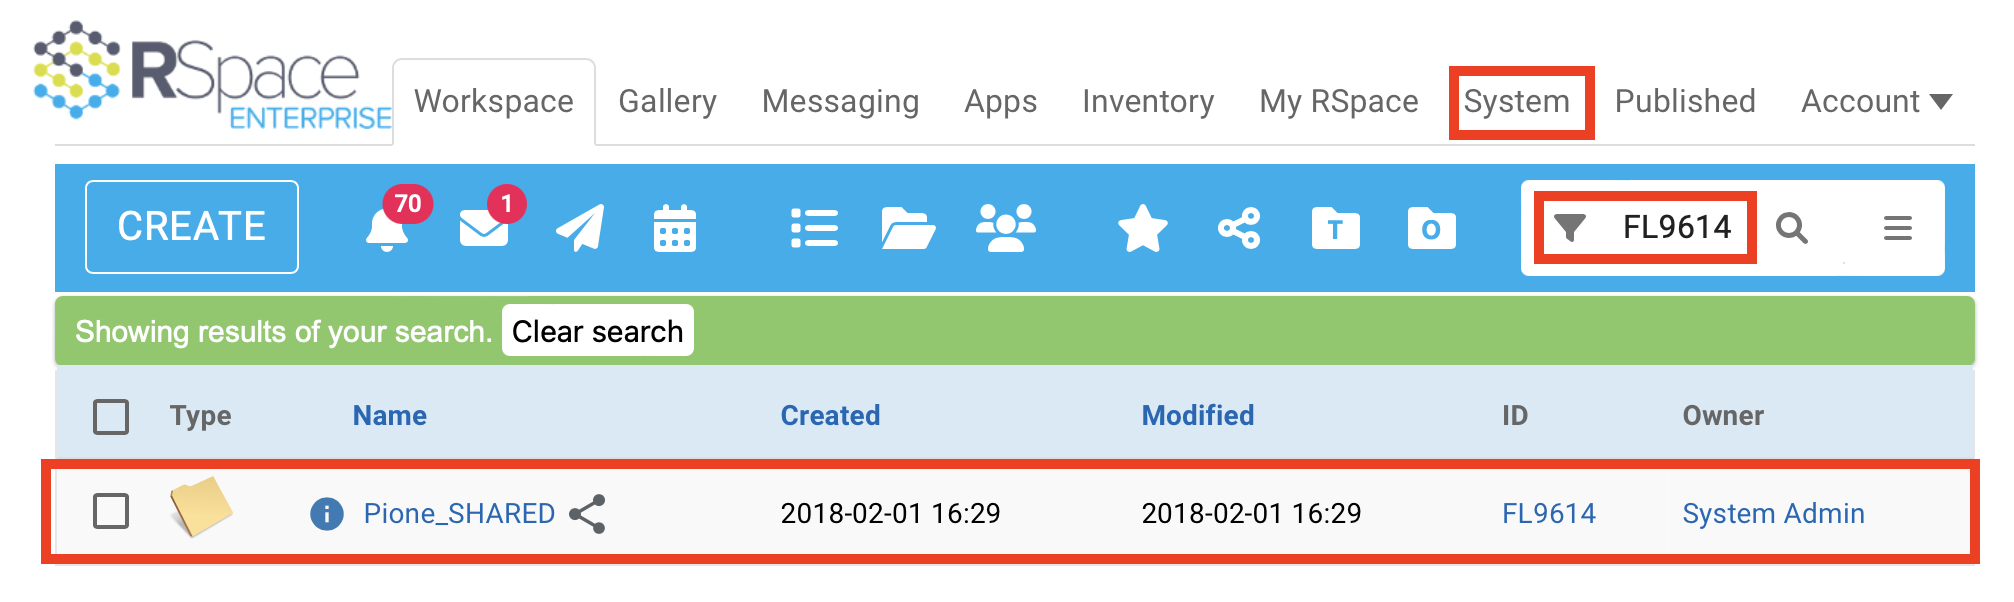
• Your RSpace System Admin CAN access this folder (even though they are not a member of this LabGroup) by searching for it based on its RSpace ID number or exact name:
Examples of sharing scenarios and project organization
• In RSpace, access to documents and notebooks is controlled by LabGroup membership. If you don't belong to a particular LabGroup, you will not be able to see the shared folder for that LabGroup. If you don't belong to ANY LabGroups, you cannot share anything with anyone, nobody else except your RSpace system admin can see your data, and the "Share" button will not appear in your toolbar. This can be useful if a user needs to work in isolation from other users, but most of the time, most users will belong to one or more groups.
• Users can belong to a single LabGroup or to many LabGroups. PIs may lead a single LabGroup, or may lead many LabGroups
• A LabGroup can only have one PI but the PI can be changed, and the PI can grant the role of "LabAdmin with view all permission" (also called a Senior Lab Admin). In practice this role has the same capabilities a PI and might also be called a "deputy PI".
• Your organization can create LabGroups that are arranged as a flat list of non-intersecting sets of users, or concentric nested subgroups, or more complex Venn diagrams. Clever arrangement of LabGroups allows organizations to control access to data very precisely.
• Your server can be configured to allow ONLY the System Admin to create new LabGroups or the server can be configured to allow PIs to make new LabGroups without assistance from the System Admin. The server can also be configured to let anyone make new Project Groups.
• LabGroups can represent permanent associations of scientists who always work together, or they may also represent temporary groupings associated with short-term projects and temporary collaborations. LabGroups can be easily created and dispanded by the System Admin.
• In addition to standard LabGroups you can belong to Collaboration Groups which allow for collaboration between users who are not in the same LabGroup, with affected PIs having full knowledge of what is being shared.
1. Using sub-folders or shared notebooks within the main LabGroup sharing folder to define a project
Let's look at what happens when a user wants to make a specific experiment they performed accessible to others using manual sharing. In this case, the experiment is part of a collaborative project called "NIH R01GM987653 - Gene activation in NASH patients".
The image below shows what robert41 sees in their own Workspace using “Tree View". There are 2 main project folders: The first contains a single RSpace document “experiment1”, and the second contains robert41’s PhD research, with 3 Notebooks used to record progress. Only robert41 and his PI can see Robert41’s Workspace by default. The PI in this group has opted not to turn on autosharing, but has asked robert41 to make “experiment1” accessible to other lab members via manual sharing (orange arrow).
When robert41 shares “experiment1” with the LabGroup “Pione”, RSpace does not "move" anything. Instead, it creates a new link (also called a shortcut or alias) to that document and places it in a designated shared Notebook "First 4 trials assigned to grad students" created by Pione. The RSpace document “experiment1” can now be accessed in two locations – one managed by robert41 in their Workspace (top) and the other managed by the PI in the Pione_SHARED folder (below). All users in the LabGroup “Pione” can access "First 4 trials assigned to grad students" and “experiment1”, as well as the related experiments 2, 3 and 4 which were contributed to the same shared Notebook by other users. In the image below the user has selected "Tree View".

Users with appropriate access can also examine the shared Notebook “First 4 trials assigned to grad students" in "List View" to see the following:
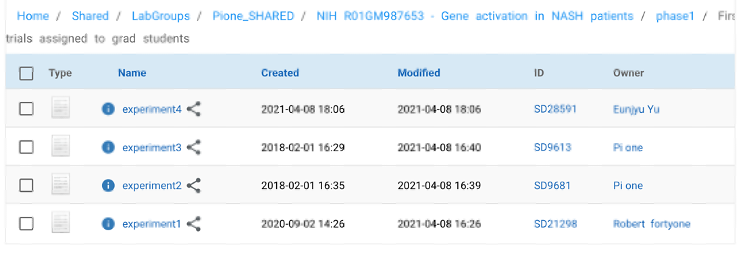
Note that in this view, ALL members of the LabGroup "Pione" can see ALL content within the "Pione_SHARED" folder including the owner of each document, its unique ID, and its location within the shared folder hierarchy, as indicated by the breadcrumb trail at the top of the page. It is also immediately apparent from the names in the “owner” column that robert41 has contributed the RSpace Document "experiment1", but other users have contributed the other 3 documents visible in the same shared Notebook.
In this case, sorting work into shared folders or notebooks may be a useful way to segregate or organize work into projects, but it does not physically prevent ALL members of LabGroup "Pione" from being able to see the all work in the "Pione_SHARED" folder, even if they are not involved with the project "NIH R01GM987653 - Gene activation in NASH patients".
'PI one' can also see the project notebook that they shared in their own Workspace (below), as well as in its shared context in the Pione_SHARED folder:
The view above shows List view of Pi one’s workspace. Note that:
• An indicator next to the Notebook shows that it is shared.
• The organizational structure in PI one’s Workspace does not have to be the same as that in the Pione_SHARED folder. The owner of a document can move the original link to a shared docuemnt anywhere they want without affecting the shared link in the shared location.
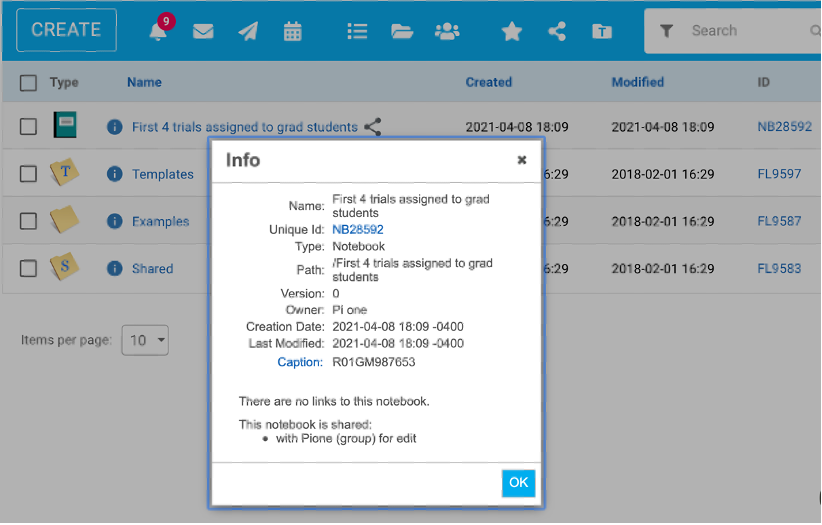
• PI one has clicked the blue info button next to Notebook icon to see additional information in the info popup. The popup shows that PI one is the owner and that the Notebook is shared. PI one has also added the grant number to the caption area of the notebook for increased searchability.
At any time, PI one can visit the My RSpace > My LabGroups and if necessary Change Group > Pione LabGroup details page (or indeed, any LabGroup they lead) to verify membership. This makes it clear who has access to the work in the shared folder Pione_SHARED. From this view the PI can also click on the work folders of individuals in their lab to examine their work more closely (below).
2. Using a separate LabGroup to define a project
Sometimes work needs to be more completely segregated so that only certain users can access it. In this example, the PI will use a totally separate LabGroup rather than a folder in their main LabGroup to be the defining container for a project.
Note that in RSpace Enterprise Edition, the System Admin can create any number of LabGroups, and although sometimes these may be permanent structures, it is also possible to create and disband LabGroups at any time to represent more transient assemblages and collaborations.
If "self-service" LabGroup creation is NOT turned on for your server, then the PI must contact their RSpace System Admin and request a new LabGroup for use with the new project.
If you are using RSpace Community edition, see instead Creating a New LabGroup.
In RSpace Enterprise Edition version 1.77 or newer, if "self-service" LabGroup creation has been enabled by the System Admin, than PIs can create new LabGroups without any need to contact the System Admin using the My RSpace > Create Labgroup tab. This can be especially useful for allowing the PI to create new LabGroups that can be used for scenarios such as:
• Creation of new project, where data is segregated and organized within the shared folder of that LabGroup, and access to project data is defined by the LabGroup membership.
• Creation of subgroups withn a large LabGroup.
• Creation of transient LabGroups used for specific purposes such as teaching a class, gathering data from various LabGroups for export as a single data bundle, or other collaborative or organizational scenarios.
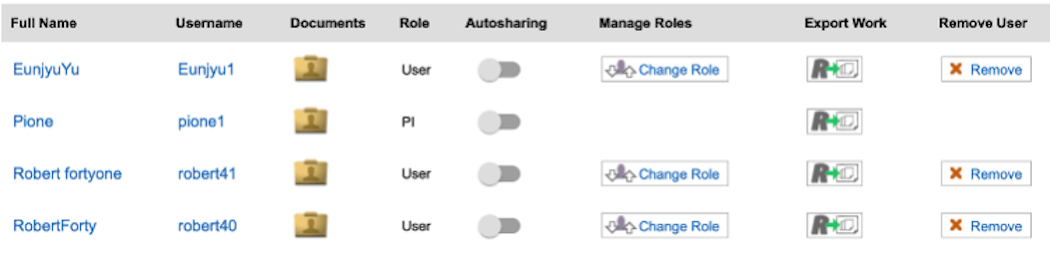
In the example below, Pione has created a LabGroup called "confidential project" with only 2 users. Both members can, if they wish, share documents into "confidential project_SHARED".
Once the new group has been created, the PI can see the following in the My RSpace > My LabGroups area. If necessary they can use Change Group > confidential project to see the LabGroup details page:
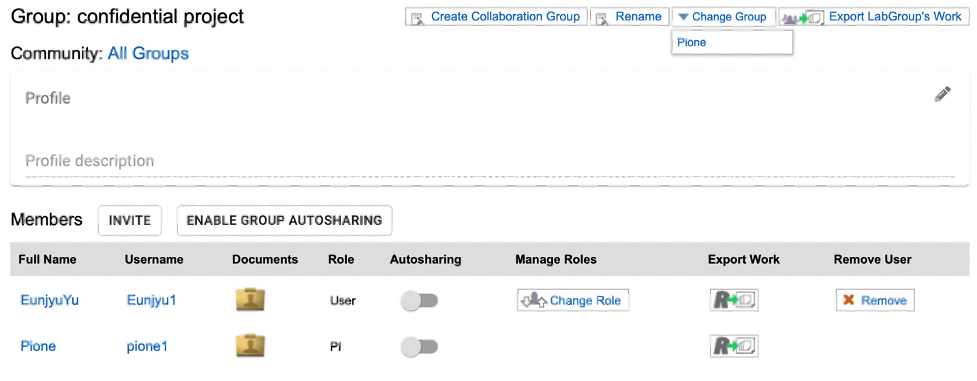
Only the two member users can see data shared into this LabGroup’s "confidential project_SHARED" folder. The PI could invite additional members if needed.
If a PI needs tighter control of access, especially when their lab includes guests, rotation students or researchers who belong to more than one LabGroup
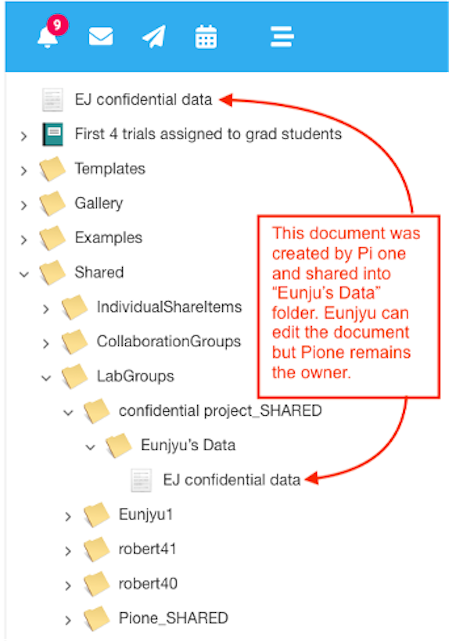
The PI now makes a sub-folder within the “confidential project_SHARED” area called “Eunjyu’s Data”, and creates an empty document called “EJ confidential data” in their Workspace. The PI then shares that document into the “Eunjyu’s Data” folder with edit permission, and asks Eunjyu to add / edit / paste her contributions into that document. This allows the PI to retain ownership of data in that document, even if Eunjyu leaves the LabGroup. All edits are properly attributed to the correct authors regardless of who currently owns the document. In Tree view, Pione’s workspace view now looks like this:
Note that if Pione wants fast access to the folder “Eunjyu Yu’s Data” they can select that folder in list view and add it (or any other shared folder) to their favorites. For PIs with access to many shared folders or notebooks, “Favorites” can be a good place to manage a list of items that are currently of most interest.
In this example, the PI created the empty placeholder document “EJ confidential data” as a way to prompt Eunjyu to submit required data, but because the Pione is the original creator and therefore owner of the document, the PI can later opt to remove Eunjyu from the LabGroup “confidential project” which will mean that subsequent work added to that project will not be visible to Eunjyu. However, the revision history for “EJ confidential data” makes it clear when and how Eunjyu contributed, even if she is no longer part of that project-centric LabGroup. It follows that it is often important to decide who should be the owner of shared documents because although CURRENT access to the document is decided by how it is shared, FUTURE access may be decided based on the owner, especially if that document is part of a Notebook.
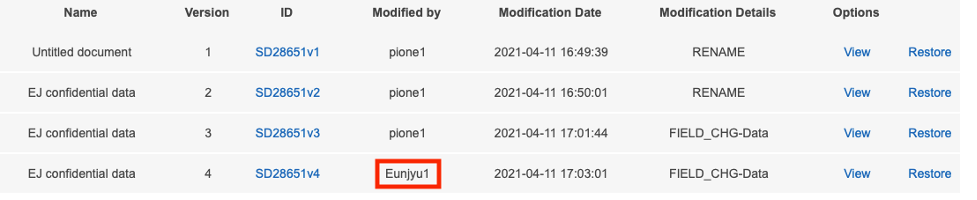
To view the revision history, select “EJ confidential data” and click “Revisions” to see the document history.
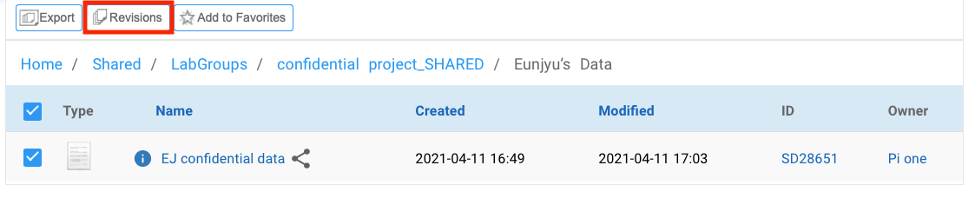
The revision history is shown. Click “View” to see the edits performed by Eunjyu. Note that the attribution of specific edits to specific authors is also indelibly recorded in the system audit trails and this information cannot be edited or altered.
If the project-centric LabGroup was created by a PI using the "self-service" feature, then the same PI can delete the LabGroup when the project is completed. This will delete the SHARED folder for that LabGroup, but all work will still be available in the workspaces of the users who created the work.
The PI can also export all the work associated with the project (i.e the content of the LabGroup shared folder) for storage outside of RSpace.
3. Using a Collaboration Group to define a project
In this example, three PIs (Jan Yi, Nadine Bissue, Franz Ferdinand) from three different labs (LabGroup1, LabGroup2 LabGroup3) need to jointly supervise work created as part of a single collaborative project called "ProjectX". However, it's important to all the PIs that although they need to see the work that is part of "ProjectX" they DON'T want their counterparts to be able to see ALL the work of the members of the collaboration who are not already under their oversight.
Steps required:
1) One of the PIs sends a "Create a Collaboration Group" message to the other two PIs.
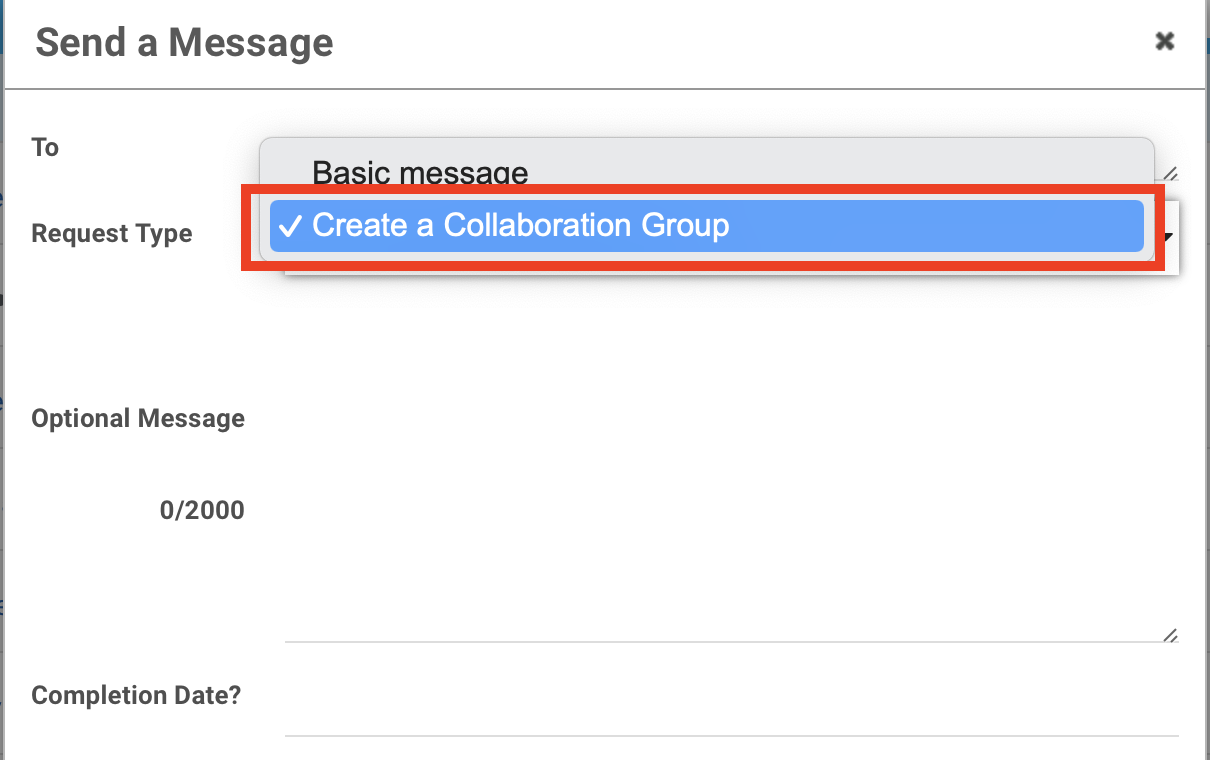
2) The other PIs accept the invitation. This triggers the creation of the Collaboration group automatically called "Yi-Bissue-Ferdinand-collabGroup" and the creation of a shared folder called "Yi-Bissue-Ferdinand-collabGroup_SHARED" located in Home / Shared / CollaborationGroups.
3) Each of the three PIs can now invite specific users who they already supervise to join that LabGroup. The invitation must be accepted by each user before they are added to Yi-Bissue-Ferdinand-collabGroup.
4) Members of Yi-Bissue-Ferdinand-collabGroup can now select specific items from their workspace related to "ProjectX" and share those into the Yi-Bissue-Ferdinand-collabGroup_SHARED folder with appropriate read or edit permission.
Result:
All members of Yi-Bissue-Ferdinand-collabGroup can access the work associated with "ProjectX", but they cannot see other work made by members of this group unless they would normally be able to see that work. As with other LabGroups, PIs and appointed LabAdmins can organize work within Yi-Bissue-Ferdinand-collabGroup_SHARED into a suitable hierarchy.
When the project ends, PIs have the option to leave the Collaboration Group, or the System Admin can delete it. This will delete the SHARED folder for that Group, but all work will still be available in the workspaces of the users who created the work.
The participating PIs also have the ability to export all the work associated with the project (i.e. the content of the Collaboration Group shared folder) for storage outside of RSpace or re-import to a new location in RSpace.
4. Using a Project Group to define a project
If allowed on your server, Project Groups allow for ad-hoc sharing between two or more users without necessarily involving a PI. Only work shared with the group is visible to all members.
Project groups may be an especially powerful option for some organizations to use as a way to define a projects because, (coming soon), it will be possible to link project groups to RAID IDs so that each project would be a fully traceable digital object, in accordance with FAIR data principles.
Project Groups are designed to allow selective and precise collaboration between users without exposing unshared work between these users. Such groups don't need a PI, and if the user with global PI role joins the Project Group, they are treated as a regular user. No member of the project group gets access to content owned by other members until that content is shared with the group. Your RSpace System Admin may choose to disallow the use of Project Groups if your organization's policies prevent sharing between users without explicit consent and oversight by a PI.
Users can start Project Group themselves, or the can be created or adjusted by System Admin. User who started the Project Group is called the Group Owner. Group owner can invite other users to join a Project Group, remove the current members from the group, or assign Group Owner role to others. In many ways the project groups is the simplest way to precisely share work with other users, but this type of group should only be used where direct oversight of the collaboration by a PI is not required.
Steps required:
1) Any RSpace user can click My RSpace > "Create Project Group" then name the group, and invite any other RSpace users on the same server to join the group.
2) Once the group is created, members can select work from their workspace, click "share" and share documents as usual into the Project Group shared folder. New work can also be created directly within a shared location by navigating to the location and clicking CREATE. This will automatically generate a second link to the new document in the owner's Workspace. ALL shared items exist as two or more links. One in the shared Group location, one in the owner's Workspace.
Result:
All members of the Project group will be able to access the shared work.
How did we do?
Exporting a LabGroup’s Work